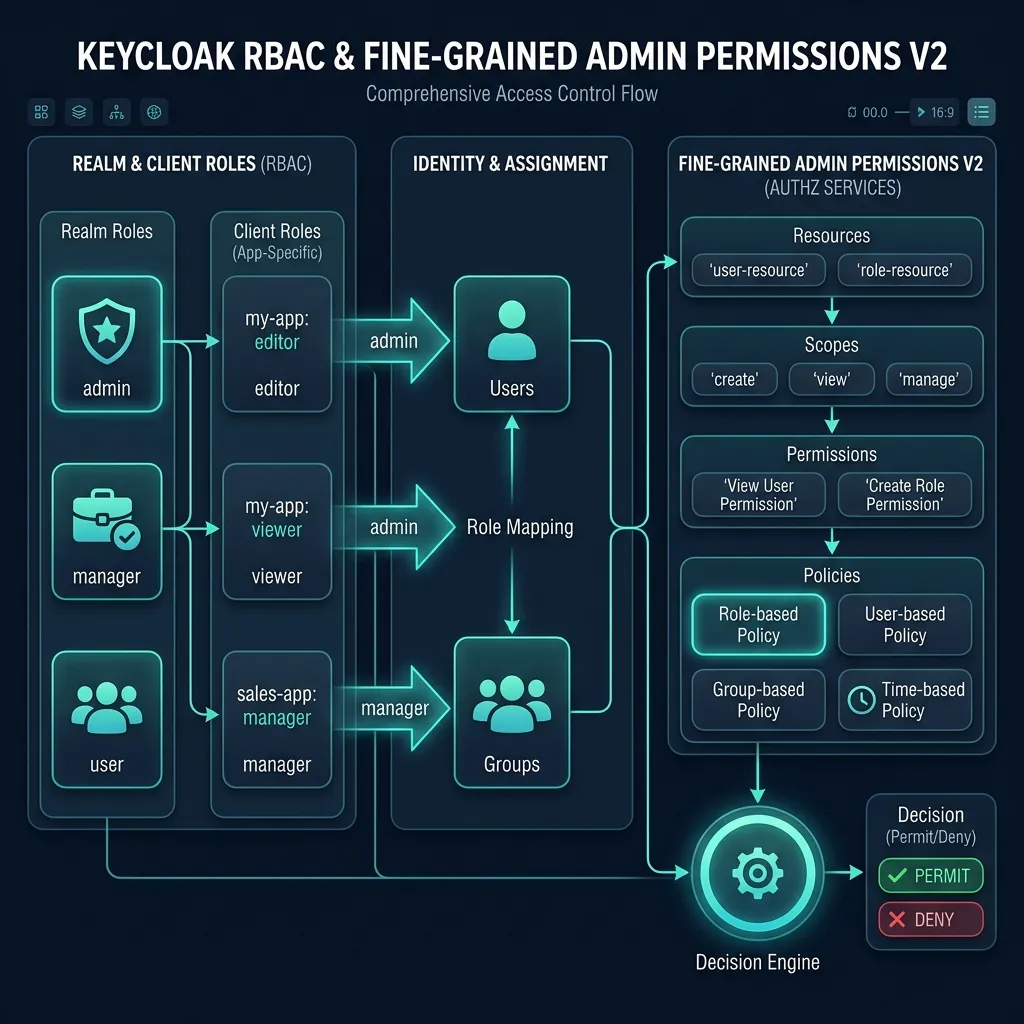
RBAC and Fine-grained Admin Permissions V2 model in Keycloak
1. Overview of Roles in Keycloak
Roles in Keycloak is the main mechanism for decentralizing access. The application checks the user's roles (through claims in the token) to decide what the user is allowed to do. Keycloak supports two types of roles: Realm Roles and Client Roles.
Realm Roles vs Client Roles
| Characteristics | Realm Roles | Client Roles |
|---|---|---|
| Scope | Entire realm | Specific client only |
| Use case | General roles (Admin, User, Manager) | Application-specific roles (editor, viewer) |
| Namespace | Unique trong realm | Unique trong client |
| Token claim | realm_access.roles | resource_access.{client}.roles |
2. Realm Roles
2.1 Realm Roles default
Keycloak creates some realm roles:
default-roles-{realm} — composite role contains default roles for new users
offline_access — allows to get offline tokens (long-term token refresh)
uma_authorization — permission to use UMA (User-Managed Access)
2.2 Create Realm Role
Qua Admin Console:
Click Realm roles trong sidebar
Click Create role
Enter:
- Role name:
admin - Description:
Full administrator access
- Role name:
Click Save
Qua Admin CLI:
# Tạo realm roles bin/kcadm.sh create roles -r my-company -s name=admin -s description="Full administrator access" bin/kcadm.sh create roles -r my-company -s name=manager -s description="Manager with limited admin access" bin/kcadm.sh create roles -r my-company -s name=user -s description="Regular user" bin/kcadm.sh create roles -r my-company -s name=viewer -s description="Read-only access"Xem danh sách realm roles
bin/kcadm.sh get roles -r my-company --fields name,description
Qua REST API:
# Tạo realm role curl -s -X POST \ "http://localhost:8080/admin/realms/my-company/roles" \ -H "Authorization: Bearer $ACCESS_TOKEN" \ -H "Content-Type: application/json" \ -d '{ "name": "admin", "description": "Full administrator access", "composite": false }'Lấy danh sách realm roles
curl -s -X GET
"http://localhost:8080/admin/realms/my-company/roles"
-H "Authorization: Bearer $ACCESS_TOKEN" | jq '.[].name'
3. Client Roles
Client roles are used when the application needs its own roles — for example, a CMS application has roles editor, author, reviewer that are different from the HR application roles.
3.1 Create Client Role
Qua Admin Console:
Go to Clients → select client (for example:
my-web-app)Tab Roles
Click Create role
Enter name and description
Qua CLI:
# Lấy client ID CLIENT_UUID=$(bin/kcadm.sh get clients -r my-company -q clientId=my-web-app --fields id --format csv --noquotes)Tạo client roles
bin/kcadm.sh create clients/$CLIENT_UUID/roles -r my-company
-s name=editor -s description="Can create and edit content"bin/kcadm.sh create clients/$CLIENT_UUID/roles -r my-company
-s name=author -s description="Can create content"bin/kcadm.sh create clients/$CLIENT_UUID/roles -r my-company
-s name=reviewer -s description="Can review and approve content"bin/kcadm.sh create clients/$CLIENT_UUID/roles -r my-company
-s name=content-admin -s description="Full content management"Xem client roles
bin/kcadm.sh get clients/$CLIENT_UUID/roles -r my-company --fields name,description
Qua REST API:
curl -s -X POST \
  "http://localhost:8080/admin/realms/my-company/clients/$CLIENT_UUID/roles" \
  -H "Authorization: Bearer $ACCESS_TOKEN" \
  -H "Content-Type: application/json" \
  -d '{
    "name": "editor",
    "description": "Can create and edit content"
  }'
3.2 Client Roles trong Token
Client roles appear in the access token under claim resource_access:
{
  "realm_access": {
    "roles": ["user", "offline_access"]
  },
  "resource_access": {
    "my-web-app": {
      "roles": ["editor", "author"]
    },
    "my-api": {
      "roles": ["read", "write"]
    },
    "account": {
      "roles": ["manage-account", "view-profile"]
    }
  }
}
4. Composite Roles
Composite roles are roles that contain one or more child roles (realm roles and/or client roles). When a user is assigned a composite role, the user automatically has all child roles.
4.1 Create Composite Role
Qua Admin Console:
Go to Realm roles → select role (for example:
admin)Tab Action → Add associated roles
Select the roles to add (realm roles and/or client roles)
Click Assign
Qua CLI:
# Tạo composite role: "manager" chứa "user" và "viewer" bin/kcadm.sh add-roles \ -r my-company \ --rname manager \ --rolename user \ --rolename viewerThêm client roles vào composite role
bin/kcadm.sh add-roles
-r my-company
--rname manager
--cclientid my-web-app
--rolename editor
--rolename reviewer
Example hierarchy:
admin (composite)
├── manager (composite)
│   ├── user (realm role)
│   ├── viewer (realm role)
│   ├── my-web-app/editor (client role)
│   └── my-web-app/reviewer (client role)
├── my-web-app/content-admin (client role)
└── account/manage-account (client role)
Note: When a user is assigned the role admin, the user will have all roles in the hierarchy: admin, manager, user, viewer, editor, reviewer, content-admin, manage-account.
4.2 Xem Composite Roles
# Xem roles con của composite role bin/kcadm.sh get-roles -r my-company --rname admin --effectiveREST API
curl -s -X GET
"http://localhost:8080/admin/realms/my-company/roles/admin/composites"
-H "Authorization: Bearer $ACCESS_TOKEN" | jq '.[].name'
5. Role Mappings
5.1 Assign Role to User
Qua Admin Console:
Go to Users → select user
Tab Role mapping
Click Assign role
Select realm roles or filter by client to select client roles
Click Assign
Qua CLI:
# Gán realm roles cho user bin/kcadm.sh add-roles \ -r my-company \ --uusername john.doe \ --rolename adminGán client roles cho user
bin/kcadm.sh add-roles
-r my-company
--uusername john.doe
--cclientid my-web-app
--rolename editorXem roles của user (bao gồm effective roles từ composite và groups)
bin/kcadm.sh get-roles
-r my-company
--uusername john.doe
--effective
Qua REST API:
# Lấy role representation ROLE_ID=$(curl -s -X GET \ "http://localhost:8080/admin/realms/my-company/roles/admin" \ -H "Authorization: Bearer $ACCESS_TOKEN" | jq -r '.id')ROLE_NAME=$(curl -s -X GET
"http://localhost:8080/admin/realms/my-company/roles/admin"
-H "Authorization: Bearer $ACCESS_TOKEN" | jq -r '.name')Gán realm role cho user
curl -s -X POST
"http://localhost:8080/admin/realms/my-company/users/$USER_ID/role-mappings/realm"
-H "Authorization: Bearer $ACCESS_TOKEN"
-H "Content-Type: application/json"
-d "[$(curl -s -X GET
"http://localhost:8080/admin/realms/my-company/roles/admin"
-H "Authorization: Bearer $ACCESS_TOKEN")]"
5.2 Assign Role to Group
When assigning a role to a group, all members of the group (and sub-groups) will inherit that role:
# Qua CLI
bin/kcadm.sh add-roles \
  -r my-company \
  --gname Engineering \
  --rolename user

bin/kcadm.sh add-roles \
  -r my-company \
  --gname Engineering \
  --cclientid my-web-app \
  --rolename viewer

# Qua REST API
curl -s -X POST \
  "http://localhost:8080/admin/realms/my-company/groups/$GROUP_ID/role-mappings/realm" \
  -H "Authorization: Bearer $ACCESS_TOKEN" \
  -H "Content-Type: application/json" \
  -d "[$(curl -s -X GET \
    "http://localhost:8080/admin/realms/my-company/roles/user" \
    -H "Authorization: Bearer $ACCESS_TOKEN")]"
5.3 Effective Roles
Effective roles of user = directly assigned roles + roles inherited from groups + roles from composite roles:
# Xem effective realm roles curl -s -X GET \ "http://localhost:8080/admin/realms/my-company/users/$USER_ID/role-mappings/realm/composite" \ -H "Authorization: Bearer $ACCESS_TOKEN" | jq '.[].name'Xem effective client roles
curl -s -X GET
"http://localhost:8080/admin/realms/my-company/users/$USER_ID/role-mappings/clients/$CLIENT_UUID/composite"
-H "Authorization: Bearer $ACCESS_TOKEN" | jq '.[].name'
6. Default Roles
Default roles are automatically assigned to every new user when creating an account or registering.
6.1 Configure Default Roles
Qua Admin Console:
Enter Realm roles
Find the role default-roles-{realm} (for example:
default-roles-my-company)Click on role → tab Action → Add associated roles
Select the role you want to set as default
Qua CLI:
# Thêm role vào default roles bin/kcadm.sh add-roles \ -r my-company \ --rname default-roles-my-company \ --rolename user \ --rolename offline_accessThêm client role vào default roles
bin/kcadm.sh add-roles
-r my-company
--rname default-roles-my-company
--cclientid my-web-app
--rolename viewer
After that, every newly created user will automatically have roles: user, offline_access, my-web-app/viewer.
7. Service Account Roles
Service accounts are used for communication between services (machine-to-machine) — no user interaction required.
7.1 Enable Service Account for Client
Go to Clients → select or create client
Tab Settings:
- Client authentication: ON
- Service accounts roles: ON
- Authorization: OFF (unless authorization services are needed)
Click Save
7.2 Assign Role to Service Account
# Qua Admin Console: # Clients → chọn client → tab "Service account roles" → Assign roleQua CLI - lấy service account user
SA_USER_ID=$(bin/kcadm.sh get clients/$CLIENT_UUID/service-account-user -r my-company --fields id --format csv --noquotes)
Gán realm roles
bin/kcadm.sh add-roles
-r my-company
--uid $SA_USER_ID
--rolename adminGán client roles (realm-management) cho API access
bin/kcadm.sh add-roles
-r my-company
--uid $SA_USER_ID
--cclientid realm-management
--rolename manage-users
--rolename view-users
--rolename manage-clients
7.3 Using Service Account
# Lấy access token cho service account (client credentials grant) ACCESS_TOKEN=$(curl -s -X POST \ "http://localhost:8080/realms/my-company/protocol/openid-connect/token" \ -H "Content-Type: application/x-www-form-urlencoded" \ -d "grant_type=client_credentials" \ -d "client_id=my-backend-service" \ -d "client_secret=YOUR_CLIENT_SECRET" | jq -r '.access_token')Sử dụng token để gọi API
curl -s -X GET
"http://localhost:8080/admin/realms/my-company/users"
-H "Authorization: Bearer $ACCESS_TOKEN" | jq '.[].username'
8. Fine-grained Admin Permissions V2
Fine-grained admin permissions V2 (from Keycloak 26+) allows granular control over who can manage which resources in the Admin Console — instead of just using raw realm-management client roles.
8.1 Enable Fine-grained Admin Permissions
Go to Realm settings → General
Find Admin Permissions → enable Fine-grained admin permissions (V2)
Keycloak will create permission management resources in realm
Note: This is a preview feature in Keycloak 26.x. In production, you need to evaluate carefully before turning on.
8.2 Resource Permissions
Once enabled, you can create permissions for resources:
Users permissions:
| Permission | Description |
|---|---|
| view | View list and details users |
| manage | Create, edit, delete users |
| map-roles | Assign/remove roles to users |
| manage-group-membership | Add/remove users from groups |
| impersonate | Impersonate users |
Groups permissions:
| Permission | Description |
|---|---|
| view | Xem groups |
| manage | Create, edit, delete groups |
| view-members | View members of group |
| manage-members | Add/remove members |
| manage-membership | Manage group membership |
Clients permissions:
| Permission | Description |
|---|---|
| view | Xem clients |
| manage | Create, edit, delete clients |
| configure | Change client settings |
| map-roles | Create/assign client roles |
Roles permissions:
| Permission | Description |
|---|---|
| view | Xem roles |
| manage | Create, edit, delete roles |
| map-role | Assign roles to users/groups |
8.3 Create Permission
Go to Realm settings → Admin permissions
Select resource type (Users, Groups, Clients, Roles)
Click on the permission to configure (for example: manage for Users)
Add policies to determine who has this permission
8.4 Policies
Policies defines the conditions for granting permission. Keycloak V2 supports the following policies:
Role-based Policy:
// Cho phép users có role "hr-admin" quản lý users
{
  "type": "role",
  "name": "HR Admin Policy",
  "description": "Users with hr-admin role",
  "roles": [
    {
      "id": "{role-id-of-hr-admin}",
      "required": true
    }
  ]
}
User-based Policy:
// Cho phép specific users
{
  "type": "user",
  "name": "Specific Admin Policy",
  "users": [
    "{user-id-of-admin-1}",
    "{user-id-of-admin-2}"
  ]
}
Group-based Policy:
// Cho phép members của group
{
  "type": "group",
  "name": "Admin Group Policy",
  "groups": [
    {
      "id": "{group-id-of-admins}",
      "extendChildren": true
    }
  ]
}
Client-based Policy:
// Cho phép specific clients (service accounts)
{
  "type": "client",
  "name": "Backend Service Policy",
  "clients": [
    "{client-id-of-backend-service}"
  ]
}
8.5 Practical example: HR Admin only manages Users
Requirement: User with role hr-admin is only allowed to view and manage users, not manage clients or realm settings.
Create realm role
hr-admin:bin/kcadm.sh create roles -r my-company \ -s name=hr-admin \ -s description="HR Administrator - can manage users only"Enable Fine-grained admin permissions V2
Create Role-based Policy for
hr-admin:- Go to Admin permissions → Policies tab
- Create policy → Role-based
- Name: "HR Admin Policy"
- Select role:
hr-admin
Assign policy to Users permissions:
- Users → permission view → Add policy "HR Admin Policy"
- Users → permission manage → Add policy "HR Admin Policy"
Assign role to user:
bin/kcadm.sh add-roles -r my-company \
  --uusername hr-manager \
  --rolename hr-admin
Now user hr-manager can log in to Admin Console and only see menu Users.
8.6 Permission Evaluation
You can test permissions using the Evaluation tab:
Go to Admin permissions → Evaluate
Select the user or client to test
Select resource type and permission
Click Evaluate to see the result (PERMIT or DENY)
9. Dedicated Realm Admin Consoles
Keycloak allows creating separate admin accounts for each realm — no need to access the master realm:
9.1 Create Realm Admin
# Tạo user trong realm bin/kcadm.sh create users -r my-company \ -s username=realm-admin \ -s [email protected] \ -s enabled=true \ -s emailVerified=truebin/kcadm.sh set-password -r my-company
--username realm-admin
--new-password "RealmAdmin@123"Gán realm-management client roles
bin/kcadm.sh add-roles -r my-company
--uusername realm-admin
--cclientid realm-management
--rolename realm-admin
9.2 Realm Management Client Roles
Client realm-management has available roles to control admin rights:
| Role | Description |
|---|---|
| realm-admin | Full admin access cho realm |
| manage-users | Manage users |
| view-users | Xem users |
| manage-clients | Manage clients |
| view-clients | Xem clients |
| manage-realm | Manage realm settings |
| view-realm | Xem realm settings |
| manage-identity-providers | Manage identity providers |
| manage-events | Manage events |
| manage-authorization | Manage authorization |
| impersonation | Impersonate users |
| query-users | Search users |
| query-groups | Search groups |
| query-clients | Search clients |
| query-realms | Search realms |
For example: Create a limited admin that only manages users and groups:
bin/kcadm.sh add-roles -r my-company \
  --uusername limited-admin \
  --cclientid realm-management \
  --rolename manage-users \
  --rolename view-users \
  --rolename query-users \
  --rolename query-groups
10. Using Roles in application
10.1 Check Roles from Access Token
Decoded access token contains roles:
{
  "sub": "user-uuid",
  "realm_access": {
    "roles": [
      "admin",
      "manager",
      "user",
      "default-roles-my-company",
      "offline_access",
      "uma_authorization"
    ]
  },
  "resource_access": {
    "my-web-app": {
      "roles": [
        "editor",
        "content-admin"
      ]
    },
    "account": {
      "roles": [
        "manage-account",
        "manage-account-links",
        "view-profile"
      ]
    }
  }
}
10.2 Example in Spring Boot
// SecurityConfig.java @Configuration @EnableWebSecurity public class SecurityConfig {@Bean public SecurityFilterChain filterChain(HttpSecurity http) throws Exception { http .authorizeHttpRequests(auth -> auth .requestMatchers("/api/admin/**").hasRole("admin") .requestMatchers("/api/content/**").hasRole("editor") .requestMatchers("/api/public/**").permitAll() .anyRequest().authenticated() ) .oauth2ResourceServer(oauth2 -> oauth2 .jwt(jwt -> jwt .jwtAuthenticationConverter(jwtAuthenticationConverter()) ) ); return http.build(); } @Bean public JwtAuthenticationConverter jwtAuthenticationConverter() { JwtGrantedAuthoritiesConverter converter = new JwtGrantedAuthoritiesConverter(); converter.setAuthoritiesClaimName("realm_access.roles"); converter.setAuthorityPrefix("ROLE_"); JwtAuthenticationConverter jwtConverter = new JwtAuthenticationConverter(); jwtConverter.setJwtGrantedAuthoritiesConverter(converter); return jwtConverter; }
}
10.3 Example in Node.js (Express)
// middleware/auth.js const jwt = require('jsonwebtoken');function hasRealmRole(role) { return (req, res, next) => { const token = req.headers.authorization?.split(' ')[1]; if (!token) return res.status(401).json({ error: 'No token provided' });
try { const decoded = jwt.decode(token); const roles = decoded.realm_access?.roles || []; if (roles.includes(role)) { req.user = decoded; next(); } else { res.status(403).json({ error: 'Insufficient permissions' }); } } catch (err) { res.status(401).json({ error: 'Invalid token' }); }}; }
function hasClientRole(clientId, role) { return (req, res, next) => { const token = req.headers.authorization?.split(' ')[1]; if (!token) return res.status(401).json({ error: 'No token provided' });
try { const decoded = jwt.decode(token); const roles = decoded.resource_access?.[clientId]?.roles || []; if (roles.includes(role)) { req.user = decoded; next(); } else { res.status(403).json({ error: 'Insufficient permissions' }); } } catch (err) { res.status(401).json({ error: 'Invalid token' }); }}; }
// Sử dụng app.get('/api/admin/users', hasRealmRole('admin'), (req, res) => { // Only admin can access });
app.post('/api/content', hasClientRole('my-web-app', 'editor'), (req, res) => { // Only editors can create content });
11. Practice exercises
Create Realm Roles:
super-admin,manager,staff,viewerCreate Client Roles for client
my-web-app:content-editor,content-reviewer,content-publisherCreate Composite Roles:
super-admincontains:manager+ all client rolesmanagercontains:staff+content-reviewerstaffcontains:viewer+content-editor
Assign roles to groups:
- Group
Engineering: realm rolestaff - Group
Engineering/Backend: client rolecontent-editor
- Group
Enable Fine-grained admin permissions V2 and create:
- Role-based policy cho
hr-admin - Assign policy to Users view/manage permissions
- Test with user with role
hr-admin
- Role-based policy cho
Create Service Account for client
my-backend-servicewith rolesmanage-users,view-usersand test with client credentials grant
12. Summary
In this lesson, you learned:
Distinguish between Realm Roles and Client Roles
Create Composite Roles with hierarchy
Role Mappings for users and groups (direct and legacy)
Configuration Default Roles for new users
Use Service Account Roles for machine-to-machine communication
Fine-grained Admin Permissions V2 with policies (role-based, user-based, group-based, client-based)
Create dedicated realm admin with limited permissions
Check roles in the application (Spring Boot, Node.js)
The next article will guide about Clients, Client Scopes and OpenID Connect in Keycloak.