1. 醫療資料加密概述
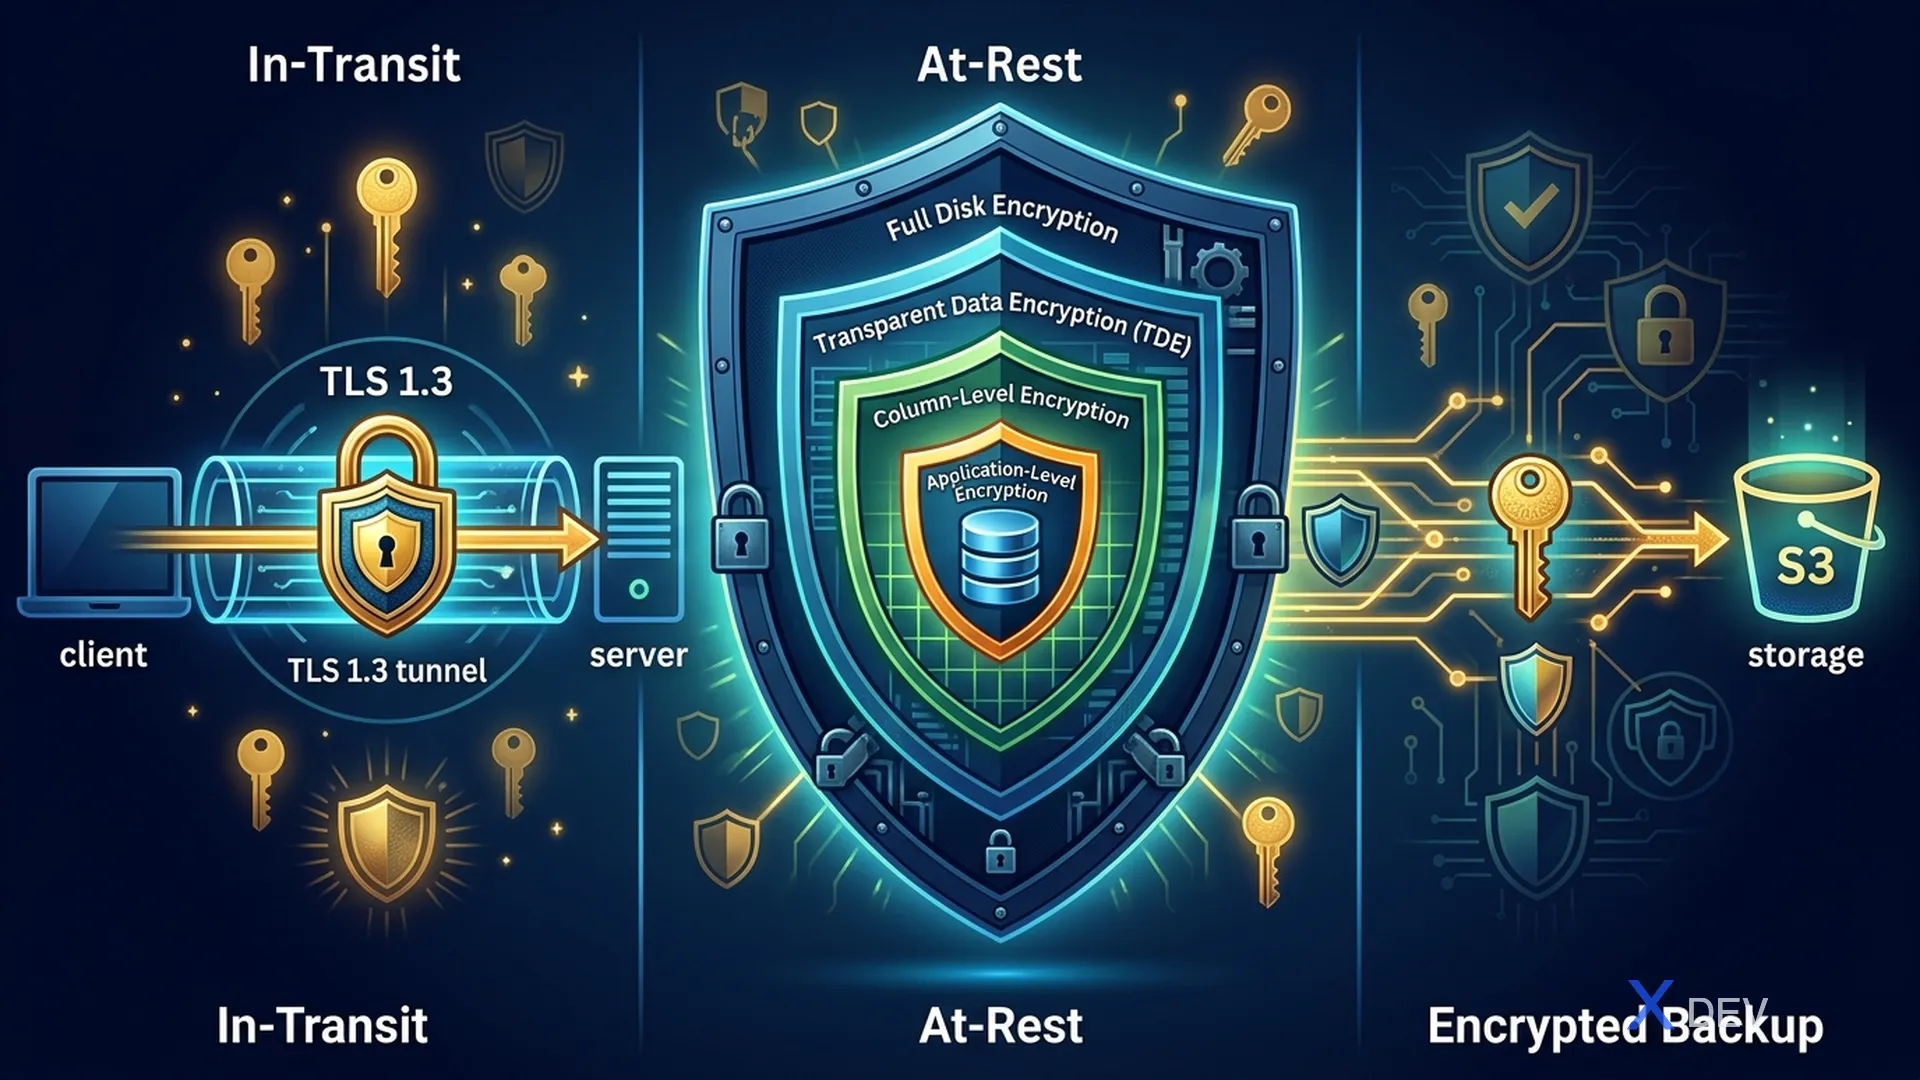
醫療資料 (PHI) 需要在兩種狀態進行加密:靜態(儲存時)和傳輸中(傳輸時)。 HIPAA 安全規則 §164.312(a)(2)(iv) 和 §164.312(e)(2)(ii) 特別規定了加密要求。
1.1。加密層
- 傳輸中:應用程式與資料庫之間的 TLS 1.3
- 靜態等級 1:全磁碟加密 (LUKS/dm-crypt) — 磁碟被竊時的保護
- 靜態等級 2:透明資料加密 (TDE) — 加密資料檔案、WAL、暫存文件
- 靜態等級 3:列級加密 (pgcrypto) — 加密每個單獨的 PHI 字段
- 靜態等級 4:應用程式級加密 — 在傳送至資料庫之前進行加密
- 備份:加密備份 → S3 (SSE-KMS)
1.2。比較加密方法
| 方法 | 保護免受 | 不受保護 | 效能影響 |
|---|---|---|---|
| 全碟(LUKS) | 實體竊盜 | 資料庫管理、SQL 注入 | 最小(~2%) |
| 時差 | 未經授權的文件存取 | 超級使用者存取 | 低 (~5%) |
| 列級 (pgcrypto) | 資料庫管理、特定列的 SQL 注入 | 應用程式層級妥協 | 中(~10-20%) |
| 應用級 | DB徹底妥協 | 應用程式級妥協 | 高 (~15-30%) |
推薦用於醫療保健:結合 TDE + 列級加密 以獲得最大程度的保護。
2. 透明資料加密(TDE)
2.1。 PostgreSQL 16+ TDE(實驗)
PostgreSQL 16開始支援TDE(需要使用選項編譯 --with-ssl=openssl 和補丁)。然而,在生產中,許多組織使用替代解決方案。
2.2。 LUKS 全碟加密
#!/bin/bash
# setup-luks-pgdata.sh
# Encrypt PostgreSQL data volume với LUKS

# === Step 1: Tạo LUKS encrypted volume ===
# WARNING: Xóa toàn bộ dữ liệu trên device!
cryptsetup luksFormat --type luks2 \
    --cipher aes-xts-plain64 \
    --key-size 512 \
    --hash sha256 \
    --iter-time 5000 \
    /dev/sdb1

# === Step 2: Open encrypted volume ===
cryptsetup luksOpen /dev/sdb1 pg_encrypted

# === Step 3: Tạo filesystem ===
mkfs.ext4 /dev/mapper/pg_encrypted

# === Step 4: Mount cho PostgreSQL ===
mkdir -p /var/lib/postgresql/16/main
mount /dev/mapper/pg_encrypted /var/lib/postgresql/16/main
chown postgres:postgres /var/lib/postgresql/16/main

# === Step 5: Auto-mount khi boot (với key file hoặc TPM) ===
# Lưu key file (chỉ cho automated systems)
dd if=/dev/urandom of=/root/.pg_luks_key bs=512 count=1
chmod 400 /root/.pg_luks_key
cryptsetup luksAddKey /dev/sdb1 /root/.pg_luks_key

# /etc/crypttab
echo "pg_encrypted /dev/sdb1 /root/.pg_luks_key luks" >> /etc/crypttab

# /etc/fstab
echo "/dev/mapper/pg_encrypted /var/lib/postgresql/16/main ext4 defaults 0 2" >> /etc/fstab
3. 使用 pgcrypto 進行列級加密
3.1。安裝pgcrypto
-- Cài đặt extension (cần superuser)
CREATE EXTENSION IF NOT EXISTS pgcrypto;

-- Verify
SELECT * FROM pg_extension WHERE extname = 'pgcrypto';
3.2。對稱加密 (AES-256)
用於應用程式需要頻繁加密/解密的資料。
-- =====================================================
-- SYMMETRIC ENCRYPTION VỚI pgcrypto
-- =====================================================

-- === pgp_sym_encrypt / pgp_sym_decrypt ===
-- Sử dụng OpenPGP symmetric encryption (AES-256 by default)

-- Tạo bảng patients với encrypted columns
CREATE TABLE patient_schema.patients (
    id UUID PRIMARY KEY DEFAULT gen_random_uuid(),
    -- Non-sensitive data (plaintext)
    hospital_id UUID NOT NULL,
    created_at TIMESTAMPTZ DEFAULT NOW(),
    updated_at TIMESTAMPTZ DEFAULT NOW(),

    -- PHI - Encrypted columns (stored as BYTEA)
    full_name_encrypted BYTEA NOT NULL,
    date_of_birth_encrypted BYTEA NOT NULL,
    national_id_encrypted BYTEA NOT NULL,   -- CCCD/CMND
    phone_encrypted BYTEA,
    address_encrypted BYTEA,

    -- Medical data - Encrypted
    diagnosis_encrypted BYTEA,
    blood_type_encrypted BYTEA,
    allergies_encrypted BYTEA,

    -- Search index (hashed, không thể reverse)
    national_id_hash TEXT UNIQUE,  -- Cho phép tìm kiếm
    phone_hash TEXT                -- Cho phép tìm kiếm
);

-- === INSERT với encryption ===
INSERT INTO patient_schema.patients (
    hospital_id,
    full_name_encrypted,
    date_of_birth_encrypted,
    national_id_encrypted,
    phone_encrypted,
    diagnosis_encrypted,
    national_id_hash,
    phone_hash
) VALUES (
    '550e8400-e29b-41d4-a716-446655440000',
    pgp_sym_encrypt('Nguyễn Văn A', 'encryption-key-from-vault', 'compress-algo=2, cipher-algo=aes256'),
    pgp_sym_encrypt('1990-05-15', 'encryption-key-from-vault', 'compress-algo=2, cipher-algo=aes256'),
    pgp_sym_encrypt('079090001234', 'encryption-key-from-vault', 'compress-algo=2, cipher-algo=aes256'),
    pgp_sym_encrypt('0901234567', 'encryption-key-from-vault', 'compress-algo=2, cipher-algo=aes256'),
    pgp_sym_encrypt('Tăng huyết áp độ 2, Đái tháo đường type 2', 'encryption-key-from-vault', 'compress-algo=2, cipher-algo=aes256'),
    encode(digest('079090001234', 'sha256'), 'hex'),
    encode(digest('0901234567', 'sha256'), 'hex')
);

-- === SELECT với decryption ===
SELECT
    id,
    pgp_sym_decrypt(full_name_encrypted, 'encryption-key-from-vault') AS full_name,
    pgp_sym_decrypt(date_of_birth_encrypted, 'encryption-key-from-vault') AS date_of_birth,
    pgp_sym_decrypt(diagnosis_encrypted, 'encryption-key-from-vault') AS diagnosis
FROM patient_schema.patients
WHERE national_id_hash = encode(digest('079090001234', 'sha256'), 'hex');

-- === Tìm kiếm bằng hash (không cần decrypt) ===
SELECT id, created_at
FROM patient_schema.patients
WHERE phone_hash = encode(digest('0901234567', 'sha256'), 'hex');
3.3。非對稱加密(RSA/PGP)
當需要分離加密和解密權限時使用(例如:護士輸入資料但只有醫生可以讀取它)。
-- =====================================================
-- ASYMMETRIC ENCRYPTION VỚI pgcrypto
-- =====================================================

-- === Tạo PGP key pair ===
-- Thực hiện bên ngoài PostgreSQL
-- gpg --gen-key --batch << EOF
-- %no-protection
-- Key-Type: RSA
-- Key-Length: 4096
-- Name-Real: Healthcare DB
-- Name-Email: [email protected]
-- Expire-Date: 1y
-- EOF

-- Export keys
-- gpg --export --armor [email protected] > public.key
-- gpg --export-secret-keys --armor [email protected] > private.key

-- === Encrypt với public key (ai cũng có thể encrypt) ===
INSERT INTO patient_schema.sensitive_notes (
    patient_id,
    note_encrypted
) VALUES (
    '550e8400-e29b-41d4-a716-446655440000',
    pgp_pub_encrypt(
        'Bệnh nhân có tiền sử HIV, đang điều trị ARV',
        dearmor(pg_read_file('/etc/postgresql/keys/public.key'))
    )
);

-- === Decrypt với private key (chỉ authorized users) ===
SELECT
    patient_id,
    pgp_pub_decrypt(
        note_encrypted,
        dearmor(pg_read_file('/etc/postgresql/keys/private.key')),
        'passphrase-for-private-key'
    ) AS note
FROM patient_schema.sensitive_notes
WHERE patient_id = '550e8400-e29b-41d4-a716-446655440000';
3.4。比較 AES-256-GCM 與 AES-256-CBC
| 特點 | AES-256-GCM | AES-256-CBC |
|---|---|---|
| 已認證 | 是(AEAD) | 沒有 |
| 完整性檢查 | 內建 | 需要更多 HMAC |
| 並行處理 | 是的 | 沒有 |
| 效能 | 更快 | 慢一點 |
| pgcrypto 支援 | 透過 pgp_sym_encrypt | 透過 encrypt() |
| 推薦 | 優先 | 遺留系統 |
-- pgcrypto sử dụng AES-256 qua PGP format
-- cipher-algo=aes256 (CBC mode trong PGP)

-- Với raw encrypt() function (AES-CBC)
SELECT encrypt(
    'sensitive data'::bytea,
    'encryption-key-32-bytes-long!!!!'::bytea,  -- 256 bits
    'aes-cbc/pad:pkcs'
);

-- Decrypt
SELECT convert_from(
    decrypt(
        encrypted_data,
        'encryption-key-32-bytes-long!!!!'::bytea,
        'aes-cbc/pad:pkcs'
    ),
    'UTF8'
);
4. SSL/TLS - 傳輸中加密
4.1。證書產生詳細信息
#!/bin/bash
# setup-mutual-tls.sh
# Thiết lập mutual TLS cho PostgreSQL

SSL_DIR="/etc/postgresql/ssl"
mkdir -p $SSL_DIR && cd $SSL_DIR

# =====================================================
# STEP 1: Certificate Authority (CA)
# =====================================================
cat > ca.cnf << 'EOF'
[req]
distinguished_name = req_dn
x509_extensions = v3_ca
prompt = no

[req_dn]
C = VN
ST = Ho Chi Minh
L = Ho Chi Minh City
O = Hospital Healthcare Network
OU = IT Security
CN = Healthcare PostgreSQL CA

[v3_ca]
basicConstraints = critical, CA:TRUE, pathlen:1
keyUsage = critical, cRLSign, keyCertSign
subjectKeyIdentifier = hash
authorityKeyIdentifier = keyid:always, issuer
EOF

openssl genrsa -aes256 -out ca.key 4096
openssl req -new -x509 -days 3650 \
    -config ca.cnf \
    -key ca.key \
    -out ca.crt \
    -sha384

# =====================================================
# STEP 2: Server Certificate
# =====================================================
cat > server.cnf << 'EOF'
[req]
distinguished_name = req_dn
req_extensions = v3_req
prompt = no

[req_dn]
C = VN
ST = Ho Chi Minh
O = Hospital Healthcare Network
CN = db.hospital.local

[v3_req]
basicConstraints = CA:FALSE
keyUsage = critical, digitalSignature, keyEncipherment
extendedKeyUsage = serverAuth
subjectAltName = @alt_names

[alt_names]
DNS.1 = db.hospital.local
DNS.2 = db-primary.hospital.local
DNS.3 = db-replica.hospital.local
DNS.4 = localhost
IP.1 = 10.0.1.100
IP.2 = 127.0.0.1
EOF

openssl genrsa -out server.key 2048
chmod 600 server.key
chown postgres:postgres server.key

openssl req -new -key server.key \
    -out server.csr \
    -config server.cnf

openssl x509 -req -in server.csr \
    -CA ca.crt -CAkey ca.key -CAcreateserial \
    -out server.crt -days 365 \
    -extfile server.cnf -extensions v3_req \
    -sha384

# =====================================================
# STEP 3: Client Certificate (per-service)
# =====================================================
create_client_cert() {
    local SERVICE_NAME=$1
    local DAYS=$2

    cat > client-${SERVICE_NAME}.cnf << EOF
[req]
distinguished_name = req_dn
req_extensions = v3_req
prompt = no

[req_dn]
C = VN
ST = Ho Chi Minh
O = Hospital Healthcare Network
CN = ${SERVICE_NAME}

[v3_req]
basicConstraints = CA:FALSE
keyUsage = critical, digitalSignature
extendedKeyUsage = clientAuth
EOF

    openssl genrsa -out client-${SERVICE_NAME}.key 2048
    openssl req -new -key client-${SERVICE_NAME}.key \
        -out client-${SERVICE_NAME}.csr \
        -config client-${SERVICE_NAME}.cnf

    openssl x509 -req -in client-${SERVICE_NAME}.csr \
        -CA ca.crt -CAkey ca.key -CAcreateserial \
        -out client-${SERVICE_NAME}.crt -days ${DAYS} \
        -extfile client-${SERVICE_NAME}.cnf -extensions v3_req \
        -sha384

    echo "Created client cert for ${SERVICE_NAME} (valid ${DAYS} days)"
}

# Tạo client certs cho từng service
create_client_cert "app_patient_svc" 90
create_client_cert "app_lab_svc" 90
create_client_cert "app_pharmacy_svc" 90
create_client_cert "dba_admin" 30

# =====================================================
# STEP 4: Verify certificates
# =====================================================
echo "=== Verify server cert ==="
openssl verify -CAfile ca.crt server.crt

echo "=== Verify client certs ==="
openssl verify -CAfile ca.crt client-app_patient_svc.crt
openssl verify -CAfile ca.crt client-dba_admin.crt

echo "=== Server cert details ==="
openssl x509 -in server.crt -text -noout | grep -A 3 "Subject Alternative Name"
4.2。 PostgreSQL SSL 配置
# postgresql.conf - SSL section
ssl = on
ssl_cert_file = '/etc/postgresql/ssl/server.crt'
ssl_key_file = '/etc/postgresql/ssl/server.key'
ssl_ca_file = '/etc/postgresql/ssl/ca.crt'
ssl_crl_file = '/etc/postgresql/ssl/ca.crl'
ssl_min_protocol_version = 'TLSv1.2'
ssl_ciphers = 'ECDHE-ECDSA-AES256-GCM-SHA384:ECDHE-RSA-AES256-GCM-SHA384:ECDHE-ECDSA-AES128-GCM-SHA256:ECDHE-RSA-AES128-GCM-SHA256'
ssl_prefer_server_ciphers = on
4.3。 Quarkus mTLS 配置
# application.properties - mutual TLS
quarkus.datasource.jdbc.url=jdbc:postgresql://db.hospital.local:5432/healthcare_db

# SSL mode: verify-full = verify cert + hostname
quarkus.datasource.jdbc.additional-jdbc-properties.ssl=true
quarkus.datasource.jdbc.additional-jdbc-properties.sslmode=verify-full
quarkus.datasource.jdbc.additional-jdbc-properties.sslrootcert=${SSL_CA_CERT:/etc/app/certs/ca.crt}
quarkus.datasource.jdbc.additional-jdbc-properties.sslcert=${SSL_CLIENT_CERT:/etc/app/certs/client.crt}
quarkus.datasource.jdbc.additional-jdbc-properties.sslkey=${SSL_CLIENT_KEY:/etc/app/certs/client.key}
// Verify SSL connection trong Quarkus
@ApplicationScoped
public class SslVerificationService {

    @Inject
    AgroalDataSource dataSource;

    public SslConnectionInfo verifySslConnection() {
        try (Connection conn = dataSource.getConnection();
             PreparedStatement ps = conn.prepareStatement(
                 "SELECT ssl, ssl_version, ssl_cipher " +
                 "FROM pg_stat_ssl WHERE pid = pg_backend_pid()")) {

            ResultSet rs = ps.executeQuery();
            if (rs.next()) {
                return new SslConnectionInfo(
                    rs.getBoolean("ssl"),
                    rs.getString("ssl_version"),
                    rs.getString("ssl_cipher")
                );
            }
            throw new SecurityException("Cannot verify SSL connection");
        }
    }

    public record SslConnectionInfo(
        boolean sslEnabled,
        String tlsVersion,
        String cipherSuite
    ) {}
}
5. 使用 HashiCorp Vault 進行金鑰管理
5.1。 Vault 傳輸秘密引擎
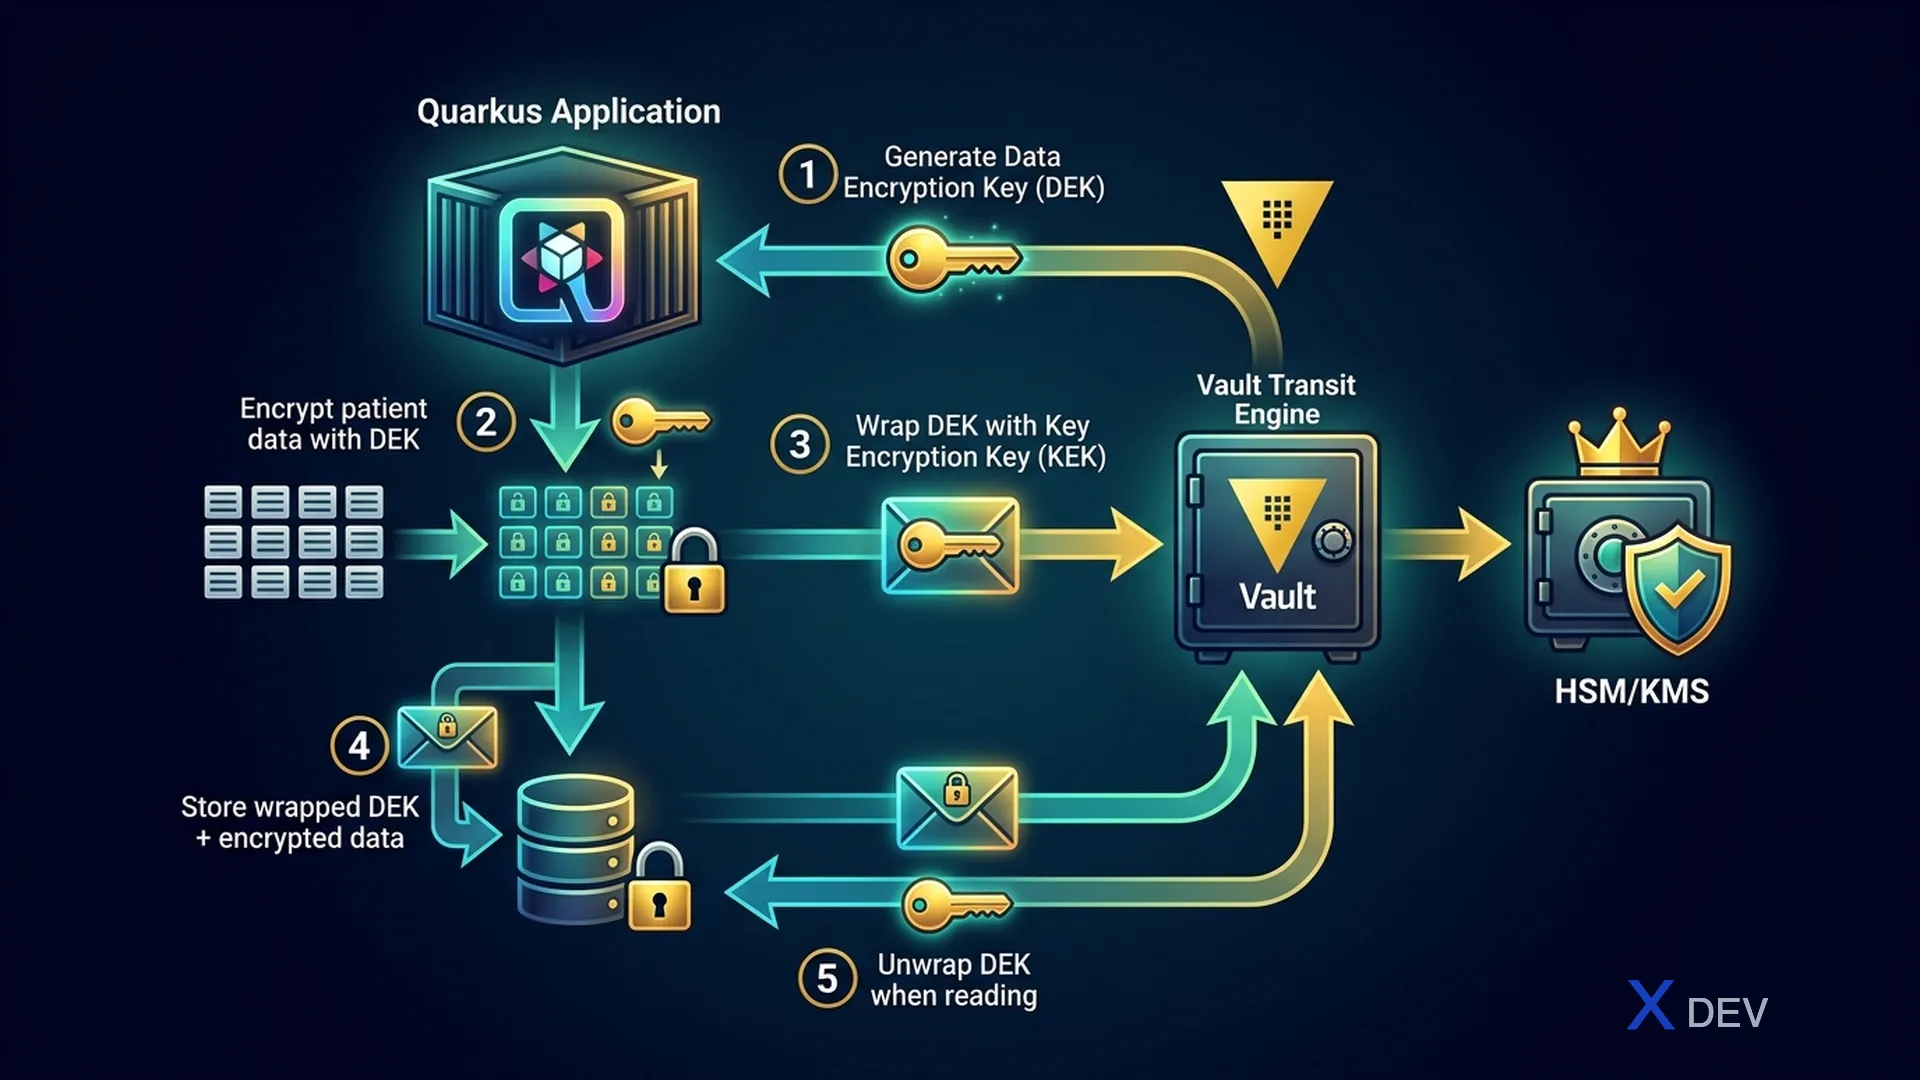
信封加密過程:
- 產生 DEK(資料加密金鑰)-每筆記錄或每張表 2.使用DEK加密數據
- 將 DEK 寄至 Vault Transit 進行包裝
- Vault 透過 HSM/KMS 使用 KEK(金鑰加密金鑰)包裝 DEK 5.在PostgreSQL中保存加密資料+包裹的DEK
5.2。保險庫配置
# === Enable Transit Secrets Engine ===
vault secrets enable transit

# === Tạo encryption keys ===
# Key cho patient data
vault write -f transit/keys/healthcare-patient-data \
    type=aes256-gcm96 \
    auto_rotate_period=90d \
    deletion_allowed=false

# Key cho lab results
vault write -f transit/keys/healthcare-lab-data \
    type=aes256-gcm96 \
    auto_rotate_period=90d \
    deletion_allowed=false

# Key cho prescriptions
vault write -f transit/keys/healthcare-pharmacy-data \
    type=aes256-gcm96 \
    auto_rotate_period=90d \
    deletion_allowed=false

# === Tạo policy cho mỗi service ===
cat > patient-svc-policy.hcl << 'EOF'
# Patient service chỉ được encrypt/decrypt với patient key
path "transit/encrypt/healthcare-patient-data" {
  capabilities = ["update"]
}
path "transit/decrypt/healthcare-patient-data" {
  capabilities = ["update"]
}
# Không được access raw key
path "transit/keys/*" {
  capabilities = ["deny"]
}
EOF

vault policy write patient-svc patient-svc-policy.hcl

# === Enable Kubernetes Auth ===
vault auth enable kubernetes
vault write auth/kubernetes/config \
    kubernetes_host="https://kubernetes.default.svc"

vault write auth/kubernetes/role/patient-svc \
    bound_service_account_names=patient-svc \
    bound_service_account_namespaces=healthcare \
    policies=patient-svc \
    ttl=1h
5.3。 Quarkus + Vault 集成
// pom.xml dependency
// <dependency>
//     <groupId>io.quarkus</groupId>
//     <artifactId>quarkus-vault</artifactId>
// </dependency>

@ApplicationScoped
public class VaultEncryptionService {

    @Inject
    VaultTransitSecretEngine transitEngine;

    private static final String PATIENT_KEY = "healthcare-patient-data";
    private static final String LAB_KEY = "healthcare-lab-data";

    /**
     * Encrypt sensitive data using Vault Transit
     */
    public String encryptPatientData(String plaintext) {
        // Vault handles: generate DEK → encrypt with KEK → return ciphertext
        return transitEngine.encrypt(PATIENT_KEY, plaintext);
        // Returns: vault:v1:base64encodedciphertext
    }

    /**
     * Decrypt sensitive data using Vault Transit
     */
    public String decryptPatientData(String ciphertext) {
        return transitEngine.decrypt(PATIENT_KEY, ciphertext).asString();
    }

    /**
     * Batch encrypt multiple fields
     */
    public Map<String, String> encryptPatientRecord(PatientRecord record) {
        Map<String, String> encrypted = new HashMap<>();

        encrypted.put("fullName", transitEngine.encrypt(PATIENT_KEY, record.fullName()));
        encrypted.put("nationalId", transitEngine.encrypt(PATIENT_KEY, record.nationalId()));
        encrypted.put("phone", transitEngine.encrypt(PATIENT_KEY, record.phone()));
        encrypted.put("diagnosis", transitEngine.encrypt(PATIENT_KEY, record.diagnosis()));

        return encrypted;
    }

    /**
     * Re-encrypt data khi key rotation
     * Vault tự động dùng key version mới nhất
     */
    public String rewrapCiphertext(String oldCiphertext) {
        return transitEngine.rewrap(PATIENT_KEY, oldCiphertext);
    }
}
5.4。 Vault 動態資料庫憑證
# === Enable Database Secrets Engine ===
vault secrets enable database

# === Configure PostgreSQL connection ===
vault write database/config/healthcare-db \
    plugin_name=postgresql-database-plugin \
    allowed_roles="patient-svc-role,lab-svc-role,readonly-role" \
    connection_url="postgresql://{{username}}:{{password}}@db.hospital.local:5432/healthcare_db?sslmode=verify-full" \
    username="vault_admin" \
    password="initial-password" \
    password_authentication="scram-sha-256"

# === Create role cho Patient Service ===
vault write database/roles/patient-svc-role \
    db_name=healthcare-db \
    creation_statements="CREATE ROLE \"{{name}}\" WITH LOGIN PASSWORD '{{password}}' VALID UNTIL '{{expiration}}' IN ROLE healthcare_app, phi_access; GRANT USAGE ON SCHEMA patient_schema TO \"{{name}}\";" \
    revocation_statements="REASSIGN OWNED BY \"{{name}}\" TO dba_admin; DROP OWNED BY \"{{name}}\"; DROP ROLE IF EXISTS \"{{name}}\";" \
    default_ttl="1h" \
    max_ttl="24h"

# === Application requests credentials ===
vault read database/creds/patient-svc-role
# Returns:
# username: v-patient-svc-role-abc123
# password: randomly-generated-strong-password
# lease_duration: 1h
# lease_id: database/creds/patient-svc-role/xyz789
# Quarkus application.properties - Vault dynamic credentials
quarkus.vault.url=https://vault.hospital.local:8200
quarkus.vault.authentication.kubernetes.role=patient-svc

# Dynamic database credentials từ Vault
quarkus.vault.credentials-provider.healthcare-db.database-credentials-role=patient-svc-role
quarkus.datasource.credentials-provider=healthcare-db
6. 信封加密模式 - 實現
6.1。 Java實作
@ApplicationScoped
public class EnvelopeEncryptionService {

    @Inject
    VaultTransitSecretEngine vaultTransit;

    private static final String KEK_NAME = "healthcare-patient-data";

    /**
     * Envelope Encryption:
     * 1. Generate random DEK (Data Encryption Key)
     * 2. Encrypt data with DEK using AES-256-GCM
     * 3. Encrypt DEK with Vault KEK (Key Encryption Key)
     * 4. Return encrypted data + encrypted DEK
     */
    public EncryptedEnvelope encrypt(String plaintext) {
        // Step 1: Generate random DEK
        byte[] dek = new byte[32]; // 256 bits
        SecureRandom.getInstanceStrong().nextBytes(dek);

        // Step 2: Generate random IV
        byte[] iv = new byte[12]; // 96 bits for GCM
        SecureRandom.getInstanceStrong().nextBytes(iv);

        // Step 3: Encrypt data with DEK (AES-256-GCM)
        byte[] encryptedData = aesGcmEncrypt(plaintext.getBytes(UTF_8), dek, iv);

        // Step 4: Encrypt DEK with Vault KEK
        String encryptedDek = vaultTransit.encrypt(
            KEK_NAME,
            Base64.getEncoder().encodeToString(dek)
        );

        // Step 5: Clear DEK from memory
        Arrays.fill(dek, (byte) 0);

        return new EncryptedEnvelope(
            Base64.getEncoder().encodeToString(encryptedData),
            Base64.getEncoder().encodeToString(iv),
            encryptedDek
        );
    }

    /**
     * Envelope Decryption:
     * 1. Decrypt DEK using Vault
     * 2. Decrypt data using DEK
     */
    public String decrypt(EncryptedEnvelope envelope) {
        // Step 1: Decrypt DEK from Vault
        String dekBase64 = vaultTransit.decrypt(
            KEK_NAME,
            envelope.encryptedDek()
        ).asString();
        byte[] dek = Base64.getDecoder().decode(dekBase64);

        // Step 2: Decrypt data
        byte[] iv = Base64.getDecoder().decode(envelope.iv());
        byte[] encryptedData = Base64.getDecoder().decode(envelope.encryptedData());
        byte[] plaintext = aesGcmDecrypt(encryptedData, dek, iv);

        // Step 3: Clear DEK
        Arrays.fill(dek, (byte) 0);

        return new String(plaintext, UTF_8);
    }

    private byte[] aesGcmEncrypt(byte[] plaintext, byte[] key, byte[] iv) {
        try {
            Cipher cipher = Cipher.getInstance("AES/GCM/NoPadding");
            GCMParameterSpec spec = new GCMParameterSpec(128, iv);
            SecretKeySpec secretKey = new SecretKeySpec(key, "AES");
            cipher.init(Cipher.ENCRYPT_MODE, secretKey, spec);
            return cipher.doFinal(plaintext);
        } catch (Exception e) {
            throw new EncryptionException("AES-GCM encryption failed", e);
        }
    }

    private byte[] aesGcmDecrypt(byte[] ciphertext, byte[] key, byte[] iv) {
        try {
            Cipher cipher = Cipher.getInstance("AES/GCM/NoPadding");
            GCMParameterSpec spec = new GCMParameterSpec(128, iv);
            SecretKeySpec secretKey = new SecretKeySpec(key, "AES");
            cipher.init(Cipher.DECRYPT_MODE, secretKey, spec);
            return cipher.doFinal(ciphertext);
        } catch (Exception e) {
            throw new EncryptionException("AES-GCM decryption failed", e);
        }
    }

    public record EncryptedEnvelope(
        String encryptedData,
        String iv,
        String encryptedDek
    ) {}
}
6.2。信封加密的資料庫架構
-- =====================================================
-- TABLE DESIGN CHO ENVELOPE ENCRYPTION
-- =====================================================

CREATE TABLE patient_schema.patient_records (
    id UUID PRIMARY KEY DEFAULT gen_random_uuid(),
    patient_id UUID NOT NULL REFERENCES patient_schema.patients(id),

    -- Non-sensitive metadata (plaintext, indexable)
    record_type VARCHAR(50) NOT NULL,  -- 'lab_result', 'prescription', 'note'
    department VARCHAR(100),
    created_at TIMESTAMPTZ DEFAULT NOW(),
    created_by UUID NOT NULL,

    -- Encrypted envelope
    encrypted_data TEXT NOT NULL,       -- AES-256-GCM encrypted content
    encryption_iv TEXT NOT NULL,        -- Initialization Vector
    encrypted_dek TEXT NOT NULL,        -- Vault-encrypted Data Encryption Key
    key_version INT NOT NULL DEFAULT 1, -- Vault key version (for rotation)

    -- Search metadata (derived, non-PHI)
    record_date DATE,                  -- Extracted date (non-sensitive)
    icd_code VARCHAR(10)               -- Searchable but non-identifying
);

-- Index cho search
CREATE INDEX idx_patient_records_patient ON patient_schema.patient_records(patient_id);
CREATE INDEX idx_patient_records_type ON patient_schema.patient_records(record_type);
CREATE INDEX idx_patient_records_date ON patient_schema.patient_records(record_date);
7. 加密備份
7.1。帶加密的 pg_dump
#!/bin/bash
# encrypted-backup.sh
# Backup PostgreSQL với encryption

BACKUP_DIR="/var/backups/postgresql"
DATE=$(date +%Y%m%d_%H%M%S)
BACKUP_FILE="${BACKUP_DIR}/healthcare_db_${DATE}.sql.gz.gpg"

# GPG key cho backup encryption
GPG_RECIPIENT="[email protected]"

# Tạo backup → compress → encrypt pipeline
pg_dump \
    --host=db.hospital.local \
    --port=5432 \
    --username=dba_admin \
    --dbname=healthcare_db \
    --format=custom \
    --compress=9 \
    --file=- | \
gpg --encrypt \
    --recipient ${GPG_RECIPIENT} \
    --output ${BACKUP_FILE} \
    --trust-model always

# Verify backup
gpg --list-packets ${BACKUP_FILE} | head -5

# Upload to S3 với SSE-KMS
aws s3 cp ${BACKUP_FILE} \
    s3://hospital-backups/postgresql/ \
    --sse aws:kms \
    --sse-kms-key-id alias/healthcare-backup-key

# Cleanup local backup sau 7 ngày
find ${BACKUP_DIR} -name "*.gpg" -mtime +7 -delete

echo "Backup completed: ${BACKUP_FILE}"
7.2。從加密備份中恢復
#!/bin/bash
# restore-encrypted-backup.sh

BACKUP_FILE=$1

if [ -z "$BACKUP_FILE" ]; then
    echo "Usage: $0 <backup_file.sql.gz.gpg>"
    exit 1
fi

# Download from S3 if needed
if [[ $BACKUP_FILE == s3://* ]]; then
    LOCAL_FILE="/tmp/restore_$(date +%s).gpg"
    aws s3 cp ${BACKUP_FILE} ${LOCAL_FILE}
    BACKUP_FILE=${LOCAL_FILE}
fi

# Decrypt → decompress → restore pipeline
gpg --decrypt ${BACKUP_FILE} | \
pg_restore \
    --host=db.hospital.local \
    --port=5432 \
    --username=dba_admin \
    --dbname=healthcare_db \
    --verbose \
    --clean \
    --if-exists

echo "Restore completed from: ${BACKUP_FILE}"
8. 金鑰輪換策略
8.1。密鑰輪換過程
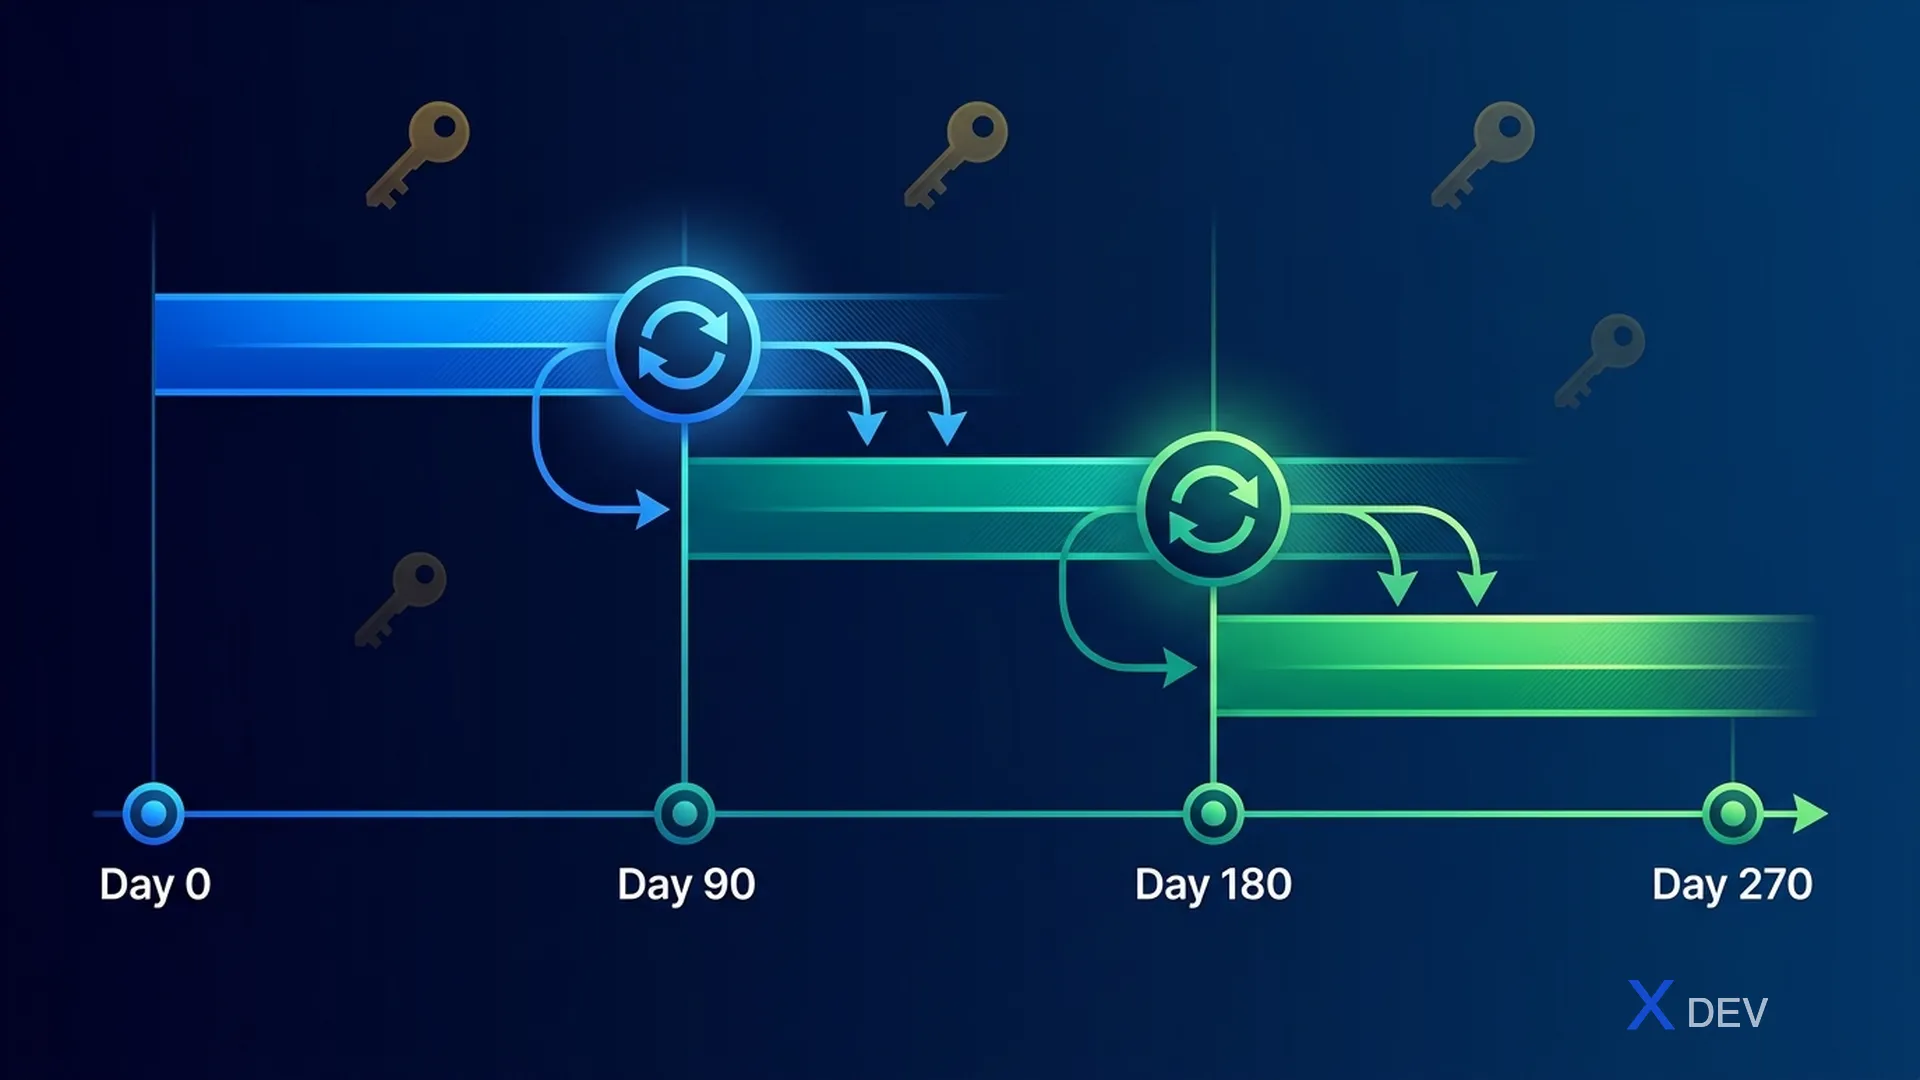
- 第 0–90 天:密鑰 v1 處於活動狀態 — 加密新數據
- 第 90–180 天:密鑰 v2 處於活動狀態 — 重新加密舊數據,v1 仍然可以解密
- 第 180 天+:金鑰 v3 處於活動狀態 — v1 已停用,v2 仍可解密
- Vault 自動輪調 KEK,舊版本仍然解密,新資料使用最新版本加密
- 重新包裝:使用新的 KEK 版本重新加密 DEK
8.2。批次重新加密腳本
@ApplicationScoped
public class KeyRotationService {

    @Inject
    VaultTransitSecretEngine vaultTransit;

    @Inject
    EntityManager entityManager;

    private static final Logger LOG = Logger.getLogger(KeyRotationService.class);

    /**
     * Re-wrap all DEKs with latest Vault key version
     * Chạy sau khi Vault key rotation
     */
    @Transactional
    public KeyRotationResult rewrapAllDeks(String keyName, int batchSize) {
        int totalRewrapped = 0;
        int totalFailed = 0;
        int currentKeyVersion = getLatestKeyVersion(keyName);

        LOG.infof("Starting DEK rewrap. Target key version: %d", currentKeyVersion);

        // Tìm records chưa được rewrap
        List<PatientRecord> outdatedRecords;
        do {
            outdatedRecords = entityManager.createQuery(
                "SELECT r FROM PatientRecord r WHERE r.keyVersion < :version",
                PatientRecord.class
            )
            .setParameter("version", currentKeyVersion)
            .setMaxResults(batchSize)
            .getResultList();

            for (PatientRecord record : outdatedRecords) {
                try {
                    // Rewrap DEK (Vault decrypts with old version, re-encrypts with new)
                    String newEncryptedDek = vaultTransit.rewrap(
                        keyName, record.getEncryptedDek()
                    );
                    record.setEncryptedDek(newEncryptedDek);
                    record.setKeyVersion(currentKeyVersion);
                    totalRewrapped++;
                } catch (Exception e) {
                    LOG.errorf("Failed to rewrap record %s: %s",
                        record.getId(), e.getMessage());
                    totalFailed++;
                }
            }
            entityManager.flush();
            entityManager.clear();

            LOG.infof("Rewrapped batch: %d records", outdatedRecords.size());
        } while (!outdatedRecords.isEmpty());

        return new KeyRotationResult(totalRewrapped, totalFailed, currentKeyVersion);
    }

    public record KeyRotationResult(
        int totalRewrapped,
        int totalFailed,
        int targetKeyVersion
    ) {}
}
總結
在本課中,我們為 PostgreSQL 醫療保健實現了端對端加密:
- 靜態加密:LUKS全碟加密+pgcrypto列級加密
- 傳輸中加密:具有雙向 TLS (mTLS) 驗證的 SSL/TLS
- pgcrypto:對稱(pgp_sym_encrypt)和非對稱(pgp_pub_encrypt)加密
- 金鑰管理:具有信封加密模式的 HashiCorp Vault Transit 引擎
- 信封加密:產生DEK→加密資料→用Vault KEK包裝DEK
- AES-256-GCM 與 CBC:由於經過驗證的加密,GCM 是首選
- 動態憑證:用於自動輪換密碼的 Vault 資料庫機密引擎
- 加密備份:pg_dump → GPG → S3 with SSE-KMS
- 密鑰輪換:KEK 輪換時自動 DEK 重新包裝
重要原則:
- 切勿將加密金鑰與加密資料一起儲存
- 請務必使用經過驗證的加密 (AES-GCM)
- 實施金鑰輪換,零停機時間
- 最小化 DEK 生命週期 - 每個記錄或會話都有一個單獨的 DEK
- 使用後從記憶體中清除金鑰
練習
-
列級加密:為 5 個 PHI 欄位使用 pgcrypto 加密建立病患表。編寫SQL插入加密資料和SELECT解密資料。與純文字相比的基準效能。
-
相互 TLS 設定:為 3 個微服務建立 CA → 伺服器憑證 → 3 個客戶端憑證。將 PostgreSQL 設定為僅接受 mTLS 連線。驗證相等
pg_stat_ssl。 -
Vault Transit Integration:設定 HashiCorp Vault(開發模式),建立傳輸金鑰,編寫 Quarkus 服務加密/解密患者姓名和診斷。使用重新包裝測試金鑰旋轉。
-
加密備份管道:編寫腳本來建立加密備份(pg_dump→gpg),上傳到S3,並還原腳本。恢復後驗證資料完整性。
| ◀ 上一篇 | 下一篇文章 ▶ |
|---|---|
| 第9課:PostgreSQL安全加強-綜合安全配置 | 第 11 課:PHI 的行級安全性與列加密 |