If you're looking for a powerful, free, and directly integrated virtualization solution Linux kernel, then KVM (Kernel-based Virtual Machine) is the answer. KVM turns Linux into a Type-1 hypervisor, allowing you to run a lot virtual machines (VMs) with almost native performance.
In this article, I will guide you through the installation KVM from A-Z above 2 physical servers with specific configuration:
| Hostname | IP Address | Role |
|---|---|---|
| kvm-node01 | 192.168.1.10 | KVM Host #1 |
| kvm-node02 | 192.168.1.11 | KVM Host #2 |
This configuration is suitable for building a homelab, running a Kubernetes cluster, or a development/testing environment.
Why choose KVM?
Before jumping into the installation, let's understand why KVM is a popular choice:
Compare virtualization solutions:
┌─────────────────┬──────────────┬─────────────┬──────────────┐
│     Tiêu chí    │     KVM      │   VMware    │  VirtualBox  │
├─────────────────┼──────────────┼─────────────┼──────────────┤
│ Chi phí         │ Miễn phí     │ Có phí      │ Miễn phí     │
│ Hiệu năng       │ Xuất sắc     │ Xuất sắc    │ Tốt          │
│ Tích hợp Linux  │ Native       │ Cần driver  │ Cần driver   │
│ Production-ready│ Có           │ Có          │ Không        │
│ Cloud providers │ AWS, GCP...  │ VMware Cloud│ Không        │
│ Nested Virt     │ Tốt          │ Tốt         │ Hạn chế      │
└─────────────────┴──────────────┴─────────────┴──────────────┘
KVM used by major cloud providers such as AWS, Google Cloud, DigitalOcean, and is the foundation for OpenStack, Proxmox VE.
System requirements
Configuring our 2 servers:
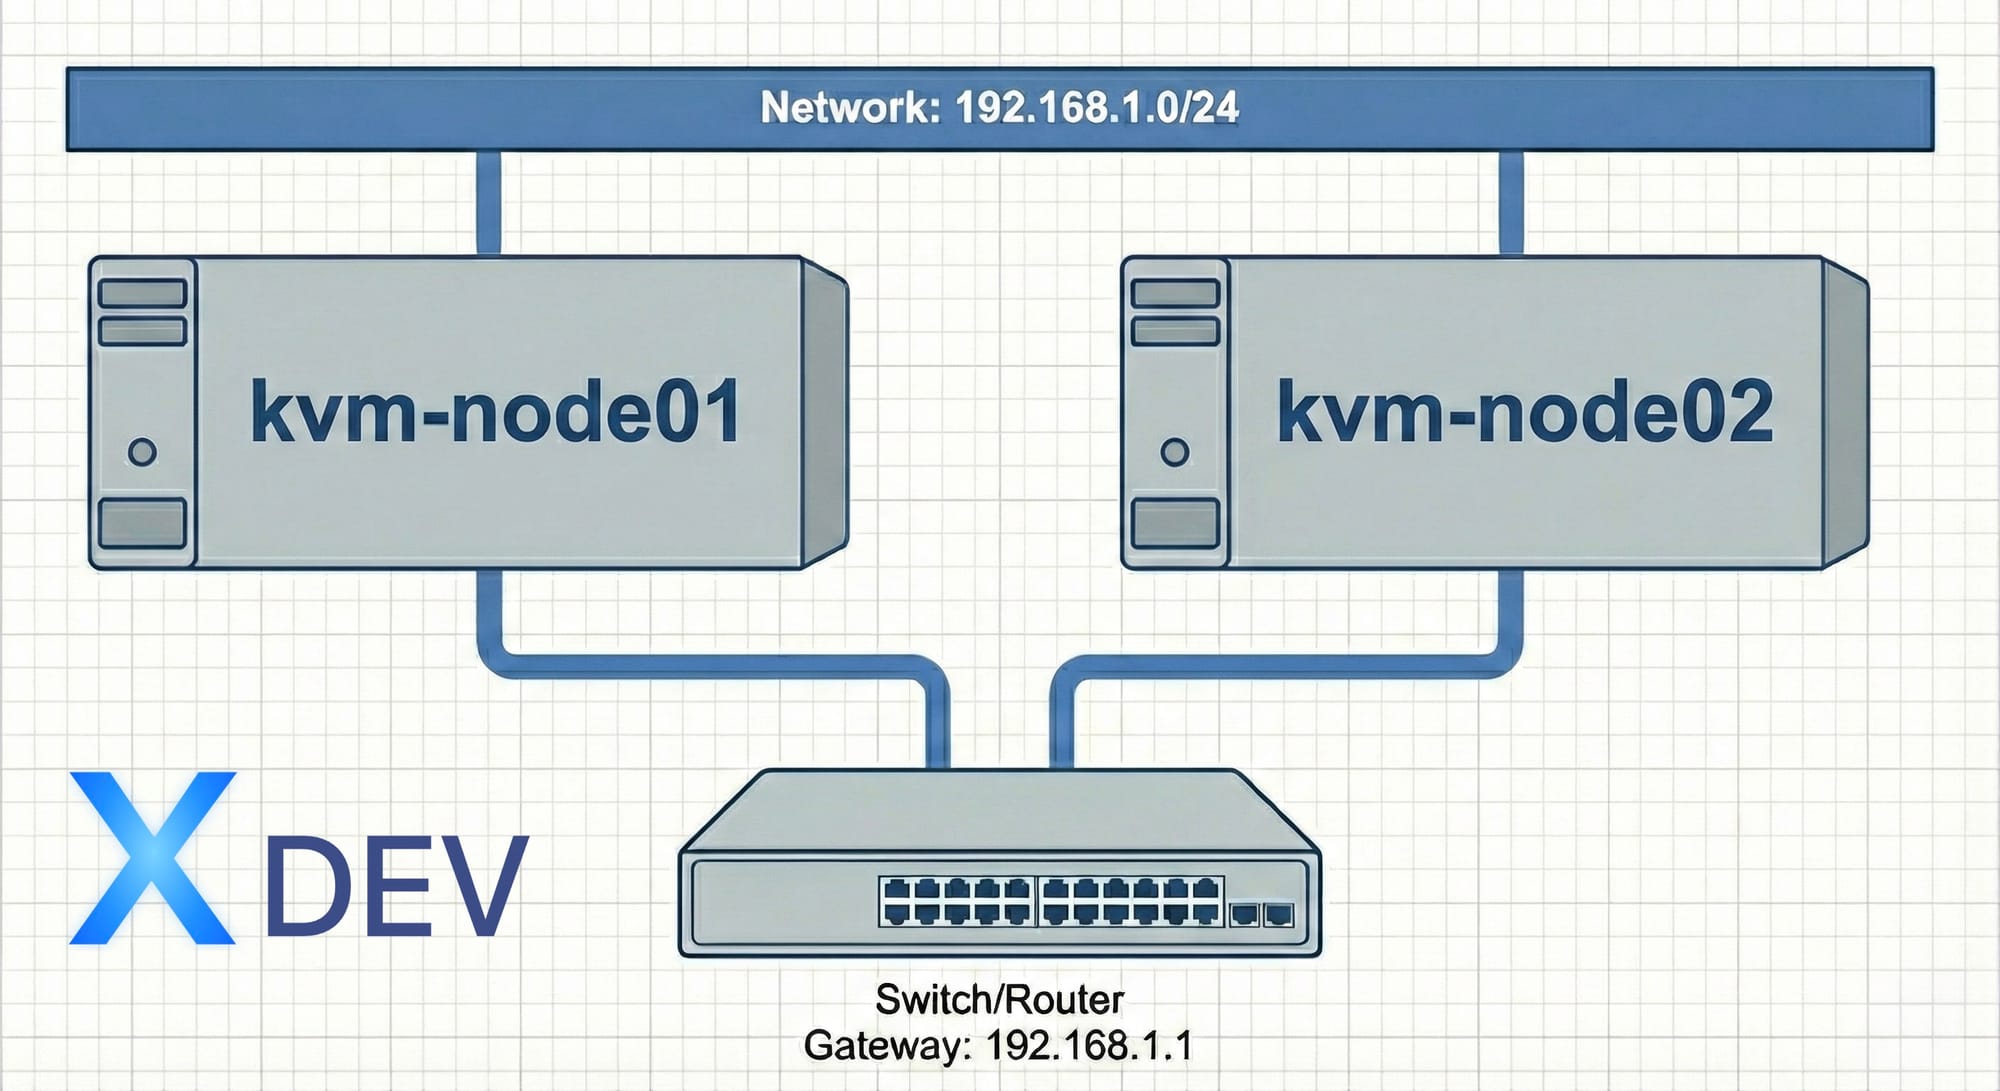
Minimum requirements per node:
- Hardware supported CPU Virtualization (Intel VT-x or AMD-V)
- RAM: 8GB+ (16GB+ recommended)
- Storage: 100GB+ SSD
- Ubuntu Server 22.04 LTS or 24.04 LTS
- Network: 1 NIC (can add NIC for storage network)
Step 1: Check Hardware Virtualization Support
📚 Do the above both nodes: kvm-node01 and kvm-node02
First, you need to confirm that the CPU supports hardware virtualization. This is the most important step - if the CPU doesn't support it, you can't use it KVM.
Check CPU flags:
# Kiểm tra số lượng CPU cores hỗ trợ virtualization
egrep -c '(vmx|svm)' /proc/cpuinfo
A result that returns a number greater than 0 means the CPU supports:
vmx- Intel VT-xsvm- AMD-V
Check out more details:
# Xem loại virtualization lscpu | grep VirtualizationOutput mẫu:
Virtualization: VT-x (Intel)
Virtualization: AMD-V (AMD)
Use the kvm-ok tool:
# Cài đặt cpu-checker sudo apt update sudo apt install -y cpu-checkerChạy kiểm tra
sudo kvm-ok
Desired results:
INFO: /dev/kvm exists
KVM acceleration can be used
⚠️ Note: If the result says "KVM acceleration can NOT be used", check BIOS/UEFI and enable the Intel VT-x or AMD-V option.
Step 2: Install KVM and Packages
📚 Do the above both nodes
Proceed with installation KVM and necessary packages:
# Update hệ thống sudo apt update && sudo apt upgrade -yCài đặt KVM và toàn bộ dependencies
sudo apt install -y
qemu-kvm
libvirt-daemon-system
libvirt-clients
bridge-utils
virtinst
virt-manager
libguestfs-tools
libosinfo-bin
cloud-image-utils
Explanation of each package:
| Package | Function |
|---|---|
qemu-kvm |
QEMU emulator with KVM acceleration.acceleration |
libvirt-daemon-system |
Libvirt daemon manages VMs |
libvirt-clients |
CLI tools like virsh |
bridge-utils |
Create and manage network bridges. bridges |
virtinst |
Virt-install tool to create VMs |
virt-manager |
GUI for managing VMs (optional for server. server) |
libguestfs-tools |
Tools for manipulating disk images |
libosinfo-bin |
Database of OS information |
cloud-image-utils |
Tools work with cloud images |
Verify installation:
# Kiểm tra KVM modules đã load lsmod | grep kvmOutput mẫu (Intel):
kvm_intel 368640 0
kvm 1028096 1 kvm_intel
Output mẫu (AMD):
kvm_amd 139264 0
kvm 1028096 1 kvm_amd
Step 3: Configure Users and Services
📚 Do the above both nodes
To use KVM without needing sudo for every command, add the user to the necessary groups:
# Thêm user hiện tại vào group libvirt và kvm sudo usermod -aG libvirt $USER sudo usermod -aG kvm $USERVerify groups
groups $USER
Enable and start libvirtd service:
# Enable service khởi động cùng hệ thống sudo systemctl enable libvirtdStart service
sudo systemctl start libvirtd
Kiểm tra status
sudo systemctl status libvirtd
Desired output:
● libvirtd.service - Virtualization daemon
Loaded: loaded (/lib/systemd/system/libvirtd.service; enabled; ...)
Active: active (running) since ...
💡 Tip: After adding users to groups, you need to logout and login again, or run newgrp libvirt to apply immediately.Check libvirt connection:
# Test virsh command virsh list --allNếu thành công, output sẽ là:
Id Name State
----------------------
(empty - chưa có VM nào)
Step 4: Configure Network Bridge
This is the most important step for VMs to be able to communicate with the outside network. We will configure the bridge network for both servers with static IPs.
Determine the network interface name (done on both nodes):
# Liệt kê các network interfaces ip link showTìm interface chính (thường là enp0s3, eth0, eno1, ens18...)
Ghi nhớ tên này để dùng ở bước sau
Backup current config:
sudo mkdir -p /etc/netplan/backup
sudo cp /etc/netplan/*.yaml /etc/netplan/backup/
Configuration for kvm-node01 (192.168.1.10)
sudo nano /etc/netplan/01-bridge-config.yaml
# /etc/netplan/01-bridge-config.yaml - kvm-node01 network: version: 2 renderer: networkdethernets: enp0s3: # ⚠️ Thay bằng tên interface thực tế dhcp4: false dhcp6: false
bridges: br0: interfaces: - enp0s3 # ⚠️ Thay bằng tên interface thực tế addresses: - 192.168.1.10/24 routes: - to: default via: 192.168.1.1 nameservers: addresses: - 8.8.8.8 - 8.8.4.4 mtu: 1500 parameters: stp: true forward-delay: 4
Configuration for kvm-node02 (192.168.1.11)
sudo nano /etc/netplan/01-bridge-config.yaml
# /etc/netplan/01-bridge-config.yaml - kvm-node02 network: version: 2 renderer: networkdethernets: enp0s3: # ⚠️ Thay bằng tên interface thực tế dhcp4: false dhcp6: false
bridges: br0: interfaces: - enp0s3 # ⚠️ Thay bằng tên interface thực tế addresses: - 192.168.1.11/24 routes: - to: default via: 192.168.1.1 nameservers: addresses: - 8.8.8.8 - 8.8.4.4 mtu: 1500 parameters: stp: true forward-delay: 4
Apply configuration (done on both nodes):
# Kiểm tra syntax sudo netplan tryNếu OK, áp dụng
sudo netplan apply
Verify bridge đã tạo
ip addr show br0 brctl show
Desired output:
bridge name     bridge id               STP enabled     interfaces
br0             8000.xxxxxxxxxxxx       yes             enp0s3
⚠️ Warning: When configuring a network bridge via SSH, you may lose connection. Use netplan try will automatically rollback after 120 seconds if you do not confirm.IP planning for VMs
| Range | Purpose |
|---|---|
| 192.168.1.10 - 192.168.1.11 | KVM Hosts |
| 192.168.1.20 - 192.168.1.49 | Infrastructure VMs (DNS, DHCP, etc.) |
| 192.168.1.50 - 192.168.1.99 | Kubernetes Cluster |
| 192.168.1.100 - 192.168.1.149 | VMs on kvm-node01 |
| 192.168.1.150 - 192.168.1.199 | VMs on kvm-node02 |
| 192.168.1.200 - 192.168.1.250 | Reserved / DHCP Pool |
| 192.168.1.1 | Gateway |
Configure Virtual Network for VMs (NAT Network)
In addition to the bridge network, we will create one more private virtual network for VMs. This network uses NAT so that VMs can access the internet through the host, but are isolated from the physical network.
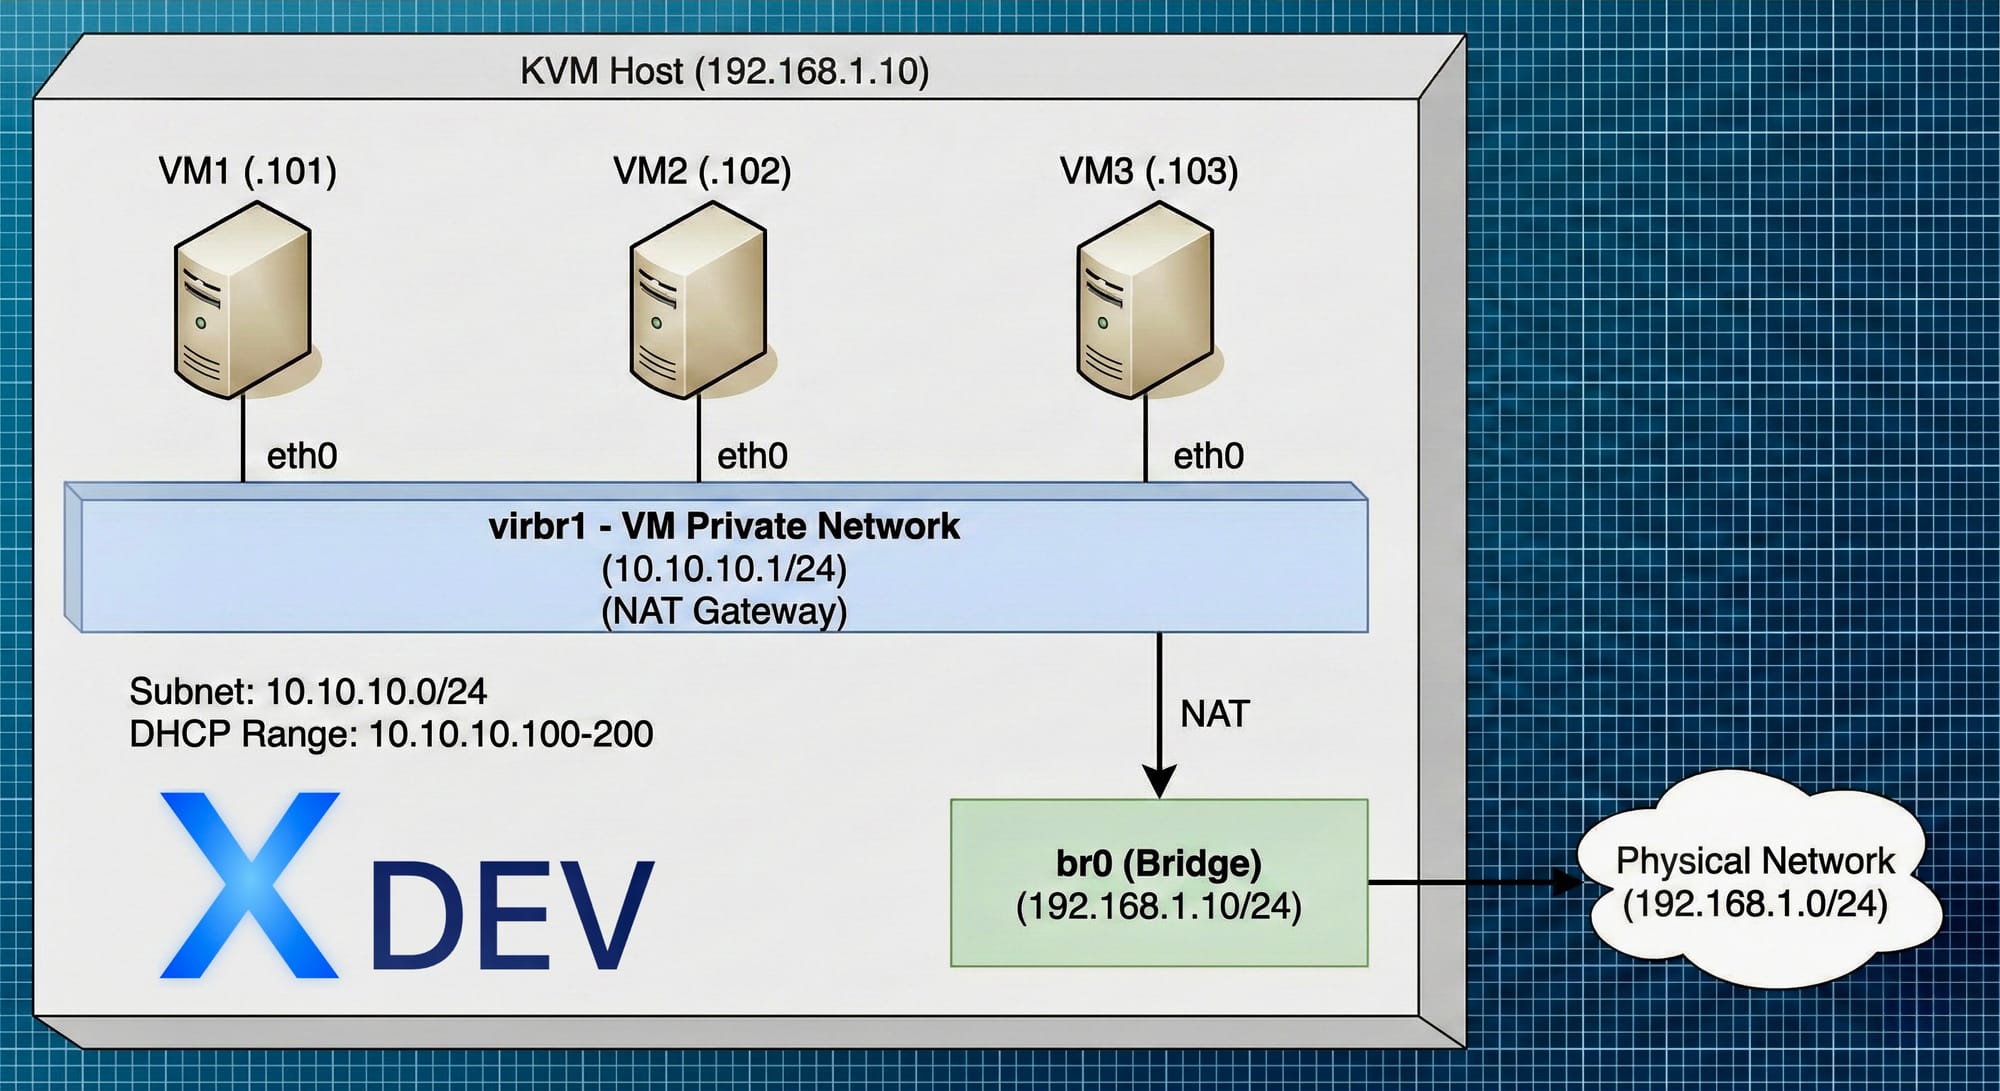
Create virtual network definition file:
# Tạo file XML cho mạng ảo
sudo tee /tmp/vm-private-network.xml << EOF
<network>
  <name>vm-private</name>
  <forward mode='nat'>
    <nat>
      <port start='1024' end='65535'/>
    </nat>
  </forward>
  <bridge name='virbr1' stp='on' delay='0'/>
  <ip address='10.10.10.1' netmask='255.255.255.0'>
    <dhcp>
      <range start='10.10.10.100' end='10.10.10.200'/>
    </dhcp>
  </ip>
</network>
EOF
Create and activate virtual network (performed on both nodes):
# Define network từ XML sudo virsh net-define /tmp/vm-private-network.xmlStart network
sudo virsh net-start vm-private
Enable autostart
sudo virsh net-autostart vm-private
Verify
sudo virsh net-list --all
Desired output:
 Name          State    Autostart   Persistent
default       active   yes         yes
vm-private    active   yes         yes
View virtual network details:
# Xem cấu hình sudo virsh net-dumpxml vm-privateXem DHCP leases
sudo virsh net-dhcp-leases vm-private
Xem bridge interface
ip addr show virbr1
Virtual network planning for both nodes:
| Node | Virtual Network | Subnet | DHCP Range |
|---|---|---|---|
| kvm-node01 | vm-private | 10.10.10.0/24 | 10.10.10.100-149 |
| kvm-node02 | vm-private | 10.10.10.0/24 | 10.10.10.150-200 |
💡 Note: Both nodes share the same subnet 10.10.10.0/24 but share different DHCP ranges to avoid IP conflicts. VMs on 2 nodes can communicate directly with each other over a virtual network.
Virtual network configuration for kvm-node02 (same subnet, different DHCP range):
# Trên kvm-node02, tạo file XML với DHCP range khác sudo tee /tmp/vm-private-network.xml << EOF <network> <n>vm-private</n> <forward mode='nat'> <nat> <port start='1024' end='65535'/> </nat> </forward> <bridge name='virbr1' stp='on' delay='0'/> <ip address='10.10.10.1' netmask='255.255.255.0'> <dhcp> <range start='10.10.10.150' end='10.10.10.200'/> </dhcp> </ip> </network> EOFDefine và start
sudo virsh net-define /tmp/vm-private-network.xml sudo virsh net-start vm-private sudo virsh net-autostart vm-private
Install Cockpit to manage KVM via Web UI
Cockpit is a web UI that helps with management KVM intuitive and easy. Install above both nodes:
# Cài đặt Cockpit và module KVM sudo apt install -y cockpit cockpit-machinesEnable và start Cockpit
sudo systemctl enable --now cockpit.socket
Kiểm tra status
sudo systemctl status cockpit.socket
Mở firewall (nếu có)
sudo ufw allow 9090/tcp
Visit Cockpit:
| Node | URL |
|---|---|
| kvm-node01 | https://192.168.1.10:9090 |
| kvm-node02 | https://192.168.1.11:9090 |
Login using user Linux yours (needs sudo permission).
Cockpit interface for KVM:
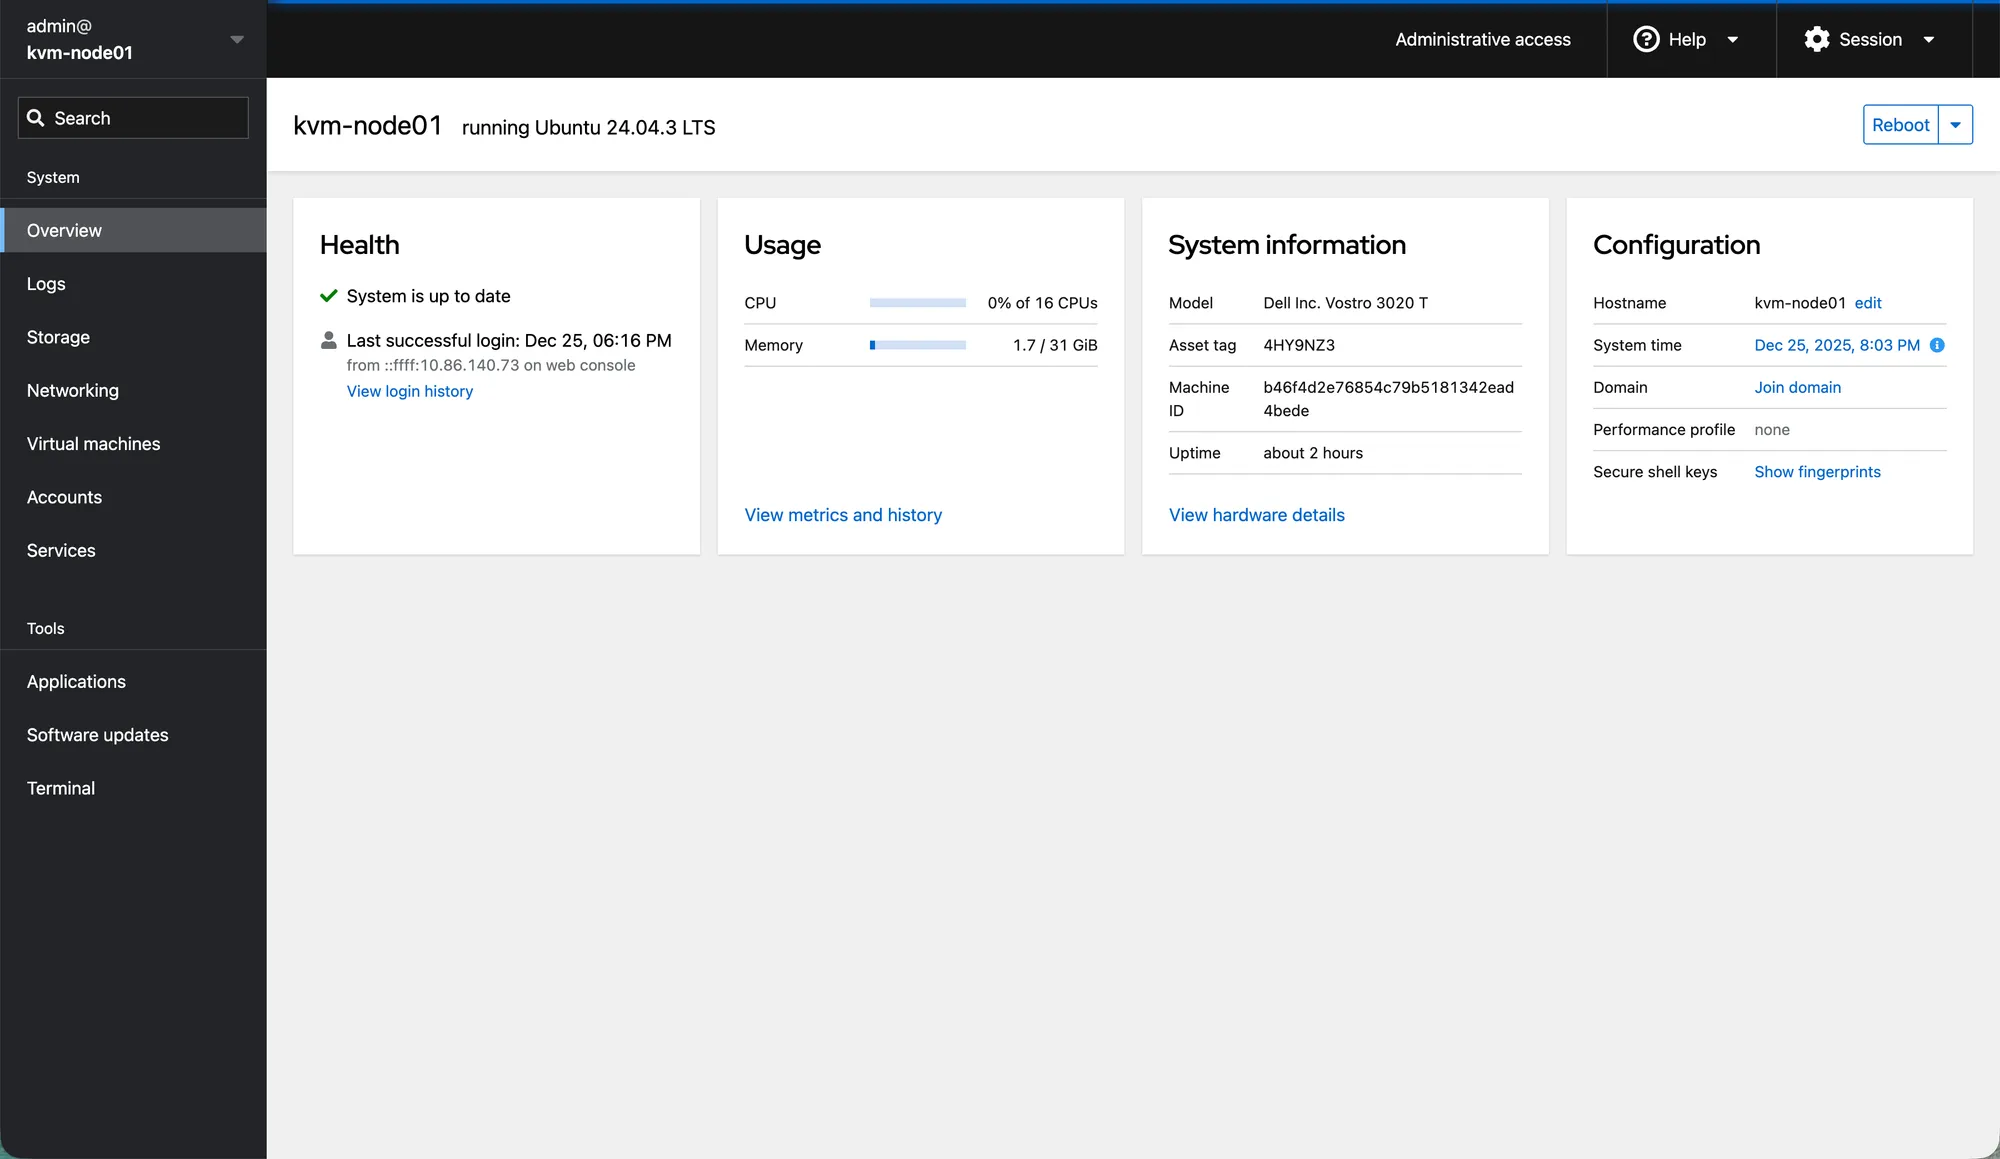
Cockpit features for KVM:
| Features | Description |
|---|---|
| Virtual Machines | Create, delete, start, stop VMs intuitively |
| Console | VNC/Serial console right in the browser |
| Storage Pools | Manage disk images, upload ISO |
| Networks | Create/edit virtual networks (NAT, Bridge) |
| Snapshots | Create and restore snapshots |
| Resource Monitor | Monitor CPU, RAM, Disk, Network real-time |
Configure VXLAN Overlay Network (2-node common virtual network)
So that VMs on 2 nodes can communicate directly with each other over a common virtual network, we use VXLAN (Virtual Extensible LAN). VXLAN creates Layer 2 tunnels across the physical network, allowing VMs on different hosts to act as the same virtual switch.
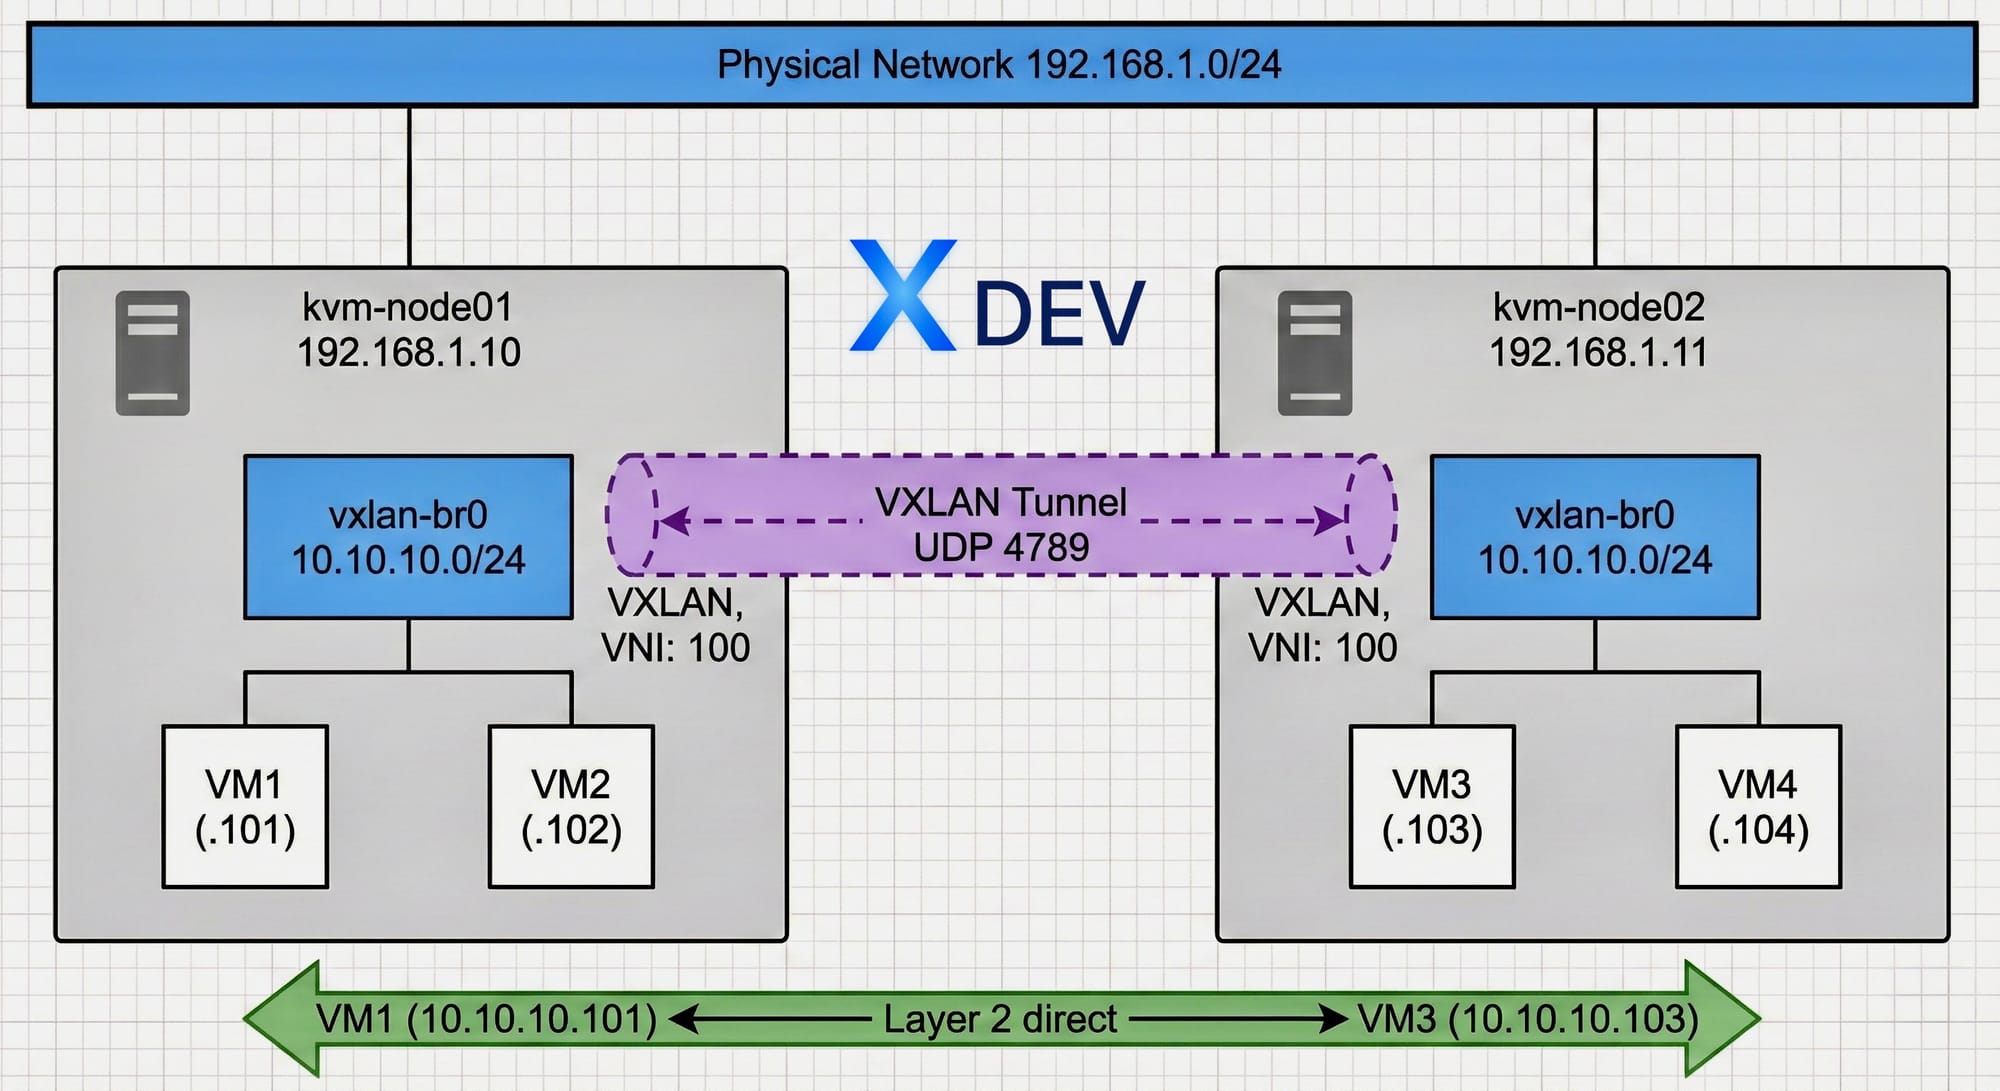
Step 1: Create VXLAN interface on kvm-node01:
# Tạo VXLAN interface với VNI 100 sudo ip link add vxlan100 type vxlan id 100 \ local 192.168.1.10 \ remote 192.168.1.11 \ dstport 4789 \ dev br0Bật interface
sudo ip link set vxlan100 up
Step 2: Create VXLAN interface on kvm-node02:
# Tạo VXLAN interface với VNI 100 sudo ip link add vxlan100 type vxlan id 100
local 192.168.1.11
remote 192.168.1.10
dstport 4789
dev br0Bật interface
sudo ip link set vxlan100 up
Step 3: Create bridge for VXLAN (performed on both nodes):
# Tạo bridge mới cho VXLAN sudo ip link add vxlan-br0 type bridge sudo ip link set vxlan-br0 upGắn VXLAN interface vào bridge
sudo ip link set vxlan100 master vxlan-br0
Verify
bridge link show
Step 4: Configure persistent with Netplan:
Create files /etc/netplan/02-vxlan.yaml above kvm-node01:
network:
version: 2
tunnels:
vxlan100:
mode: vxlan
id: 100
local: 192.168.1.10
remote: 192.168.1.11
port: 4789
bridges:
vxlan-br0:
interfaces:
- vxlan100
mtu: 1450
parameters:
stp: false
forward-delay: 0
Create files /etc/netplan/02-vxlan.yaml above kvm-node02:
network:
version: 2
tunnels:
vxlan100:
mode: vxlan
id: 100
local: 192.168.1.11
remote: 192.168.1.10
port: 4789
bridges:
vxlan-br0:
interfaces:
- vxlan100
mtu: 1450
parameters:
stp: false
forward-delay: 0
Apply configuration:
sudo netplan applyVerify VXLAN
ip -d link show vxlan100 bridge link show
Step 5: Define VXLAN network for libvirt (both nodes):
sudo tee /tmp/vxlan-network.xml << EOF <network> <name>vxlan-net</name> <forward mode="bridge"/> <bridge name="vxlan-br0"/> </network> EOFDefine và start network
sudo virsh net-define /tmp/vxlan-network.xml sudo virsh net-start vxlan-net sudo virsh net-autostart vxlan-net
Verify
sudo virsh net-list --all
Step 6: Create VM using VXLAN network:
# Tạo VM với VXLAN network
sudo virt-install

--name vm-vxlan-01

--memory 2048

--vcpus 2

--disk path=/var/lib/libvirt/images/vm-vxlan-01.qcow2,size=20

--os-variant ubuntu22.04

--network network=vxlan-net

--graphics vnc

--cdrom /var/lib/libvirt/images/ubuntu-22.04.3-live-server-amd64.iso

--noautoconsole
⚠️ Note MTU: VMs using VXLAN need to set MTU = 1450 (due to VXLAN header ~50 bytes). Configuration in VM:
Test VXLAN connection:
# Trên VM1 (kvm-node01) - IP: 10.10.10.101 ping 10.10.10.103 # Ping đến VM3 trên kvm-node02Kiểm tra VXLAN statistics
ip -s link show vxlan100
Compare virtual network types:
| Type | Use Case | VMs communicate cross-node | Isolation |
|---|---|---|---|
| NAT (vm-private) | Simple Dev/Test | ❌ No | ✅ Yes |
| Bridge (br0) | Production, LAN access | ✅ Via LAN | ❌ No |
| VXLAN Overlay | Multi-node clusters | ✅ Direct L2 | ✅ Yes |
Step 5: Configure Storage Pool
📚 Do the above both nodes
Storage pool is where disk images of VMs are stored.
Create storage folder:
# Sử dụng thư mục mặc định sudo mkdir -p /var/lib/libvirt/imagesSet permissions
sudo chown -R libvirt-qemu:kvm /var/lib/libvirt/images sudo chmod -R 775 /var/lib/libvirt/images
Storage pool definition:
# Tạo pool mới sudo virsh pool-define-as
--name default
--type dir
--target /var/lib/libvirt/imagesBuild và start pool
sudo virsh pool-build default sudo virsh pool-start default sudo virsh pool-autostart default
Verify
sudo virsh pool-list --all sudo virsh pool-info default
Desired output:
 Name      State    Autostart
default   active   yes
Step 6: Configure Hostname and /etc/hosts
In order for two nodes to be able to communicate with each other by hostname, configuration is needed SSH and hostname:
On kvm-node01:
# Set hostname sudo hostnamectl set-hostname kvm-node01Cập nhật /etc/hosts
sudo nano /etc/hosts
127.0.0.1       localhost
192.168.1.10       kvm-node01
192.168.1.11       kvm-node02
On kvm-node02:
# Set hostname sudo hostnamectl set-hostname kvm-node02Cập nhật /etc/hosts
sudo nano /etc/hosts
127.0.0.1       localhost
192.168.1.10       kvm-node01
192.168.1.11       kvm-node02
Test connection between 2 nodes:
# Từ kvm-node01 ping -c 3 kvm-node02Từ kvm-node02
ping -c 3 kvm-node01
Step 7: Create the first Virtual Machine
After installation KVM done, we will create the first VM to use vm-private virtual network.
Method 1: Use Cloud Image (Fast)
Cloud images are disk images with pre-installed OS, just need to configure and boot:
On kvm-node01:
# Download Ubuntu Cloud Image cd /var/lib/libvirt/images sudo wget https://cloud-images.ubuntu.com/jammy/current/jammy-server-cloudimg-amd64.imgTạo disk image cho VM
sudo qemu-img create -f qcow2
-F qcow2
-b jammy-server-cloudimg-amd64.img
vm-test-01.qcow2 20G
Create cloud-init configuration:
# Tạo thư mục cho cloud-init sudo mkdir -p /var/lib/libvirt/cloud-initTạo file meta-data
sudo tee /var/lib/libvirt/cloud-init/meta-data << EOF instance-id: vm-test-01 local-hostname: vm-test-01 EOF
Tạo file user-data
sudo tee /var/lib/libvirt/cloud-init/user-data << EOF #cloud-config hostname: vm-test-01 users:
- name: ubuntu sudo: ALL=(ALL) NOPASSWD:ALL groups: users, admin home: /home/ubuntu shell: /bin/bash lock_passwd: false
chpasswd: list: | ubuntu:ubuntu123 expire: false
package_update: true packages:
- qemu-guest-agent
- curl
- wget
- vim
runcmd:
- systemctl enable qemu-guest-agent
- systemctl start qemu-guest-agent EOF
Tạo cloud-init ISO
sudo cloud-localds /var/lib/libvirt/images/vm-test-01-cidata.iso
/var/lib/libvirt/cloud-init/user-data
/var/lib/libvirt/cloud-init/meta-data
Create VM with vm-private virtual network:
sudo virt-install

--name vm-test-01

--memory 2048

--vcpus 2

--disk path=/var/lib/libvirt/images/vm-test-01.qcow2,format=qcow2

--disk path=/var/lib/libvirt/images/vm-test-01-cidata.iso,device=cdrom

--os-variant ubuntu22.04

--network network=vm-private

--graphics none

--import

--noautoconsole
💡 Note: Use--network network=vm-privateinstead--network bridge=br0for the VM to connect to the virtual network.
Check VM:
# List VMs virsh list --allXem IP của VM (VM sẽ nhận IP từ DHCP 10.10.10.x)
virsh domifaddr vm-test-01
Hoặc xem từ DHCP leases
sudo virsh net-dhcp-leases vm-private
Console vào VM
virsh console vm-test-01
Login: ubuntu / ubuntu123
Thoát console: Ctrl + ]
Check network in VM:
# Sau khi login vào VM ip addr showOutput mẫu:
eth0: 10.10.10.101/24 (mạng ảo)
Test internet (qua NAT)
ping -c 3 google.com
Test ping đến host
ping -c 3 10.10.10.1
Create VM with 2 Network Interfaces
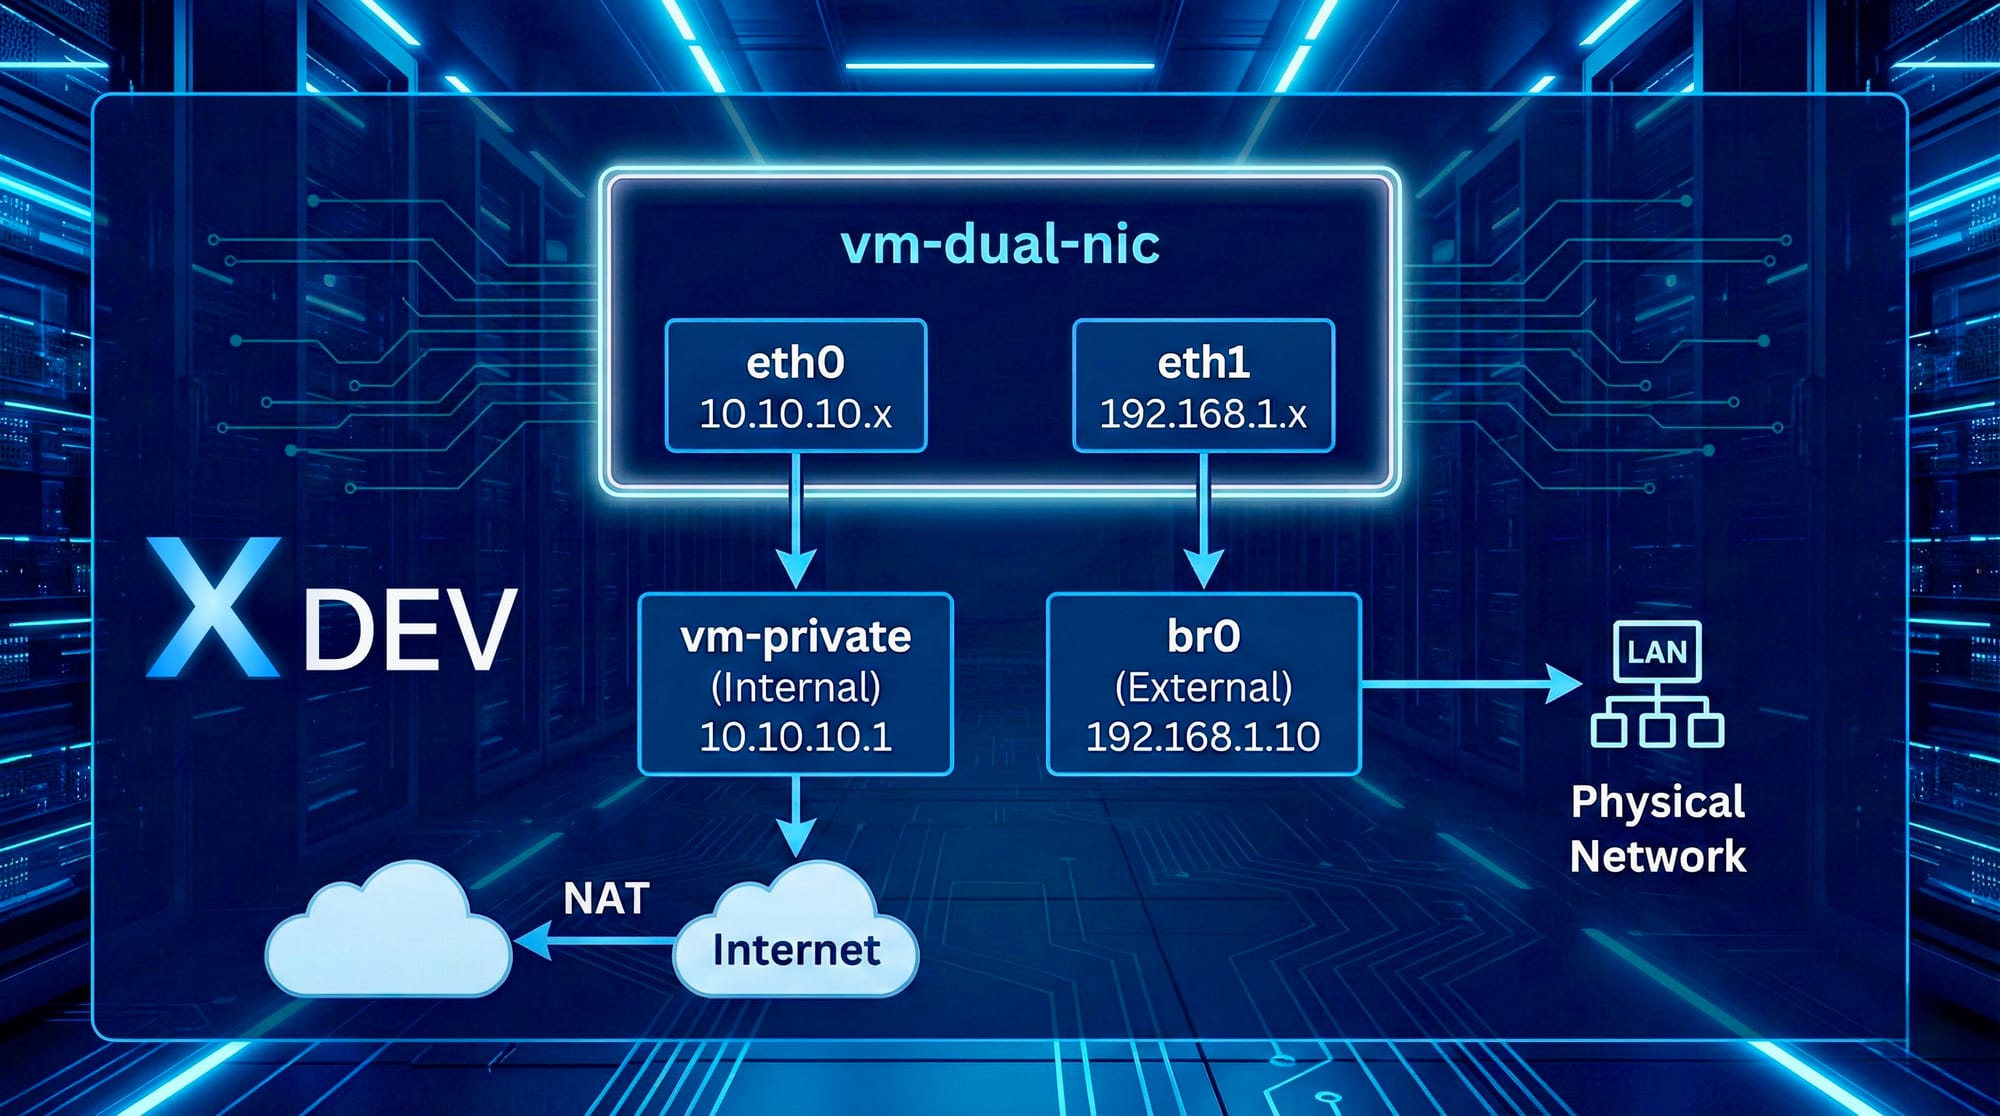
If you need the VM to connect to both a virtual network (internal) and a bridge connection (external):
sudo virt-install

--name vm-dual-nic

--memory 2048

--vcpus 2

--disk path=/var/lib/libvirt/images/vm-dual-nic.qcow2,size=20,format=qcow2

--os-variant ubuntu22.04

--network network=vm-private

--network bridge=br0

--graphics vnc,listen=0.0.0.0

--cdrom /var/lib/libvirt/images/ubuntu-22.04.3-live-server-amd64.iso

--boot cdrom,hd

--noautoconsole
Method 2: Install from ISO
# Download Ubuntu Server ISO (nếu chưa có) cd /var/lib/libvirt/images sudo wget https://releases.ubuntu.com/22.04/ubuntu-22.04.3-live-server-amd64.isoTạo VM với mạng ảo
sudo virt-install
--name vm-ubuntu-01
--memory 2048
--vcpus 2
--disk path=/var/lib/libvirt/images/vm-ubuntu-01.qcow2,size=20,format=qcow2
--os-variant ubuntu22.04
--network network=vm-private
--graphics vnc,listen=0.0.0.0,port=5901
--cdrom /var/lib/libvirt/images/ubuntu-22.04.3-live-server-amd64.iso
--boot cdrom,hd
--noautoconsole
Connect VNC to install:
# Xem VNC port sudo virsh vncdisplay vm-ubuntu-01Output: :1 (nghĩa là port 5901)
Kết nối từ máy khác bằng VNC client
Address: 192.168.1.10:5901
Compare Network types
| Network Type | Use Case | VM IP | External access |
|---|---|---|---|
| vm-private (NAT) | Development, Testing | 10.10.10.x | Need port forwarding |
| br0 (Bridge) | Production, Services | 192.168.1.x | Directly |
| Dual NICs | DMZ, Multi-tier apps | Both | Options |
Step 8: Manage Virtual Machines with virsh
After creating the above VM KVM, you will manage them with virsh command.
Managing Virtual Networks
# Liệt kê tất cả networks virsh net-list --allXem thông tin network
virsh net-info vm-private
Xem DHCP leases (IP đã cấp cho VMs)
virsh net-dhcp-leases vm-private
Xem cấu hình XML của network
virsh net-dumpxml vm-private
Start/Stop network
virsh net-start vm-private virsh net-destroy vm-private
Enable/Disable autostart
virsh net-autostart vm-private virsh net-autostart --disable vm-private
Xóa network
virsh net-undefine vm-private
Basic commands
Lifecycle management:
# Liệt kê tất cả VMs virsh list --allStart VM
virsh start vm-test-01
Shutdown graceful
virsh shutdown vm-test-01
Force stop (như rút điện)
virsh destroy vm-test-01
Reboot
virsh reboot vm-test-01
Suspend/Resume
virsh suspend vm-test-01 virsh resume vm-test-01
Autostart khi host boot
virsh autostart vm-test-01 virsh autostart --disable vm-test-01
VM information:
# Thông tin tổng quan virsh dominfo vm-test-01CPU và memory stats
virsh domstats vm-test-01
Network interfaces
virsh domiflist vm-test-01
Disk information
virsh domblklist vm-test-01
IP address
virsh domifaddr vm-test-01
Snapshots
# Tạo snapshot virsh snapshot-create-as vm-test-01
--name "before-upgrade"
--description "Snapshot before system upgrade"Liệt kê snapshots
virsh snapshot-list vm-test-01
Revert về snapshot
virsh snapshot-revert vm-test-01 before-upgrade
Xóa snapshot
virsh snapshot-delete vm-test-01 before-upgrade
Clone VM
# Shutdown VM trước khi clone virsh shutdown vm-test-01Clone VM
virt-clone
--original vm-test-01
--name vm-test-02
--auto-clone
Delete VMs
# Shutdown VM virsh shutdown vm-test-01Xóa VM definition và storage
virsh undefine vm-test-01 --remove-all-storage
Step 9: Configure Nested Virtualization (Optional)
Nested virtualization allows running VMs inside VMs - useful when you want to test Kubernetes or Docker in VM.
For Intel CPUs:
# Tạo file config echo "options kvm_intel nested=1" | sudo tee /etc/modprobe.d/kvm-intel.confReload module
sudo modprobe -r kvm_intel sudo modprobe kvm_intel
Verify
cat /sys/module/kvm_intel/parameters/nested
Output: Y hoặc 1
For AMD CPUs:
# Tạo file config echo "options kvm_amd nested=1" | sudo tee /etc/modprobe.d/kvm-amd.confReload module
sudo modprobe -r kvm_amd sudo modprobe kvm_amd
Verify
cat /sys/module/kvm_amd/parameters/nested
Step 10: Troubleshooting
Common errors
Error: "Cannot access storage file"
# Kiểm tra permissions ls -la /var/lib/libvirt/images/Fix permissions
sudo chown libvirt-qemu:kvm /var/lib/libvirt/images/.qcow2 sudo chmod 660 /var/lib/libvirt/images/.qcow2
Error: VM does not have an IP address
# Kiểm tra bridge brctl show ip addr show br0Trong VM, request DHCP
sudo dhclient -v
Error: "Permission denied" when running virsh
# Thêm vào groups sudo usermod -aG libvirt,kvm $USERLogout và login lại
View logs:
# Libvirt logs sudo journalctl -u libvirtd -fQEMU logs cho specific VM
sudo tail -f /var/log/libvirt/qemu/vm-test-01.log
References
- All articles about KVM
- Cockpit on xdev.asia
- Virtualization on xdev.asia
- Networking on xdev.asia
- QEMU Documentation
- Libvirt on xdev.asia
- Ubuntu Server Guides
- KVM Official Documentation
- VXLAN - Linux Kernel Documentation
If you encounter problems during the installation process, please leave a comment below!