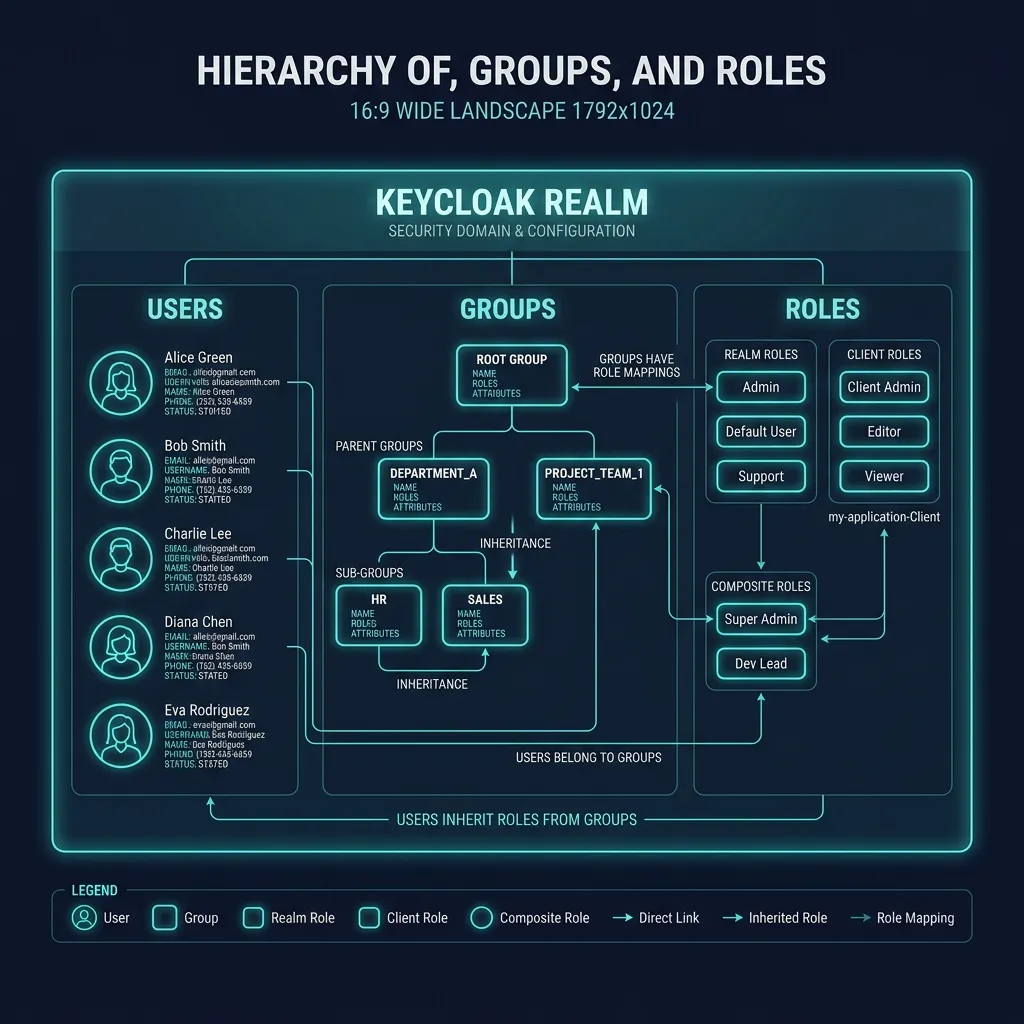
Users, Groups and Roles hierarchical model in Keycloak Realm
1. Managing Users
Users is the central entity of Keycloak — representing users who can log into the system. Each user belongs to a specific realm and can have attributes, credentials, roles, and group memberships.
1.1 Create User via Admin Console
Select realm (e.g.
my-company) from realm selectorClick Users trong sidebar
Click Add user
Fill in information:
- Username:
john.doe(required) - Email:
[email protected] - First name:
John - Last name:
Doe - Email verified: ON (if email verified)
- Enabled: ON
- Username:
Click Create
1.2 Create User via Admin CLI
# Tạo user cơ bản bin/kcadm.sh create users \ -r my-company \ -s username=john.doe \ -s [email protected] \ -s firstName=John \ -s lastName=Doe \ -s enabled=true \ -s emailVerified=trueLấy user ID vừa tạo
USER_ID=$(bin/kcadm.sh get users -r my-company -q username=john.doe --fields id --format csv --noquotes)
echo "User ID: $USER_ID"
1.3 Create User via REST API
# Tạo user mới curl -s -X POST \ "http://localhost:8080/admin/realms/my-company/users" \ -H "Authorization: Bearer $ACCESS_TOKEN" \ -H "Content-Type: application/json" \ -d '{ "username": "john.doe", "email": "[email protected]", "firstName": "John", "lastName": "Doe", "enabled": true, "emailVerified": true, "attributes": { "department": ["Engineering"], "employee_id": ["EMP001"] } }'Lấy user ID từ response header Location
Location: http://localhost:8080/admin/realms/my-company/users/{user-id}
2. Set Credentials
2.1 Set password via Admin Console
Go to Users → select user → tab Credentials
Click Set password
Enter new password
Temporary: ON (user must change password when logging in for the first time) or OFF (fixed password)
Click Save
2.2 Set password via CLI
# Đặt password cố định bin/kcadm.sh set-password \ -r my-company \ --username john.doe \ --new-password "SecureP@ssw0rd!"Đặt password tạm thời (bắt đổi khi login)
bin/kcadm.sh set-password
-r my-company
--username john.doe
--new-password "TempP@ss123"
--temporary
2.3 Set password via REST API
# Lấy user ID USER_ID=$(curl -s -X GET \ "http://localhost:8080/admin/realms/my-company/users?username=john.doe" \ -H "Authorization: Bearer $ACCESS_TOKEN" | jq -r '.[0].id')Đặt password
curl -s -X PUT
"http://localhost:8080/admin/realms/my-company/users/$USER_ID/reset-password"
-H "Authorization: Bearer $ACCESS_TOKEN"
-H "Content-Type: application/json"
-d '{ "type": "password", "value": "SecureP@ssw0rd!", "temporary": false }'
2.4 Password Policies
Configure password policies for realm at Authentication → Policies → Password policy:
| Policy | Description | Example value |
|---|---|---|
| Minimum length | Minimum length | 8 |
| Uppercase characters | Uppercase characters required | 1 |
| Lowercase characters | Lowercase characters required | 1 |
| Digits | Request number | 1 |
| Special characters | Special characters required | 1 |
| Not username | Password must not be the same as username | - |
| Not email | Password must not match email | - |
| Password history | Do not reuse old password | 3 |
| Expire password | Password expiration time (days) | 90 |
| Hashing algorithm | Algorithm hash password | argon2 |
| Hashing iterations | Number of hashing rounds | 5 (argon2) |
Configuration via CLI:
bin/kcadm.sh update realms/my-company \
  -s 'passwordPolicy="length(8) and upperCase(1) and lowerCase(1) and digits(1) and specialChars(1) and notUsername and passwordHistory(3)"'
3. User Profile
User Profile is a feature that allows administrators to define a schema for user attributes — controlling which attributes users have, how they are validated, and how they are displayed on the interface.
3.1 Enable User Profile
From Keycloak 24+, User Profile is enabled by default. For older versions:
Go to Realm settings → General
Find User profile enabled: ON
Once enabled, access Realm settings → User profile to configure.
3.2 Definition of Attribute Schema
Each attribute has the following configurations:
Name — attribute name (lowercase, used for API)
Display name — UI display name (i18n support:
${profile.attribute.department})Permissions — who can view/edit (admin, user)
Validations — rules validate value
Annotations — metadata cho UI rendering
Required — required for users, admins, or both
Multivalued — allows multiple values
3.3 Built-in Attributes
Keycloak has available attributes:
| Attribute | Description | Default |
|---|---|---|
| username | Username | Required, unique |
| Email address | Required (can be turned off) | |
| firstName | Name | Required |
| lastName | LastName | Required |
3.4 Create Custom Attribute
Example of creating attribute phone_number:
Go to Realm settings → User profile
Click Create attribute
Configuration:
- Name:
phone_number - Display name:
Phone Number - Attribute group: (select or create new)
- Enabled when: Always
- Required: Required for user
- Name:
3.5 Validators
Keycloak provides many validators to check attribute values:
| Validator | Description | Example configuration |
|---|---|---|
| length | Length limit | min: 3, max: 50 |
| Check email format | - | |
| pattern | Check regex pattern | ^\\+[0-9]{10,15}$ |
| integer | Integer check | min: 0, max: 999999 |
| double | Check real number | min: 0.0, max: 100.0 |
| uri | Check valid URL | - |
| options | Limit value in list | ["vn","us","jp"] |
| person-name-prohibited-characters | Prohibit special characters in name | - |
| username-prohibited-characters | Prohibit special characters in username | - |
| multivalued | Validate quantity values | min: 1, max: 5 |
Example configuration of attribute phone_number via JSON (User Profile tab → JSON editor):
{
  "attributes": [
    {
      "name": "phone_number",
      "displayName": "Phone Number",
      "validations": {
        "length": {
          "min": 10,
          "max": 15
        },
        "pattern": {
          "pattern": "^\\+[0-9]{10,15}$",
          "error-message": "Phone number must start with + and contain 10-15 digits"
        }
      },
      "required": {
        "roles": ["user"]
      },
      "permissions": {
        "view": ["admin", "user"],
        "edit": ["admin", "user"]
      },
      "annotations": {
        "inputType": "tel",
        "inputHelperTextBefore": "Enter your phone number with country code (e.g., +84901234567)"
      }
    }
  ]
}
3.6 Annotations cho UI Rendering
Annotations allows customizing how attributes are displayed on registration/account page:
| Annotation | Description | Value |
|---|---|---|
| inputType | HTML input type | text, email, tel, number, date, select, multiselect, textarea, html5-* |
| inputHelperTextBefore | Helper text displayed before input | String text |
| inputHelperTextAfter | Helper text displayed after input | String text |
| inputOptionsFromValidation | Get options from validator | Validation name (e.g. "options") |
3.7 Progressive Profiling
Progressive profiling allows collecting user information gradually instead of asking for it all upon registration:
Create attribute with Required → Required for user: ON
When the user logs in, if the attribute does not have a value, Keycloak will display a form asking to fill in
Combined with "Enabled when" scopes — only requires attribute when client requests specific scope
For example: Attribute phone_number is only required when the client requests scope phone:
{
  "name": "phone_number",
  "required": {
    "roles": ["user"],
    "scopes": ["phone"]
  }
}
4. Groups and Sub-groups
Groups helps organize users and apply roles and attributes to groups of users at once — instead of assigning individual users.
4.1 Create Group via Admin Console
Click Groups trong sidebar
Click Create group
Enter Name:
EngineeringClick Create
4.2 Create Sub-group
Sub-groups inherit attributes and role mappings from parent group:
Click on group
EngineeringClick Create sub-group
Enter name:
Backend,Frontend,DevOps
Group structure example:
Engineering/
├── Backend/
│   ├── Java Team
│   └── Go Team
├── Frontend/
│   ├── Web Team
│   └── Mobile Team
└── DevOps/
    ├── SRE
    └── Platform
Operations/
├── HR
├── Finance
└── Legal
4.3 Create Group via CLI
# Tạo top-level group bin/kcadm.sh create groups -r my-company -s name="Engineering"Lấy group ID
GROUP_ID=$(bin/kcadm.sh get groups -r my-company --fields id,name | jq -r '.[] | select(.name=="Engineering") | .id')
Tạo sub-group
bin/kcadm.sh create groups/$GROUP_ID/children -r my-company -s name="Backend" bin/kcadm.sh create groups/$GROUP_ID/children -r my-company -s name="Frontend" bin/kcadm.sh create groups/$GROUP_ID/children -r my-company -s name="DevOps"
4.4 Group Attributes
Groups can contain key-value attributes — useful for metadata, group configuration:
# Thêm attributes cho group
bin/kcadm.sh update groups/$GROUP_ID -r my-company \
  -s 'attributes={"cost_center":["CC-ENG-001"],"location":["HCM","HN"]}'
Via Admin Console: Click on group → tab Attributes → add key-value pairs.
4.5 Add User to Group
# Qua Admin Console: # Users → chọn user → tab Groups → Join group → chọn groupQua CLI
USER_ID=$(bin/kcadm.sh get users -r my-company -q username=john.doe --fields id --format csv --noquotes) bin/kcadm.sh update users/$USER_ID/groups/$GROUP_ID -r my-company -s realm=my-company -s userId=$USER_ID -s groupId=$GROUP_ID -n
Qua REST API
curl -s -X PUT
"http://localhost:8080/admin/realms/my-company/users/$USER_ID/groups/$GROUP_ID"
-H "Authorization: Bearer $ACCESS_TOKEN"
-H "Content-Type: application/json"
4.6 Default Groups
Default groups automatically add new users when creating an account or registering:
Enter Groups
Select the group to set as default
Or go to Realm settings → User registration → Default groups
# Qua CLI
bin/kcadm.sh update realms/my-company -s 'defaultGroups=["/Engineering/Backend"]'
5. Required Actions
Required Actions are actions that the user must perform before being able to log in successfully.
5.1 List of available Required Actions
| Action | Description |
|---|---|
| Update Password | Required password change |
| Verify Email | Verify email |
| Configure OTP | Set OTP (TOTP/HOTP) |
| Update Profile | Update personal information |
| Terms and Conditions | Accept terms of use |
| Configure WebAuthn | Register WebAuthn device |
| Update User Locale | Select language |
| Delete Credential | Delete old credential |
5.2 Assign Required Action to User
# Qua Admin Console: # Users → chọn user → tab Details → Required user actions → chọn actionsQua CLI
bin/kcadm.sh update users/$USER_ID -r my-company
-s 'requiredActions=["UPDATE_PASSWORD","VERIFY_EMAIL","CONFIGURE_TOTP"]'Qua REST API
curl -s -X PUT
"http://localhost:8080/admin/realms/my-company/users/$USER_ID"
-H "Authorization: Bearer $ACCESS_TOKEN"
-H "Content-Type: application/json"
-d '{ "requiredActions": ["UPDATE_PASSWORD", "VERIFY_EMAIL"] }'
5.3 Default Required Actions
Configure default required actions for all new users at Authentication → Required actions:
Enable column Set as default action for desired action
All new users will automatically be assigned default actions
6. User Self-Registration
6.1 Enable Self-Registration
Go to Realm settings → Login
On User registration: ON
The login page will display the "Register" link
6.2 reCAPTCHA cho Registration
To protect registration form from bots, enable reCAPTCHA:
Sign up for Google reCAPTCHA at https://www.google.com/recaptcha
Enter Authentication → Flows → Registration
Find step reCAPTCHA → switch from Disabled to Required
Click gear icon → enter Site Key and Secret Key from Google
6.3 Customize Registration Form
With User Profile, you control which fields are displayed on the registration form:
Attributes with Required for user: ON will appear on form
Display order according to sort order in User Profile configuration
Use attribute groups to group related fields
7. Impersonation
Impersonation allows admins to "fake" login under another user name — useful for debugging and support.
7.1 Using Impersonation
Go to Users → find the user you need to impersonate
Click menu dropdown (kebab menu) → Impersonate
Browser will open a new tab to log in under that user name
All actions recorded in Events with event type
IMPERSONATE
7.2 Impersonation qua REST API
curl -s -X POST \
  "http://localhost:8080/admin/realms/my-company/users/$USER_ID/impersonation" \
  -H "Authorization: Bearer $ACCESS_TOKEN" \
  -H "Content-Type: application/json"
Security note:
Only users with role
impersonationin realmrealm-managementcan impersonateAll impersonation events are logged — important for audit
In production, limit impersonation permission to only super admin
8. Search and manage advanced Users
8.1 Search Users
# Tìm theo username bin/kcadm.sh get users -r my-company -q username=johnTìm theo email
bin/kcadm.sh get users -r my-company -q email=[email protected]
Tìm theo attribute
bin/kcadm.sh get users -r my-company -q "q=department:Engineering"
Tìm với pagination
bin/kcadm.sh get users -r my-company --offset 0 --limit 20
REST API - tìm với nhiều tiêu chí
curl -s -X GET
"http://localhost:8080/admin/realms/my-company/users?search=john&max=20&first=0"
-H "Authorization: Bearer $ACCESS_TOKEN" | jq '.[].username'
8.2 Delete User
# Qua CLI bin/kcadm.sh delete users/$USER_ID -r my-companyQua REST API
curl -s -X DELETE
"http://localhost:8080/admin/realms/my-company/users/$USER_ID"
-H "Authorization: Bearer $ACCESS_TOKEN"
8.3 Disable User (instead of deleting)
# Disable user - vẫn giữ data nhưng không cho login
bin/kcadm.sh update users/$USER_ID -r my-company -s enabled=false
8.4 Bulk Operations
Example script to create multiple users from CSV:
#!/bin/bash # bulk-create-users.shREALM="my-company"
while IFS=',' read -r username email firstName lastName department; do bin/kcadm.sh create users -r $REALM
-s username="$username"
-s email="$email"
-s firstName="$firstName"
-s lastName="$lastName"
-s enabled=true
-s emailVerified=true
-s "attributes={"department":["$department"]}"bin/kcadm.sh set-password -r $REALM
--username "$username"
--new-password "Welcome@123"
--temporary
echo "Created user: $username" done < users.csv
9. Personal Data Management
Keycloak supports GDPR compliance through Account Console, allowing users:
View personal information — email, name, attributes
Edit information — depends on permissions in User Profile
View sessions — active login sessions
Manage devices — view and revoke logged in devices
View applications — applications that have been granted access
Delete account — manually delete account (if allowed)
Account Console URL:
http://localhost:8080/realms/{realm}/accountBật tính năng xóa tài khoản:
Vào Authentication → Required actions
Enable action Delete Account
Vào Realm settings → Login → bật Delete account
10. Bài tập thực hành
Tạo User Profile cho realm
my-companyvới các custom attributes:phone_number(required, regex validator cho format quốc tế)department(required, options: Engineering, HR, Finance, Marketing)employee_id(admin-only edit, pattern: EMP-[0-9]{4})
Tạo Group hierarchy:
- Engineering → Backend, Frontend, DevOps
- Operations → HR, Finance
Tạo 5 users qua CLI, mỗi user thuộc một group khác nhau, password tạm thời
Bật self-registration với verify email và test đăng ký
Cấu hình password policy: min 10 chars, 1 uppercase, 1 digit, 1 special, history 5, expire 90 days
11. Tổng kết
Trong bài này, bạn đã học:
Tạo và quản lý Users qua Admin Console, CLI, và REST API
Thiết lập Credentials và Password Policies
Sử dụng User Profile để định nghĩa attribute schema với validators và annotations
Tạo Groups và sub-groups với hierarchy, attributes, và default groups
Cấu hình Required Actions bắt buộc cho users
Bật Self-Registration với reCAPTCHA
Sử dụng Impersonation cho debugging
Quản lý Personal Data cho GDPR compliance
Bài tiếp theo sẽ hướng dẫn về Roles, Permissions và Access Control trong Keycloak.