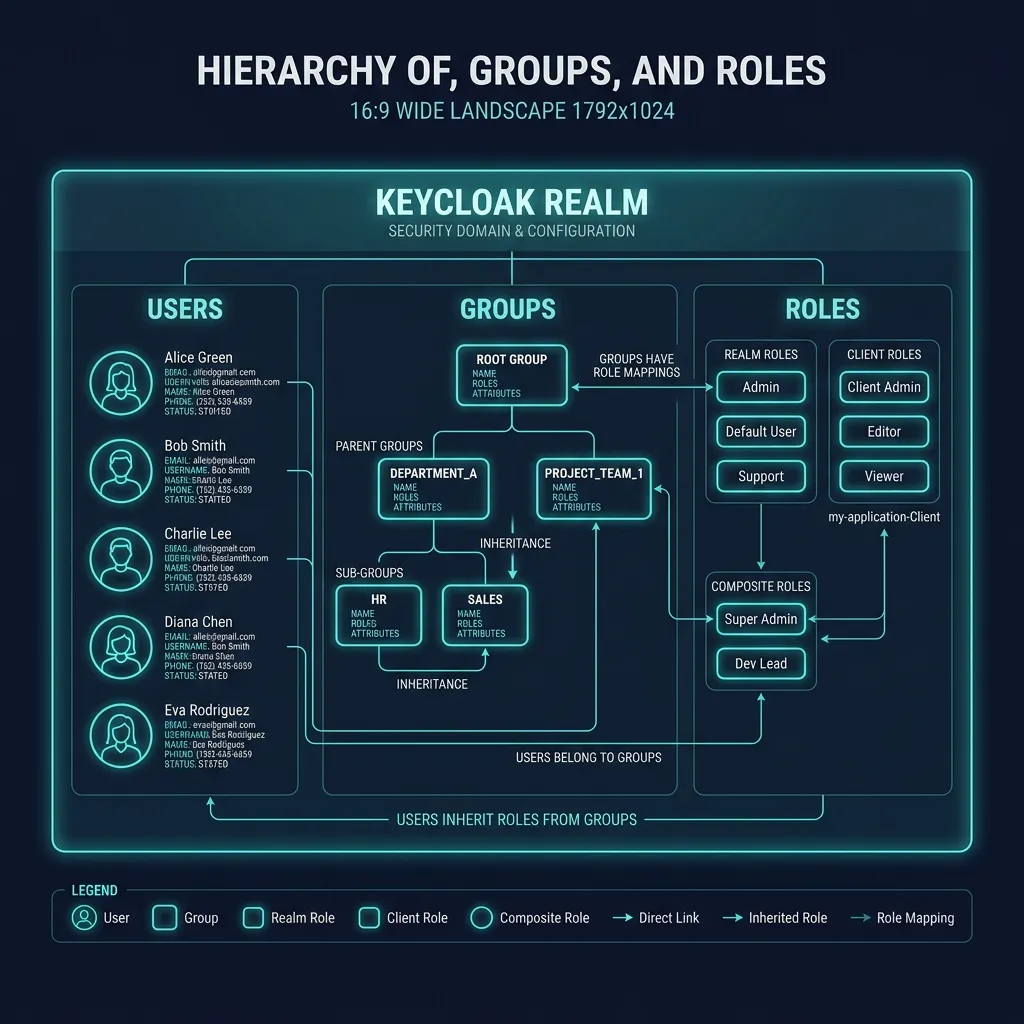
Mô hình phân cấp Users, Groups và Roles trong Keycloak Realm
1. Quản lý Users
Users là thực thể trung tâm của Keycloak — đại diện cho người dùng có thể đăng nhập vào hệ thống. Mỗi user thuộc về một realm cụ thể và có thể có attributes, credentials, roles, và group memberships.
1.1 Tạo User qua Admin Console
Chọn realm (ví dụ:
my-company) từ realm selectorClick Users trong sidebar
Click Add user
Điền thông tin:
- Username:
john.doe(bắt buộc) - Email:
[email protected] - First name:
John - Last name:
Doe - Email verified: ON (nếu đã xác thực email)
- Enabled: ON
- Username:
Click Create
1.2 Tạo User qua Admin CLI
# Tạo user cơ bản bin/kcadm.sh create users \ -r my-company \ -s username=john.doe \ -s [email protected] \ -s firstName=John \ -s lastName=Doe \ -s enabled=true \ -s emailVerified=trueLấy user ID vừa tạo
USER_ID=$(bin/kcadm.sh get users -r my-company -q username=john.doe --fields id --format csv --noquotes)
echo "User ID: $USER_ID"
1.3 Tạo User qua REST API
# Tạo user mới curl -s -X POST \ "http://localhost:8080/admin/realms/my-company/users" \ -H "Authorization: Bearer $ACCESS_TOKEN" \ -H "Content-Type: application/json" \ -d '{ "username": "john.doe", "email": "[email protected]", "firstName": "John", "lastName": "Doe", "enabled": true, "emailVerified": true, "attributes": { "department": ["Engineering"], "employee_id": ["EMP001"] } }'Lấy user ID từ response header Location
Location: http://localhost:8080/admin/realms/my-company/users/{user-id}
2. Thiết lập Credentials
2.1 Đặt mật khẩu qua Admin Console
Vào Users → chọn user → tab Credentials
Click Set password
Nhập password mới
Temporary: ON (user phải đổi password khi đăng nhập lần đầu) hoặc OFF (password cố định)
Click Save
2.2 Đặt mật khẩu qua CLI
# Đặt password cố định bin/kcadm.sh set-password \ -r my-company \ --username john.doe \ --new-password "SecureP@ssw0rd!"Đặt password tạm thời (bắt đổi khi login)
bin/kcadm.sh set-password
-r my-company
--username john.doe
--new-password "TempP@ss123"
--temporary
2.3 Đặt mật khẩu qua REST API
# Lấy user ID USER_ID=$(curl -s -X GET \ "http://localhost:8080/admin/realms/my-company/users?username=john.doe" \ -H "Authorization: Bearer $ACCESS_TOKEN" | jq -r '.[0].id')Đặt password
curl -s -X PUT
"http://localhost:8080/admin/realms/my-company/users/$USER_ID/reset-password"
-H "Authorization: Bearer $ACCESS_TOKEN"
-H "Content-Type: application/json"
-d '{ "type": "password", "value": "SecureP@ssw0rd!", "temporary": false }'
2.4 Password Policies
Cấu hình password policies cho realm tại Authentication → Policies → Password policy:
| Policy | Mô tả | Giá trị ví dụ |
|---|---|---|
| Minimum length | Độ dài tối thiểu | 8 |
| Uppercase characters | Yêu cầu chữ hoa | 1 |
| Lowercase characters | Yêu cầu chữ thường | 1 |
| Digits | Yêu cầu số | 1 |
| Special characters | Yêu cầu ký tự đặc biệt | 1 |
| Not username | Password không được trùng username | - |
| Not email | Password không được trùng email | - |
| Password history | Không dùng lại password cũ | 3 |
| Expire password | Thời gian hết hạn password (ngày) | 90 |
| Hashing algorithm | Algorithm hash password | argon2 |
| Hashing iterations | Số vòng hash | 5 (argon2) |
Cấu hình qua CLI:
bin/kcadm.sh update realms/my-company \
  -s 'passwordPolicy="length(8) and upperCase(1) and lowerCase(1) and digits(1) and specialChars(1) and notUsername and passwordHistory(3)"'
3. User Profile
User Profile là tính năng cho phép quản trị viên định nghĩa schema cho user attributes — kiểm soát những attributes nào users có, cách validate, và cách hiển thị trên giao diện.
3.1 Kích hoạt User Profile
Từ Keycloak 24+, User Profile được bật mặc định. Với phiên bản cũ hơn:
Vào Realm settings → General
Tìm User profile enabled: ON
Sau khi bật, truy cập Realm settings → User profile để cấu hình.
3.2 Định nghĩa Attribute Schema
Mỗi attribute có các cấu hình:
Name — tên attribute (lowercase, dùng cho API)
Display name — tên hiển thị trên UI (hỗ trợ i18n:
${profile.attribute.department})Permissions — ai có thể view/edit (admin, user)
Validations — các rules validate giá trị
Annotations — metadata cho UI rendering
Required — bắt buộc cho users, admins, hoặc cả hai
Multivalued — cho phép nhiều giá trị
3.3 Built-in Attributes
Keycloak có sẵn các attributes:
| Attribute | Mô tả | Mặc định |
|---|---|---|
| username | Tên đăng nhập | Required, unique |
| Địa chỉ email | Required (có thể tắt) | |
| firstName | Tên | Required |
| lastName | Họ | Required |
3.4 Tạo Custom Attribute
Ví dụ tạo attribute phone_number:
Vào Realm settings → User profile
Click Create attribute
Cấu hình:
- Name:
phone_number - Display name:
Phone Number - Attribute group: (chọn hoặc tạo mới)
- Enabled when: Always
- Required: Required for user
- Name:
3.5 Validators
Keycloak cung cấp nhiều validators để kiểm tra giá trị attribute:
| Validator | Mô tả | Cấu hình ví dụ |
|---|---|---|
| length | Giới hạn độ dài | min: 3, max: 50 |
| Kiểm tra định dạng email | - | |
| pattern | Kiểm tra regex pattern | ^\\+[0-9]{10,15}$ |
| integer | Kiểm tra số nguyên | min: 0, max: 999999 |
| double | Kiểm tra số thực | min: 0.0, max: 100.0 |
| uri | Kiểm tra URL hợp lệ | - |
| options | Giới hạn giá trị trong danh sách | ["vn","us","jp"] |
| person-name-prohibited-characters | Chặn ký tự đặc biệt trong tên | - |
| username-prohibited-characters | Chặn ký tự đặc biệt trong username | - |
| multivalued | Validate số lượng values | min: 1, max: 5 |
Ví dụ cấu hình attribute phone_number qua JSON (User Profile tab → JSON editor):
{
  "attributes": [
    {
      "name": "phone_number",
      "displayName": "Phone Number",
      "validations": {
        "length": {
          "min": 10,
          "max": 15
        },
        "pattern": {
          "pattern": "^\\+[0-9]{10,15}$",
          "error-message": "Phone number must start with + and contain 10-15 digits"
        }
      },
      "required": {
        "roles": ["user"]
      },
      "permissions": {
        "view": ["admin", "user"],
        "edit": ["admin", "user"]
      },
      "annotations": {
        "inputType": "tel",
        "inputHelperTextBefore": "Enter your phone number with country code (e.g., +84901234567)"
      }
    }
  ]
}
3.6 Annotations cho UI Rendering
Annotations cho phép tùy chỉnh cách attribute hiển thị trên registration/account page:
| Annotation | Mô tả | Giá trị |
|---|---|---|
| inputType | HTML input type | text, email, tel, number, date, select, multiselect, textarea, html5-* |
| inputHelperTextBefore | Helper text hiển thị trước input | Chuỗi text |
| inputHelperTextAfter | Helper text hiển thị sau input | Chuỗi text |
| inputOptionsFromValidation | Lấy options từ validator | Tên validation (ví dụ: "options") |
3.7 Progressive Profiling
Progressive profiling cho phép thu thập thông tin user dần dần thay vì yêu cầu tất cả khi đăng ký:
Tạo attribute với Required → Required for user: ON
Khi user đăng nhập, nếu attribute chưa có giá trị, Keycloak sẽ hiện form yêu cầu điền
Kết hợp với "Enabled when" scopes — chỉ yêu cầu attribute khi client request scope cụ thể
Ví dụ: Attribute phone_number chỉ required khi client request scope phone:
{
  "name": "phone_number",
  "required": {
    "roles": ["user"],
    "scopes": ["phone"]
  }
}
4. Groups và Sub-groups
Groups giúp tổ chức users và áp dụng roles, attributes cho nhóm users cùng lúc — thay vì gán từng user riêng lẻ.
4.1 Tạo Group qua Admin Console
Click Groups trong sidebar
Click Create group
Nhập Name:
EngineeringClick Create
4.2 Tạo Sub-group
Sub-groups kế thừa attributes và role mappings từ parent group:
Click vào group
EngineeringClick Create sub-group
Nhập name:
Backend,Frontend,DevOps
Cấu trúc groups ví dụ:
Engineering/
├── Backend/
│   ├── Java Team
│   └── Go Team
├── Frontend/
│   ├── Web Team
│   └── Mobile Team
└── DevOps/
    ├── SRE
    └── Platform
Operations/
├── HR
├── Finance
└── Legal
4.3 Tạo Group qua CLI
# Tạo top-level group bin/kcadm.sh create groups -r my-company -s name="Engineering"Lấy group ID
GROUP_ID=$(bin/kcadm.sh get groups -r my-company --fields id,name | jq -r '.[] | select(.name=="Engineering") | .id')
Tạo sub-group
bin/kcadm.sh create groups/$GROUP_ID/children -r my-company -s name="Backend" bin/kcadm.sh create groups/$GROUP_ID/children -r my-company -s name="Frontend" bin/kcadm.sh create groups/$GROUP_ID/children -r my-company -s name="DevOps"
4.4 Group Attributes
Groups có thể chứa key-value attributes — hữu ích cho metadata, cấu hình nhóm:
# Thêm attributes cho group
bin/kcadm.sh update groups/$GROUP_ID -r my-company \
  -s 'attributes={"cost_center":["CC-ENG-001"],"location":["HCM","HN"]}'
Qua Admin Console: Click vào group → tab Attributes → thêm key-value pairs.
4.5 Thêm User vào Group
# Qua Admin Console: # Users → chọn user → tab Groups → Join group → chọn groupQua CLI
USER_ID=$(bin/kcadm.sh get users -r my-company -q username=john.doe --fields id --format csv --noquotes) bin/kcadm.sh update users/$USER_ID/groups/$GROUP_ID -r my-company -s realm=my-company -s userId=$USER_ID -s groupId=$GROUP_ID -n
Qua REST API
curl -s -X PUT
"http://localhost:8080/admin/realms/my-company/users/$USER_ID/groups/$GROUP_ID"
-H "Authorization: Bearer $ACCESS_TOKEN"
-H "Content-Type: application/json"
4.6 Default Groups
Default groups tự động thêm user mới vào khi tạo tài khoản hoặc đăng ký:
Vào Groups
Chọn group cần set làm default
Hoặc vào Realm settings → User registration → Default groups
# Qua CLI
bin/kcadm.sh update realms/my-company -s 'defaultGroups=["/Engineering/Backend"]'
5. Required Actions
Required Actions là các hành động bắt buộc user phải thực hiện trước khi có thể đăng nhập thành công.
5.1 Danh sách Required Actions có sẵn
| Action | Mô tả |
|---|---|
| Update Password | Bắt buộc đổi mật khẩu |
| Verify Email | Xác thực email |
| Configure OTP | Thiết lập OTP (TOTP/HOTP) |
| Update Profile | Cập nhật thông tin cá nhân |
| Terms and Conditions | Chấp nhận điều khoản sử dụng |
| Configure WebAuthn | Đăng ký thiết bị WebAuthn |
| Update User Locale | Chọn ngôn ngữ |
| Delete Credential | Xóa credential cũ |
5.2 Gán Required Action cho User
# Qua Admin Console: # Users → chọn user → tab Details → Required user actions → chọn actionsQua CLI
bin/kcadm.sh update users/$USER_ID -r my-company
-s 'requiredActions=["UPDATE_PASSWORD","VERIFY_EMAIL","CONFIGURE_TOTP"]'Qua REST API
curl -s -X PUT
"http://localhost:8080/admin/realms/my-company/users/$USER_ID"
-H "Authorization: Bearer $ACCESS_TOKEN"
-H "Content-Type: application/json"
-d '{ "requiredActions": ["UPDATE_PASSWORD", "VERIFY_EMAIL"] }'
5.3 Default Required Actions
Cấu hình required actions mặc định cho tất cả users mới tại Authentication → Required actions:
Bật cột Set as default action cho action mong muốn
Mọi user mới sẽ tự động được gán các default actions
6. User Self-Registration
6.1 Bật Self-Registration
Vào Realm settings → Login
Bật User registration: ON
Trang đăng nhập sẽ hiển thị link "Register"
6.2 reCAPTCHA cho Registration
Để bảo vệ registration form khỏi bot, bật reCAPTCHA:
Đăng ký Google reCAPTCHA tại https://www.google.com/recaptcha
Vào Authentication → Flows → Registration
Tìm step reCAPTCHA → chuyển từ Disabled sang Required
Click gear icon → nhập Site Key và Secret Key từ Google
6.3 Tùy chỉnh Registration Form
Với User Profile, bạn kiểm soát những fields nào hiển thị trên registration form:
Attributes với Required for user: ON sẽ hiện trên form
Thứ tự hiển thị theo sort order trong User Profile configuration
Sử dụng attribute groups để nhóm các fields liên quan
7. Impersonation
Impersonation cho phép admin đăng nhập "giả" dưới tên một user khác — hữu ích cho debugging và support.
7.1 Sử dụng Impersonation
Vào Users → tìm user cần impersonate
Click menu dropdown (kebab menu) → Impersonate
Browser sẽ mở tab mới đăng nhập dưới tên user đó
Mọi actions được ghi lại trong Events với event type
IMPERSONATE
7.2 Impersonation qua REST API
curl -s -X POST \
  "http://localhost:8080/admin/realms/my-company/users/$USER_ID/impersonation" \
  -H "Authorization: Bearer $ACCESS_TOKEN" \
  -H "Content-Type: application/json"
Lưu ý bảo mật:
Chỉ users có role
impersonationtrong realmrealm-managementmới có thể impersonateMọi impersonation event được log — quan trọng cho audit
Trong production, hạn chế permission impersonation chỉ cho super admin
8. Tìm kiếm và quản lý Users nâng cao
8.1 Tìm kiếm Users
# Tìm theo username bin/kcadm.sh get users -r my-company -q username=johnTìm theo email
bin/kcadm.sh get users -r my-company -q email=[email protected]
Tìm theo attribute
bin/kcadm.sh get users -r my-company -q "q=department:Engineering"
Tìm với pagination
bin/kcadm.sh get users -r my-company --offset 0 --limit 20
REST API - tìm với nhiều tiêu chí
curl -s -X GET
"http://localhost:8080/admin/realms/my-company/users?search=john&max=20&first=0"
-H "Authorization: Bearer $ACCESS_TOKEN" | jq '.[].username'
8.2 Xóa User
# Qua CLI bin/kcadm.sh delete users/$USER_ID -r my-companyQua REST API
curl -s -X DELETE
"http://localhost:8080/admin/realms/my-company/users/$USER_ID"
-H "Authorization: Bearer $ACCESS_TOKEN"
8.3 Disable User (thay vì xóa)
# Disable user - vẫn giữ data nhưng không cho login
bin/kcadm.sh update users/$USER_ID -r my-company -s enabled=false
8.4 Bulk Operations
Ví dụ script tạo nhiều users từ CSV:
#!/bin/bash # bulk-create-users.shREALM="my-company"
while IFS=',' read -r username email firstName lastName department; do bin/kcadm.sh create users -r $REALM
-s username="$username"
-s email="$email"
-s firstName="$firstName"
-s lastName="$lastName"
-s enabled=true
-s emailVerified=true
-s "attributes={"department":["$department"]}"bin/kcadm.sh set-password -r $REALM
--username "$username"
--new-password "Welcome@123"
--temporary
echo "Created user: $username" done < users.csv
9. Personal Data Management
Keycloak hỗ trợ GDPR compliance thông qua Account Console, cho phép users:
Xem thông tin cá nhân — email, name, attributes
Chỉnh sửa thông tin — tùy thuộc permissions trong User Profile
Xem sessions — các phiên đăng nhập đang hoạt động
Quản lý devices — xem và revoke thiết bị đã đăng nhập
Xem applications — các ứng dụng đã được cấp quyền truy cập
Xóa tài khoản — tự xóa tài khoản (nếu được phép)
Account Console URL:
http://localhost:8080/realms/{realm}/accountBật tính năng xóa tài khoản:
Vào Authentication → Required actions
Enable action Delete Account
Vào Realm settings → Login → bật Delete account
10. Bài tập thực hành
Tạo User Profile cho realm
my-companyvới các custom attributes:phone_number(required, regex validator cho format quốc tế)department(required, options: Engineering, HR, Finance, Marketing)employee_id(admin-only edit, pattern: EMP-[0-9]{4})
Tạo Group hierarchy:
- Engineering → Backend, Frontend, DevOps
- Operations → HR, Finance
Tạo 5 users qua CLI, mỗi user thuộc một group khác nhau, password tạm thời
Bật self-registration với verify email và test đăng ký
Cấu hình password policy: min 10 chars, 1 uppercase, 1 digit, 1 special, history 5, expire 90 days
11. Tổng kết
Trong bài này, bạn đã học:
Tạo và quản lý Users qua Admin Console, CLI, và REST API
Thiết lập Credentials và Password Policies
Sử dụng User Profile để định nghĩa attribute schema với validators và annotations
Tạo Groups và sub-groups với hierarchy, attributes, và default groups
Cấu hình Required Actions bắt buộc cho users
Bật Self-Registration với reCAPTCHA
Sử dụng Impersonation cho debugging
Quản lý Personal Data cho GDPR compliance
Bài tiếp theo sẽ hướng dẫn về Roles, Permissions và Access Control trong Keycloak.