Kubernetes Architecture: From Overview to Details__HTMLTAG_1___
Kubernetes is designed in a distributed model with a clear master-worker architecture. To use Kubernetes effectively — and especially to debug when things go wrong — you need to understand what each component does, how they communicate with each other, and why they are designed that way. This lesson dives into the Kubernetes 1.32+ architecture with important changes in containerd 2.0, nftables mode for kube-proxy, and the cgroup v2 roadmap.
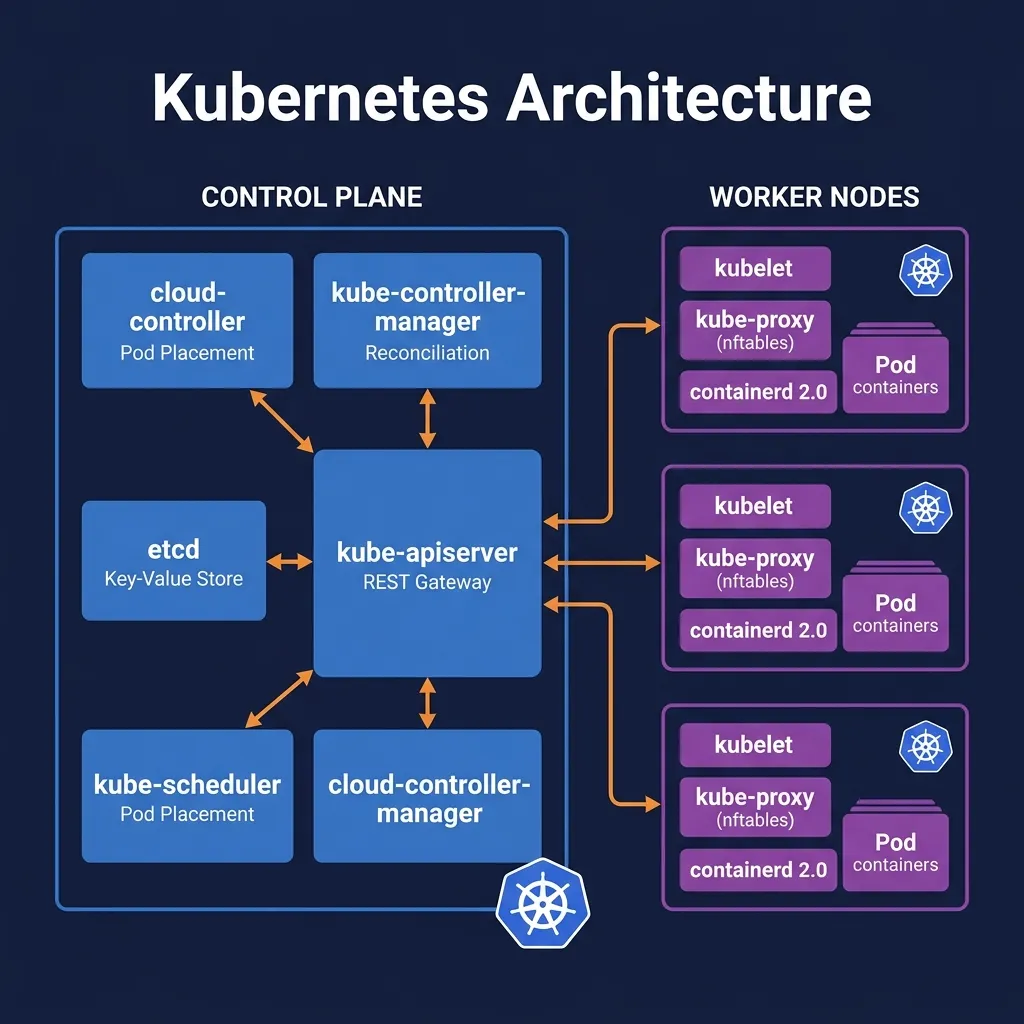
1. Architecture Overview: Control Plane and Worker Nodes
A Kubernetes cluster is divided into two groups of functional nodes:
- Control Plane (Master Node): Brain of the cluster. Responsible for global decision making — scheduling where to run Pods, detecting and responding to cluster events, maintaining desired state.
- Worker Nodes: Where the workload actually runs. Each node contains a runtime container, a kubelet to communicate with the Control Plane, and a kube-proxy to handle the network.
In a production environment, Control Plane is usually deployed on at least 3 separate nodes to ensure high availability (HA). With Kubernetes 1.32+, managed Kubernetes services like GKE, EKS, AKS completely hide the Control Plane — you only interact via API.
┌─────────────────────────────────────────────────────────────────┐
│                        CONTROL PLANE                            │
│                                                                 │
│  ┌─────────────────┐  ┌──────────┐  ┌──────────────────────┐   │
│  │  kube-apiserver │  │   etcd   │  │  kube-scheduler      │   │
│  │  (REST Gateway) │  │  (State) │  │  (Pod Placement)     │   │
│  └────────┬────────┘  └────┬─────┘  └──────────────────────┘   │
│           │               │                                     │
│  ┌────────┴───────────────┴──────────────────────────────────┐  │
│  │            kube-controller-manager                        │  │
│  │  (Replication / Endpoints / Namespace / SA controllers)   │  │
│  └───────────────────────────────────────────────────────────┘  │
│                                                                 │
│  ┌─────────────────────────────────────────────────────────┐    │
│  │          cloud-controller-manager (optional)            │    │
│  └─────────────────────────────────────────────────────────┘    │
└─────────────────────────────────────────────────────────────────┘
              │                    │                    │
     ┌────────┴──────┐    ┌────────┴──────┐    ┌───────┴───────┐
     │  WORKER NODE  │    │  WORKER NODE  │    │  WORKER NODE  │
     │               │    │               │    │               │
     │  kubelet      │    │  kubelet      │    │  kubelet      │
     │  kube-proxy   │    │  kube-proxy   │    │  kube-proxy   │
     │  containerd   │    │  containerd   │    │  containerd   │
     │  ┌─────────┐  │    │  ┌─────────┐  │    │  ┌─────────┐  │
     │  │  Pod A  │  │    │  │  Pod B  │  │    │  │  Pod C  │  │
     │  └─────────┘  │    │  └─────────┘  │    │  └─────────┘  │
     └───────────────┘    └───────────────┘    └───────────────┘
2. Control Plane Components
2.1. kube-apiserver — Single Interface
kube-apiserver is the central component of the Control Plane. All communication within the cluster — from the developer's kubectl, from the kubelet on the worker node, from the controllers — must go through the API server. No components are allowed to communicate directly with etcd, except kube-apiserver.
Main functions of kube-apiserver:
- REST API Gateway: Provides RESTful API according to the Kubernetes API Groups standard (
core/v1,apps/v1,networking.k8s.io/v1...) - Authentication: Identity authentication — supports client certificates, Bearer tokens, OIDC, webhook token authentication__HTMLTAG_45___
- Authorization: Check access rights via RBAC (Role-Based Access Control), ABAC, or Webhook mode
- Admission Control: A series of admission webhooks — validating and mutating — applied before the object is written to etcd
- API Aggregation: Allows API extension using custom API servers (metrics-server, custom CRDs)
# Kiểm tra trạng thái kube-apiserver
kubectl get componentstatuses

# Xem logs của kube-apiserver (trên cluster tự quản lý)
kubectl logs -n kube-system kube-apiserver-controlplane

# Kiểm tra version API
kubectl api-versions | head -20

# Xem tất cả API resources
kubectl api-resources --sort-by=kind
Kube-apiserver is stateless — it does not store state, only reads/writes to etcd. This allows for horizontal scaling by running multiple API server instances behind a load balancer.
2.2. etcd — Cluster Memory
etcd is a distributed key-value store using the Raft consensus algorithm. This is the only place where the entire state of the cluster is stored — every Pod, Service, ConfigMap, Secret, Node, is stored here as serialized protobuf objects.
Important features of etcd in Kubernetes:
- Strong consistency: Raft ensures every node in the etcd cluster agrees on the value — no "split brain"
- Watch API: Clients (including kube-apiserver) can watch key changes — this is the core mechanism for Kubernetes to react
- Quorum requirement: Need majority (⌊n/2⌋ + 1) active nodes for cluster to operate. With 3 etcd nodes, 1 node can be tolerated; with 5 nodes, can withstand losing 2 nodes
- etcd v3: Kubernetes 1.32 using etcd 3.5+ with performance and lease-based improvements TTL
# Xem etcd pod
kubectl get pod -n kube-system etcd-controlplane -o wide

# Backup etcd (critical trong production!)
ETCDCTL_API=3 etcdctl snapshot save /backup/etcd-snapshot.db \
  --endpoints=https://127.0.0.1:2379 \
  --cacert=/etc/kubernetes/pki/etcd/ca.crt \
  --cert=/etc/kubernetes/pki/etcd/server.crt \
  --key=/etc/kubernetes/pki/etcd/server.key

# Kiểm tra etcd health
ETCDCTL_API=3 etcdctl endpoint health \
  --endpoints=https://127.0.0.1:2379 \
  --cacert=/etc/kubernetes/pki/etcd/ca.crt \
  --cert=/etc/kubernetes/pki/etcd/server.crt \
  --key=/etc/kubernetes/pki/etcd/server.key
Important note: etcd data must be backed up regularly. Loss of etcd = loss of entire cluster state. In managed Kubernetes, the cloud provider takes care of this itself.
2.3. kube-scheduler — Pod Allocation Algorithm
kube-scheduler is responsible for deciding which Pod will run on which Node. When you create a Pod, kube-apiserver writes the Pod to etcd with status Pending (no assigned node yet). Scheduler watches these Pods and finds the matching node.
The scheduling process consists of two steps:
- Filtering (Predicates): Eliminate nodes that do not meet the requirements — not enough CPU/Memory, nodes with taints that the Pod does not tolerate, nodeSelectors that do not match, Pod affinity/anti-affinity constraints...
- Scoring (Priorities): Score the remaining nodes according to many criteria — node with the least used resources, node that already has the necessary image (reduces pull time), node that evenly distributes Pod replicas...
# Xem scheduler logs
kubectl logs -n kube-system kube-scheduler-controlplane

# Xem events liên quan đến scheduling
kubectl get events --field-selector reason=Scheduled

# Xem tại sao Pod không được schedule
kubectl describe pod  | grep -A 10 Events

# Kiểm tra resource usage trên nodes
kubectl describe nodes | grep -A 5 "Allocated resources"
Kubernetes 1.32+ supports Scheduler Profiles — allows configuring multiple scheduling profiles with different plugin sets, suitable for diverse workloads in the same cluster.
2.4. kube-controller-manager — Control Loop
kube-controller-manager runs a set of controllers — each controller is a control loop that monitors the current state of the cluster and takes action to return it to the desired state. This is the realization of reconciliation loop pattern — the heart of the Kubernetes declarative model.
The most important controllers:
- ReplicaSet Controller: Ensure the number of Pod replicas matches the spec. If the Pod dies, the controller creates a new Pod.
- Deployment Controller: Manage rolling updates for Deployments, create/delete ReplicaSets
- EndpointSlice Controller: Update EndpointSlices when Pod ready/not-ready (replaces old Endpoints controller — Endpoints API deprecated K8s 1.33)
- Namespace Controller: Clean up resources when namespace is deleted
- ServiceAccount Controller: Automatically create default ServiceAccount for each new namespace
- Node Controller: Monitor node health, taint nodes when unreachable, evict Pods after grace period
- Job Controller: Manage batch jobs, ensure completion
- CronJob Controller: Schedule Jobs according to cron expression
# Xem controller-manager logs
kubectl logs -n kube-system kube-controller-manager-controlplane

# Xem events do controllers tạo ra
kubectl get events -A --sort-by='.lastTimestamp' | tail -20
2.5. cloud-controller-manager
Separate from kube-controller-manager, cloud-controller-managercontains controllers that integrate with cloud provider APIs:
- Node Controller: Check cloud provider to confirm node exists, get metadata like cloud region, instance type
- Route Controller: Configure network routes in cloud infrastructure
- Service Controller: Create/update/delete cloud load balancers when you create Service type LoadBalancer
When using on-premises or bare metal, no need for cloud-controller-manager.
3. Worker Node Components
3.1. kubelet — Agents Per Node
kubelet is an agent that runs on each Worker Node. The kubelet's job is to receive PodSpecs and ensure the containers described therein are running and healthy.
Kubelet operates according to the mechanism:
- Watch kube-apiserver to receive PodSpecs assigned to your node
- Communicates with runtime containers via CRI (Container Runtime Interface) — a standardized gRPC interface__HTMLTAG_197___
- Report node status and Pod status back to API server
- Run liveness/readiness/startup probes
- Mount volumes, pull images, setup networking namespace__HTMLTAG_203___
- Manage resource limits through cgroup v2
# Xem trạng thái kubelet service
systemctl status kubelet

# Kubelet logs
journalctl -u kubelet -f

# Xem node conditions do kubelet báo cáo
kubectl describe node  | grep -A 20 Conditions

# Kiểm tra resource capacity và allocatable
kubectl get node  -o jsonpath='{.status.allocatable}'
3.2. kube-proxy — Network Rules Engine (nftables Mode)
kube-proxy runs on each node and is responsible for implementing Kubernetes Services networking — ensuring traffic to Service VIP is forwarded to the correct Pod backend.
History of kube-proxy modes:
- iptables mode (legacy): Use iptables rules chain. Problem: with thousands of Services, iptables rules are very large and slow to update
- IPVS mode: Layer 4 load balancer in the kernel. IPVS mode deprecated in Kubernetes 1.35 and will be removed in the future
- nftables mode (current default since K8s 1.31): Use nftables — New Linux framework to replace iptables. More efficient, easier to debug, better support on modern kernel
# Xem kube-proxy mode hiện tại
kubectl get configmap -n kube-system kube-proxy -o yaml | grep mode

# Xem kube-proxy logs
kubectl logs -n kube-system -l k8s-app=kube-proxy

# Kiểm tra nftables rules (khi dùng nftables mode)
nft list ruleset | grep -A 5 "KUBE-"

# Xem services và endpoints
kubectl get services -A
kubectl get endpointslices -ANote: Many modern clusters use CNI plugins like Cilium to completely replace kube-proxy (Cilium's kube-proxy replacement uses eBPF), giving better performance and higher observability.
3.3. Container Runtime — containerd 2.0
Container runtime is the component that actually creates and runs containers. Kubernetes communicates with the runtime via CRI (Container Runtime Interface).
Why not use Docker?
Docker Engine was removed from Kubernetes in version 1.24 (dockershim removed). Docker does not natively implement CRI — Kubernetes must use a shim layer (dockershim) for bridging. Instead:
- containerd: Official runtime, forked from Docker project, native CRI support
- CRI-O: Lighter runtime, focused on Kubernetes use case
containerd 2.0 (released 2024) brings important improvements:
- Native support for cgroup v2 (required from Kubernetes 1.36)
- Improved sandbox management with Sandbox API
- Transfer service for more efficient image management
- NRI (Node Resource Interface) plugins for extended customization
- Zstd image compression support — pulls significantly faster
- Better with Windows containers
# Kiểm tra container runtime trên node
kubectl get node  -o jsonpath='{.status.nodeInfo.containerRuntimeVersion}'

# Xem containers đang chạy qua containerd CLI
crictl ps

# Xem images
crictl images

# Kiểm tra containerd version
containerd --version

# Xem containerd logs
journalctl -u containerd -f
3.4. cgroup v2 — Modern Resource Management
cgroups (control groups) is a Linux kernel feature to limit, prioritize, and measure resource usage of process groups. Kubernetes uses cgroups to enforce CPU/memory limits on Pods and containers.
- cgroup v1: Legacy, each resource has its own hierarchy (cpu, memory, blkio...), complex and has many edge cases__HTMLTAG_287___
- cgroup v2: Unified hierarchy, a single cgroup tree, improved memory management with memory.oom.group, pressure stall information (PSI)
Important Timeline:
- Kubernetes 1.25: cgroup v2 stable
- Kubernetes 1.35: cgroup v1 deprecated
- Kubernetes 1.36: cgroup v2 required, cgroup v1 removed
- Ubuntu 22.04+, RHEL 9+, Debian 11+ uses cgroup v2 by default
# Kiểm tra cgroup version đang dùng
stat -fc %T /sys/fs/cgroup
# Kết quả: "cgroup2fs" = v2, "tmpfs" = v1

# Xem cgroup của một container cụ thể
cat /proc/$(crictl inspect  | jq '.info.pid')/cgroup

# Xem memory stats qua cgroup v2
cat /sys/fs/cgroup/kubepods.slice/memory.stat
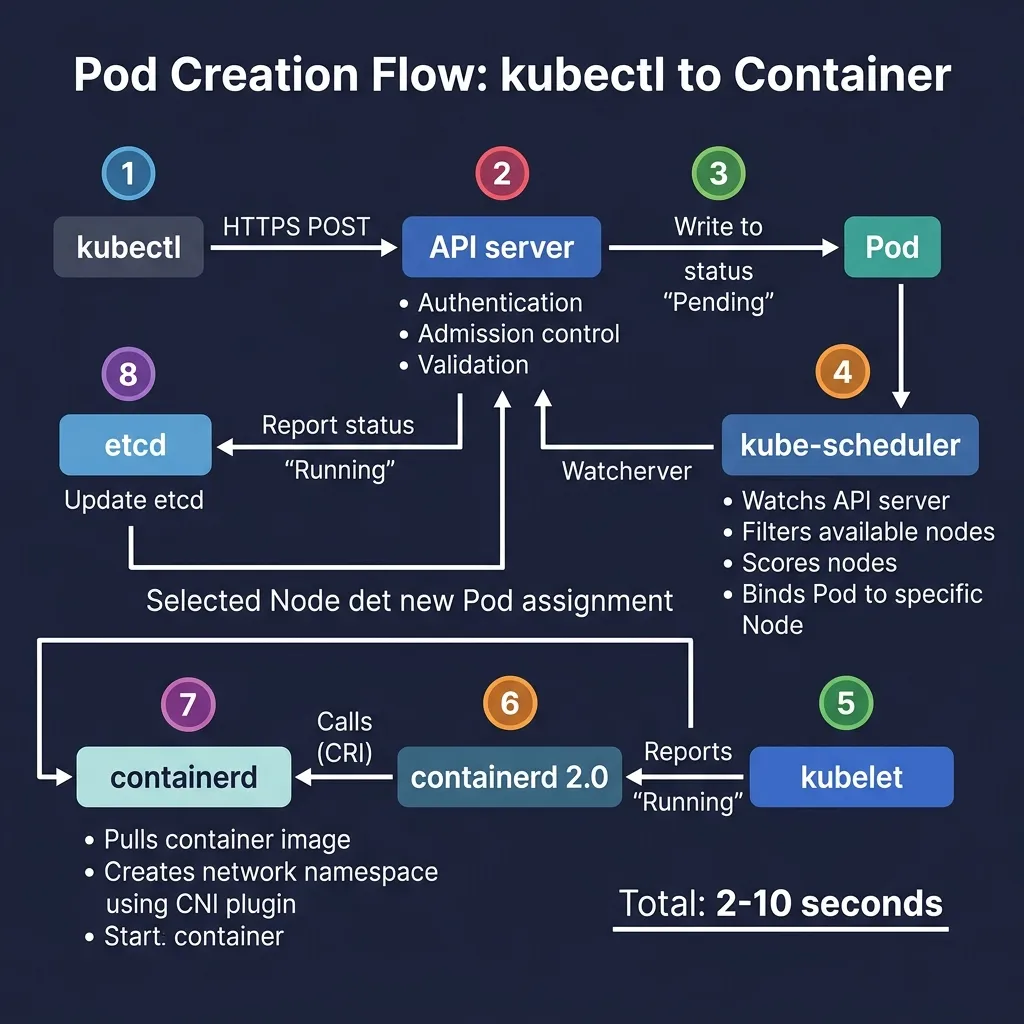
4. Pod Creation Flow: From kubectl To Container
To understand the architecture in a practical way, let's trace the flow that occurs when you run kubectl apply -f pod.yaml:
┌──────────┐    1. HTTPS POST /api/v1/pods     ┌────────────────┐
│ kubectl  │ ─────────────────────────────────► │ kube-apiserver │
└──────────┘                                    └───────┬────────┘
                                                        │
                                         2. Auth + Admission + Validate
                                                        │
                                         3. Write Pod (Pending) to etcd
                                                        │
                                                ┌───────▼────────┐
                                                │      etcd      │
                                                └───────┬────────┘
                                                        │
                                         4. API server notifies watchers
                                                        │
                          ┌─────────────────────────────┼──────────────────┐
                          │                             │                  │
                   ┌──────▼───────┐           ┌─────────▼──────────┐      │
                   │ kube-        │           │ kube-controller-   │      │
                   │ scheduler    │           │ manager            │      │
                   └──────┬───────┘           └────────────────────┘      │
                          │                                                │
               5. Filter + Score nodes                                     │
               6. Bind Pod to Node-1                                       │
               7. Write binding to etcd                                    │
                          │                                                │
                   ┌──────▼───────┐                                       │
                   │ kube-apiserver│ (notifies kubelet on Node-1)          │
                   └──────┬───────┘                                       │
                          │                                                │
                   ┌──────▼───────┐                                       │
                   │ kubelet       │ (on Node-1)                          │
                   │ (watches API) │                                       │
                   └──────┬───────┘                                       │
                          │                                                │
               8. kubelet calls containerd via CRI                         │
                          │                                                │
                   ┌──────▼───────┐                                       │
                   │  containerd  │                                       │
                   └──────┬───────┘                                       │
                          │                                                │
               9. Pull image (if not cached)                               │
               10. Create network namespace                                 │
               11. Call CNI plugin to setup networking                     │
               12. Start container process                                  │
                          │                                                │
               13. kubelet reports Pod Running to API server               │
                          │                                                │
                   ┌──────▼───────┐                                       │
                   │ kube-apiserver│ ─── 14. Update Pod status in etcd ──►│
                   └──────────────┘                                       │
This entire process, from the moment kubectl apply to the moment the container actually runs, usually takes 2-10 seconds depending on whether the image has been cached and the network speed.
5. Important Add-ons
5.1. CoreDNS — Service Discovery
CoreDNS is a DNS server running in the cluster, allowing Pods to find Services and other Pods via domain name instead of IP:
- Service
my-svcin namespacemy-nscan be resolved with:my-svc.my-ns.svc.cluster.local - Pod-to-Pod DNS:
pod-ip.namespace.pod.cluster.local - CoreDNS is a required Kubernetes add-on — clusters cannot function properly without DNS
# Xem CoreDNS pods
kubectl get pods -n kube-system -l k8s-app=kube-dns

# Kiểm tra DNS resolution từ trong Pod
kubectl run dns-test --image=busybox:1.36 --rm -it --restart=Never -- \
  nslookup kubernetes.default.svc.cluster.local

# Xem CoreDNS config
kubectl get configmap -n kube-system coredns -o yaml
5.2. CNI Plugin — Container Network Interface
CNI plugins implements pod networking — ensures each Pod has its own IP and can communicate with other Pods. Kubernetes does not have built-in networking — you must install a CNI plugin.
Popular CNIs in 2026:
- Cilium: eBPF-based, highest performance, built-in Hubble observability, kube-proxy replacement, advanced network policies. This is the default choice for many managed K8s services.
- Flannel: Simple, lightweight, suitable for learning and dev environments
- Calico: Strong network policies, using BGP for routing, popular in on-premises enterprises
- Weave Net: Simple setup, mesh networking
# Kiểm tra CNI đang dùng
ls /etc/cni/net.d/
cat /etc/cni/net.d/10-flannel.conflist

# Với Cilium
kubectl get pods -n kube-system -l k8s-app=cilium
cilium status
5.3. metrics-server — Resource Metrics
metrics-server collects CPU and memory metrics from the kubelet on each node, serving the Horizontal Pod Autoscaler (HPA) and the command kubectl top.
# Cài metrics-server
kubectl apply -f https://github.com/kubernetes-sigs/metrics-server/releases/latest/download/components.yaml

# Sau khi cài, xem resource usage
kubectl top nodes
kubectl top pods -A --sort-by=cpu
6. High Availability Control Plane
In production, Control Plane needs HA to avoid single point of failure:
- 3 or 5 control plane nodesrun kube-apiserver, kube-scheduler, kube-controller-manager
- Load balancer in front of kube-apiservers (HAProxy, cloud LB, or virtual IP with keepalived)
- etcd cluster with quorum (at least 3 nodes) — can run stacked (on same control plane nodes) or external (on separate nodes)
- kube-scheduler and kube-controller-manager use leader election — only one instance active at a time, the remaining instances standby__HTMLTAG_398___
# Kiểm tra leader election
kubectl get endpoints -n kube-system kube-scheduler -o yaml
kubectl get endpoints -n kube-system kube-controller-manager -o yaml

# Xem tất cả control plane components
kubectl get pods -n kube-system | grep -E 'apiserver|etcd|scheduler|controller'
7. Summary and Key Takeaways
Kubernetes architecture reflects important design principles:
- Separation of concerns: Each component has clear responsibilities, communicating via standard API
- Declarative model: You declare the desired state, controllers take care of reaching that state
- Single source of truth: etcd is the only place to store state, every component watches the server API
- Extensibility: CRI, CNI, CSI are interfaces that allow replacing components (runtime, network, storage)
- Resilience: HA design allows nodes to fail and the cluster still operates
In the next article, we'll put this architectural knowledge into practice by installing a Kubernetes cluster complete with containerd 2.0, cgroup v2, and the necessary tools for 2026 development.
# Quick health check của một cluster
kubectl get componentstatuses  # Deprecated nhưng vẫn hữu ích
kubectl get nodes -o wide
kubectl get pods -n kube-system
kubectl cluster-info