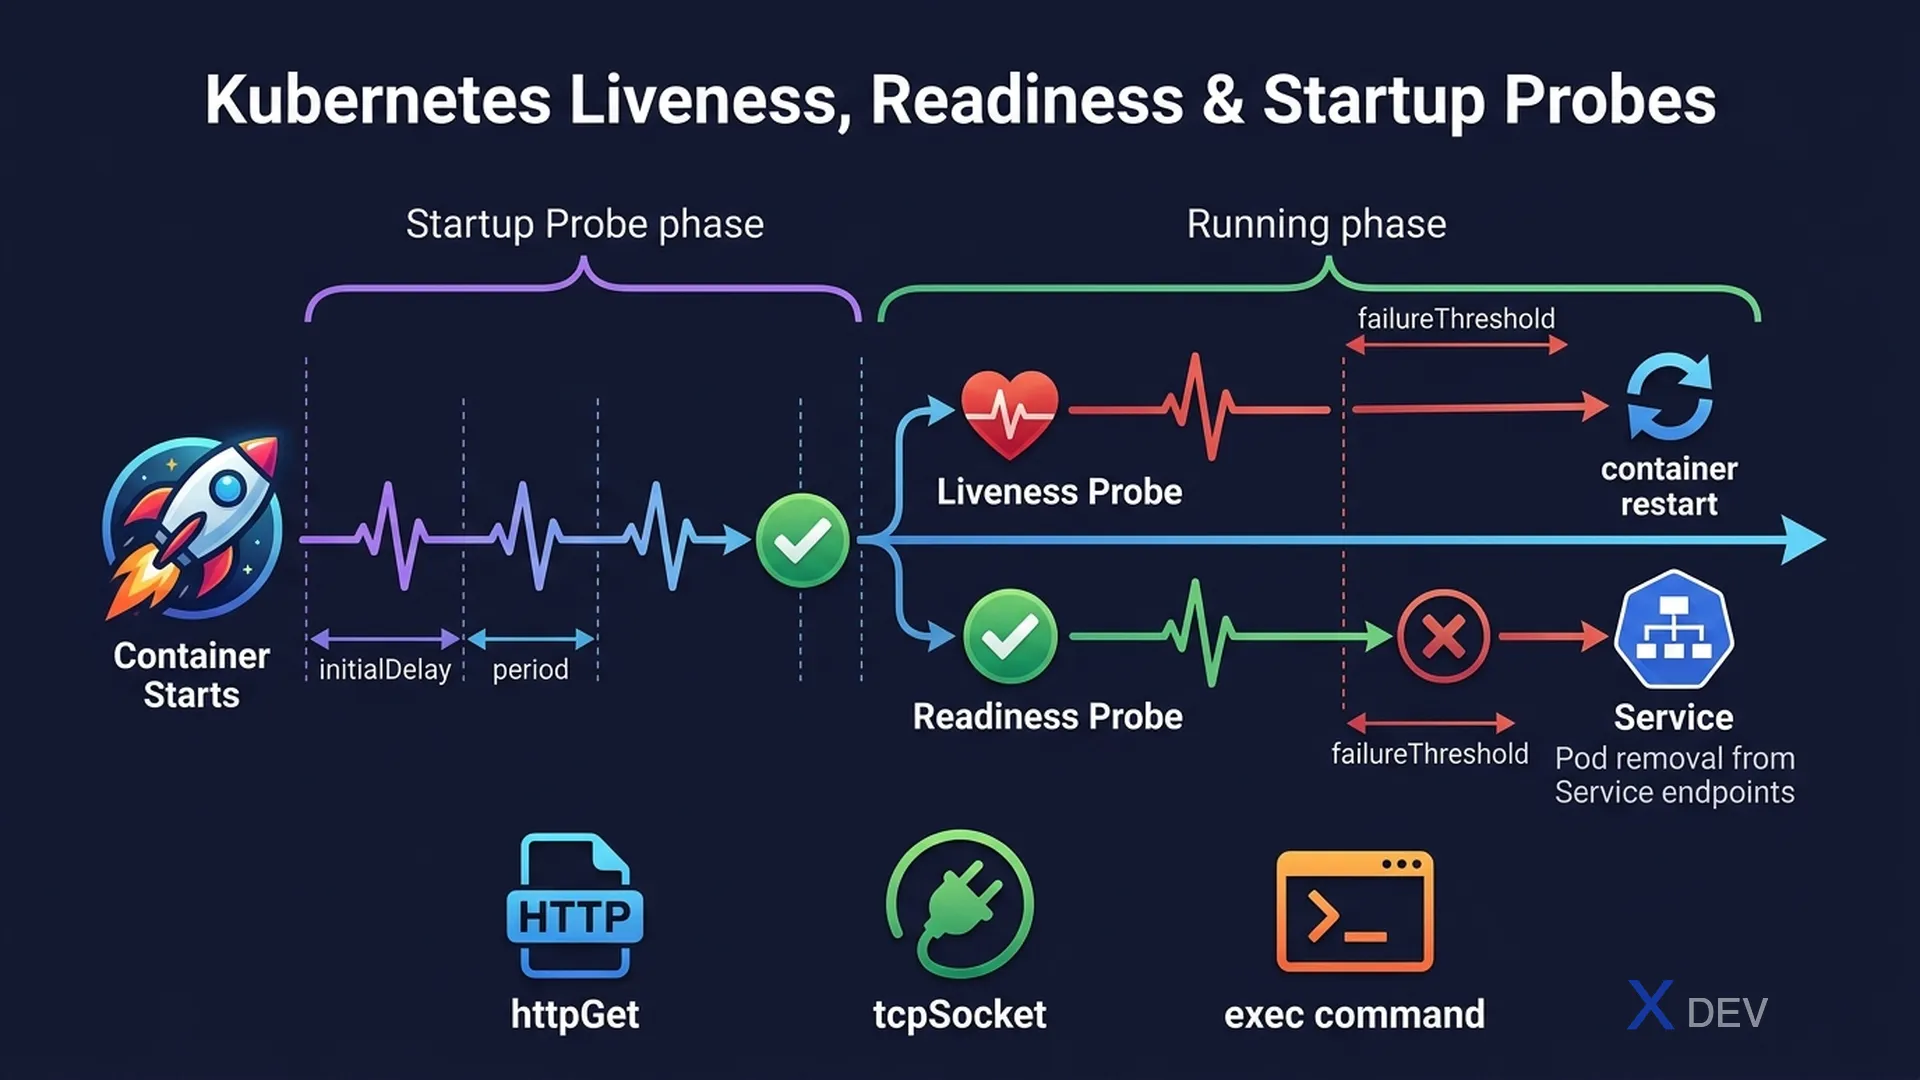
1. Ba loại Probe
| Probe | Mục đích | Khi fail? |
|---|---|---|
| Liveness | Container có còn "sống" không? | Container bị restart |
| Readiness | Container có sẵn sàng nhận traffic? | Removed from Service endpoints (không restart) |
| Startup | App đã khởi động xong chưa? | Container bị restart (dùng trước liveness check) |
Probe execution timeline:

  Container starts
       │
       ▼
  startupProbe checks (periodically)
       │ success
       ▼
  Both livenessProbe & readinessProbe run in parallel
       │                      │
       ▼ fail                 ▼ fail
  Container restart       Removed from Service
                          (pod still running)
2. Probe Methods (httpGet, tcpSocket, exec)
livenessProbe:
  httpGet:                # HTTP GET — success if status 200-399
    path: /healthz
    port: 8080
    httpHeaders:
    - name: Custom-Header
      value: Awesome
  initialDelaySeconds: 15  # Wait before first probe
  periodSeconds: 20        # How often to probe
  timeoutSeconds: 5        # Timeout per probe
  failureThreshold: 3      # Fail count before action
  successThreshold: 1      # Success count to pass

readinessProbe:
  tcpSocket:              # TCP connection — success if port open
    port: 3306
  initialDelaySeconds: 5
  periodSeconds: 10

startupProbe:
  exec:                   # Run command in container — success if exit 0
    command:
    - cat
    - /tmp/healthy
  failureThreshold: 30    # Allows 30*10s = 5 min to start
periodSeconds: 10| Field | Default | Ý nghĩa |
|---|---|---|
initialDelaySeconds | 0 | Chờ trước khi probe đầu tiên |
periodSeconds | 10 | Interval giữa các probes |
timeoutSeconds | 1 | Timeout của mỗi probe |
failureThreshold | 3 | Fail bao nhiêu lần thì action |
successThreshold | 1 | Pass bao nhiêu lần để "healthy" |
Exam tip: Startup probe dùng khi app khởi động lâu (ví dụ: legacy app cần 2 phút load). Set
failureThreshold * periodSeconds>= thời gian startup tối đa. Liveness probe không chạy cho đến khi startup probe pass.
3. Logging & kubectl logs
# Xem logs của pod
kubectl logs podname

# Follow logs (tail -f)
kubectl logs -f podname

# Previous container (nếu bị crash)
kubectl logs podname --previous

# Logs của specific container trong multi-container pod
kubectl logs podname -c container-name

# Logs với timestamp
kubectl logs podname --timestamps

# Tail N lines
kubectl logs podname --tail=100
4. Debugging Commands
# Exec vào container
kubectl exec -it podname -- /bin/bash
kubectl exec -it podname -c container-name -- sh

# Port forward để test service locally
kubectl port-forward pod/podname 8080:80
kubectl port-forward service/myservice 8080:80

# Ephemeral debug container (khi container không có shell)
kubectl debug -it podname --image=busybox --target=container-name

# Debug a node
kubectl debug node/worker-1 -it --image=ubuntu

# Copy files
kubectl cp podname:/app/logs/error.log ./error.log
kubectl cp ./config.yaml podname:/app/config.yaml
Exam tip: Khi pod không có shell (distroless image), dùng
kubectl debugvới ephemeral container. Trong CKAD exam,kubectl exec+kubectl logslà 2 commands debugging quan trọng nhất. Luôn check logs trước khi exec.
5. Common Pod States & Debug
| Pod State | Nguyên nhân thường gặp | Debug command |
|---|---|---|
CrashLoopBackOff | App crash, bad command, missing config | kubectl logs --previous |
ImagePullBackOff | Wrong image name, registry auth failure | kubectl describe pod |
Pending | Insufficient resources, unschedulable | kubectl describe pod → Events |
OOMKilled | Memory limit exceeded | kubectl describe pod → Last State |
Error | Init container failed, bad entrypoint | kubectl logs -c init-c |
6. Cheat Sheet
| Task | Command |
|---|---|
| Check pod sức khỏe | kubectl describe pod <name> |
| Xem logs crash | kubectl logs <pod> --previous |
| Shell vào container | kubectl exec -it <pod> -- sh |
| Test service connectivity | kubectl port-forward svc/<name> 8080:80 |
| Debug distroless container | kubectl debug -it <pod> --image=busybox |
7. Practice Questions
Q1: A Pod's readinessProbe fails, but the livenessProbe passes. What happens to the Pod?
- A) The Pod is restarted
- B) The Pod is deleted
- C) The Pod remains running but is removed from the Service's endpoint list ✓
- D) The Pod is marked as Failed
Explanation: Readiness probe failure does NOT restart the container. It only removes the Pod from the Service endpoints so no new traffic is routed to it. The Pod keeps running. When the readiness probe passes again, the Pod is re-added to the endpoints.
Q2: An application takes 3 minutes to start. Without a startupProbe, the livenessProbe with failureThreshold: 3 and periodSeconds: 10 would kill the container before it finishes starting. How should you configure a startupProbe to allow up to 5 minutes for startup?
- A) startupProbe with failureThreshold: 5 and periodSeconds: 60
- B) startupProbe with failureThreshold: 30 and periodSeconds: 10 ✓
- C) startupProbe with failureThreshold: 300 and periodSeconds: 1
- D) startupProbe with initialDelaySeconds: 300
Explanation: failureThreshold × periodSeconds = maximum startup time. 30 × 10s = 300s = 5 minutes. During this window, the liveness probe is disabled. Once the startup probe succeeds, both liveness and readiness probes activate.
Q3: You need to debug a running Pod that uses a distroless container image (no shell available). How do you get a shell for debugging?
- A) kubectl exec -it podname -- /bin/sh
- B) kubectl attach podname -it
- C) kubectl debug -it podname --image=busybox --target=app ✓
- D) kubectl run debug --image=busybox --attach
Explanation: kubectl debug with an ephemeral container injects a debug container (busybox) into the running Pod with access to the same process namespace. The --target flag shares the process namespace with the specified container. This works even when the main container has no shell.