Mục tiêu
Sau bài học này, bạn sẽ:
- Hiểu yêu cầu phần cứng và phần mềm cho Patroni cluster
- Cấu hình network và firewall
- Setup 3 VMs/Servers (VirtualBox/VMware/Cloud)
- Thiết lập SSH key-based authentication
- Đồng bộ thời gian với NTP/chrony
1. Yêu cầu phần cứng & phần mềm
Kiến trúc Lab
Chúng ta sẽ setup một cluster gồm 3 nodes:
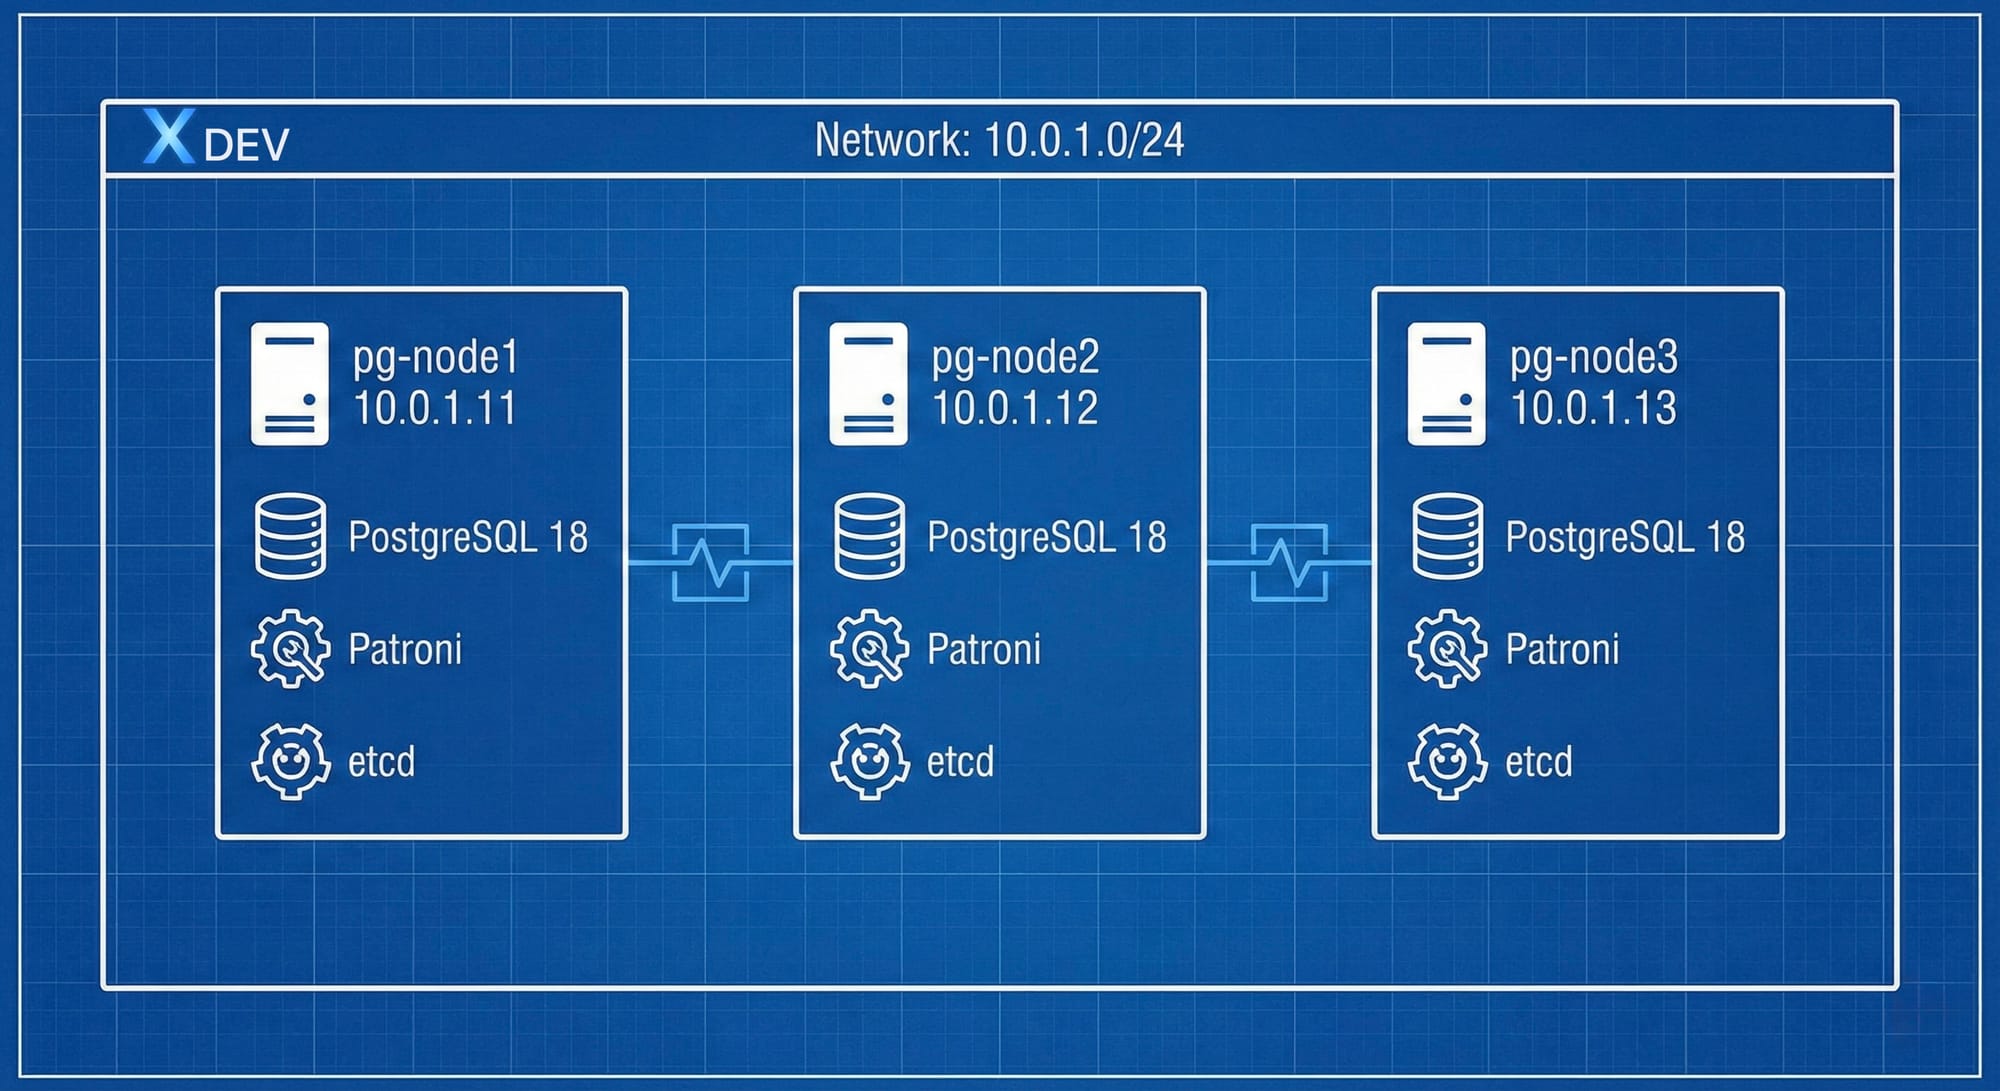
Yêu cầu phần cứng (mỗi node)
Minimum (Lab/Dev):
- CPU: 2 cores
- RAM: 4 GB
- Disk: 20 GB (OS) + 20 GB (PostgreSQL data)
- Network: 1 Gbps
Recommended (Production):
- CPU: 4-8 cores
- RAM: 8-32 GB (depends on workload)
- Disk:
- OS: 50 GB SSD
- PostgreSQL data: 100+ GB NVMe SSD
- WAL: Separate disk (optional, for performance)
- Network: 10 Gbps, redundant NICs
Storage recommendations:
/dev/sda  → OS (Ubuntu 22.04)
/dev/sdb  → PostgreSQL data (/var/lib/postgresql)
/dev/sdc  → WAL files (/var/lib/postgresql/pg_wal) [optional]
Yêu cầu phần mềm
Operating System:
- Ubuntu 22.04 LTS (recommended)
- Rocky Linux 9 / AlmaLinux 9
- Debian 12
Software Stack:
Component           Version      Purpose
─────────────────────────────────────────────────
PostgreSQL          18.x  Database
Patroni             3.x          HA orchestration
etcd                3.5.x        DCS
Python              3.9+         Patroni runtime
HAProxy (optional)  2.8+         Load balancer
PgBouncer (optional) 1.21+       Connection pooler
Network Requirements
Latency:
- Between PostgreSQL nodes: < 10ms (same datacenter)
- Between etcd nodes: < 5ms (critical!)
- Client to database: < 50ms
Bandwidth:
- Replication: Depends on write load
- etcd: Low bandwidth, but low latency critical
Ports to open:
| Service | Port | Protocol | Purpose |
|---|---|---|---|
| PostgreSQL | 5432 | TCP | Database connections |
| Patroni REST API | 8008 | TCP | Health checks, management |
| etcd client | 2379 | TCP | Client-to-etcd communication |
| etcd peer | 2380 | TCP | etcd cluster communication |
| SSH | 22 | TCP | Remote administration |
2. Cấu hình network và firewall
IP Planning
Node assignments:
Hostname    IP Address    Role
─────────────────────────────────────
pg-node1    10.0.1.11     PostgreSQL + Patroni + etcd
pg-node2    10.0.1.12     PostgreSQL + Patroni + etcd
pg-node3    10.0.1.13     PostgreSQL + Patroni + etcd
Optional components:
haproxy     10.0.1.10     Load balancer (VIP)
monitoring  10.0.1.20     Prometheus + Grafana
Hostname Configuration
On each node:
# Set hostname sudo hostnamectl set-hostname pg-node1 # Change for each nodeEdit /etc/hosts
sudo tee -a /etc/hosts << EOF 10.0.1.11 pg-node1 10.0.1.12 pg-node2 10.0.1.13 pg-node3 EOF
Verify
hostname -f ping -c 2 pg-node2 ping -c 2 pg-node3
Firewall Configuration (UFW)
On Ubuntu:
# Enable UFW sudo ufw enableAllow SSH
sudo ufw allow 22/tcp
PostgreSQL
sudo ufw allow from 10.0.1.0/24 to any port 5432
Patroni REST API
sudo ufw allow from 10.0.1.0/24 to any port 8008
etcd client port
sudo ufw allow from 10.0.1.0/24 to any port 2379
etcd peer port
sudo ufw allow from 10.0.1.0/24 to any port 2380
Verify rules
sudo ufw status numbered
Expected output:
Status: activeTo Action From -- ------ ----
[ 1] 22/tcp ALLOW IN Anywhere [ 2] 5432 ALLOW IN 10.0.1.0/24 [ 3] 8008 ALLOW IN 10.0.1.0/24 [ 4] 2379 ALLOW IN 10.0.1.0/24 [ 5] 2380 ALLOW IN 10.0.1.0/24
Firewall Configuration (firewalld)
On Rocky Linux / AlmaLinux:
# Enable firewalld sudo systemctl enable --now firewalldAdd services
sudo firewall-cmd --permanent --add-service=postgresql sudo firewall-cmd --permanent --add-port=8008/tcp sudo firewall-cmd --permanent --add-port=2379/tcp sudo firewall-cmd --permanent --add-port=2380/tcp
Allow from specific subnet
sudo firewall-cmd --permanent --add-rich-rule=' rule family="ipv4" source address="10.0.1.0/24" port protocol="tcp" port="5432" accept'
Reload
sudo firewall-cmd --reload
Verify
sudo firewall-cmd --list-all
Network Performance Testing
Test latency between nodes:
# Install tools sudo apt install -y iputils-ping netcat-openbsd iperf3Test ping latency
ping -c 10 pg-node2
Expected: < 1ms same datacenter, < 10ms same region
Test TCP connectivity
nc -zv pg-node2 5432 nc -zv pg-node2 2379
Test bandwidth (on receiver node2)
iperf3 -s
From sender node1
iperf3 -c pg-node2 -t 10
Expected: > 500 Mbps on 1Gbps network
3. Setup 3 VMs/Servers
Option 1: VirtualBox (Local Development)
Create VM template:
# Download Ubuntu 22.04 ISO wget https://releases.ubuntu.com/22.04/ubuntu-22.04.3-live-server-amd64.isoVirtualBox CLI
VBoxManage createvm --name "pg-node1" --ostype Ubuntu_64 --register
VBoxManage modifyvm "pg-node1"
--memory 4096
--cpus 2
--nic1 bridged
--bridgeadapter1 en0
--boot1 diskVBoxManage createhd --filename ~/VirtualBox\ VMs/pg-node1/pg-node1.vdi --size 40960
VBoxManage storagectl "pg-node1" --name "SATA Controller" --add sata --controller IntelAHCI VBoxManage storageattach "pg-node1" --storagectl "SATA Controller" --port 0 --device 0
--type hdd --medium ~/VirtualBox\ VMs/pg-node1/pg-node1.vdiInstall OS, then clone for other nodes
VBoxManage clonevm "pg-node1" --name "pg-node2" --register VBoxManage clonevm "pg-node1" --name "pg-node3" --register
Configure network:
# Edit /etc/netplan/00-installer-config.yaml network: ethernets: enp0s3: addresses: - 10.0.1.11/24 routes: - to: default via: 10.0.1.1 nameservers: addresses: [8.8.8.8, 8.8.4.4] version: 2Apply
sudo netplan apply
Option 2: VMware Workstation
Create VM: 1. New Virtual Machine → Custom 2. Hardware compatibility: Workstation 17.x 3. Install from: ISO image (Ubuntu 22.04) 4. Guest OS: Linux → Ubuntu 64-bit 5. VM name: pg-node1 6. Processors: 2 cores 7. Memory: 4096 MB 8. Network: Bridged or NAT with port forwarding 9. Disk: 40 GB, single file 10. Finish and install OS
Clone for other nodes:
- Right-click VM → Manage → Clone
- Create linked clone or full clone
- Change VM name and network settings
Post-Installation Steps (All Platforms)
Update system:
# Ubuntu/Debian sudo apt update && sudo apt upgrade -yRocky Linux/AlmaLinux
sudo dnf update -y
Install essential tools
sudo apt install -y
curl
wget
vim
git
net-tools
htop
iotop
sysstat
build-essential
Disable swap (recommended for databases):
# Check current swap free -hDisable swap
sudo swapoff -a
Remove from /etc/fstab
sudo sed -i '/swap/d' /etc/fstab
Verify
free -h
Set system limits:
# Edit /etc/security/limits.conf sudo tee -a /etc/security/limits.conf << EOF postgres soft nofile 65536 postgres hard nofile 65536 postgres soft nproc 8192 postgres hard nproc 8192 EOFEdit /etc/sysctl.conf
sudo tee -a /etc/sysctl.conf << EOF
PostgreSQL optimizations
vm.swappiness = 1 vm.overcommit_memory = 2 vm.dirty_background_ratio = 5 vm.dirty_ratio = 10 net.ipv4.tcp_keepalive_time = 200 net.ipv4.tcp_keepalive_intvl = 200 net.ipv4.tcp_keepalive_probes = 5 EOF
Apply
sudo sysctl -p
4. SSH key-based authentication
Generate SSH keys
On your local machine/jump server:
# Generate SSH key pair ssh-keygen -t ed25519 -C "patroni-cluster" -f ~/.ssh/patroni_clusterOutput:
~/.ssh/patroni_cluster (private key)
~/.ssh/patroni_cluster.pub (public key)
Set permissions
chmod 600 ~/.ssh/patroni_cluster chmod 644 ~/.ssh/patroni_cluster.pub
Copy keys to all nodes
# Copy to each node ssh-copy-id -i ~/.ssh/patroni_cluster.pub [email protected] ssh-copy-id -i ~/.ssh/patroni_cluster.pub [email protected] ssh-copy-id -i ~/.ssh/patroni_cluster.pub [email protected]Or manually
for node in pg-node1 pg-node2 pg-node3; do cat ~/.ssh/patroni_cluster.pub | ssh ubuntu@$node
"mkdir -p ~/.ssh && cat >> ~/.ssh/authorized_keys" done
Configure SSH client
Edit ~/.ssh/config:
cat >> ~/.ssh/config << EOF Host pg-node* User ubuntu IdentityFile ~/.ssh/patroni_cluster StrictHostKeyChecking no UserKnownHostsFile /dev/nullHost pg-node1 HostName 10.0.1.11
Host pg-node2 HostName 10.0.1.12
Host pg-node3 HostName 10.0.1.13 EOF
chmod 600 ~/.ssh/config
Test SSH connectivity
# Test password-less SSH ssh pg-node1 "hostname && date" ssh pg-node2 "hostname && date" ssh pg-node3 "hostname && date"Should connect without password prompt
Setup inter-node SSH (for postgres user)
On each node:
# As postgres user (after PostgreSQL installation) sudo -u postgres ssh-keygen -t ed25519 -N "" -f /var/lib/postgresql/.ssh/id_ed25519Copy public key to other nodes
for node in pg-node1 pg-node2 pg-node3; do sudo -u postgres ssh-copy-id -i /var/lib/postgresql/.ssh/id_ed25519.pub postgres@$node done
5. Time synchronization (NTP/chrony)
Why time sync is critical?
Importance:
- Distributed systems rely on consistent time
- etcd uses timestamps for leader election
- PostgreSQL WAL includes timestamps
- Monitoring and debugging requires accurate time
Acceptable drift: < 500ms (ideally < 100ms)
Install and configure chrony (Recommended)
Ubuntu/Debian:
# Install chrony sudo apt install -y chronyEdit /etc/chrony/chrony.conf
sudo vim /etc/chrony/chrony.conf
Configuration:
# Use public NTP servers pool ntp.ubuntu.com iburst maxsources 4 pool 0.ubuntu.pool.ntp.org iburst maxsources 1 pool 1.ubuntu.pool.ntp.org iburst maxsources 1 pool 2.ubuntu.pool.ntp.org iburst maxsources 2Or use local NTP server
server 10.0.1.1 iburst
Record the rate at which the system clock gains/losses time
driftfile /var/lib/chrony/chrony.drift
Allow NTP client access from local network
allow 10.0.1.0/24
Serve time even if not synchronized to a time source
local stratum 10
Specify directory for log files
logdir /var/log/chrony
Select which information is logged
log measurements statistics tracking
Start and enable:
# Start chrony sudo systemctl enable --now chronyCheck status
sudo systemctl status chrony
Verify time synchronization
chronyc sources -v chronyc tracking
Expected output:
MS Name/IP address         Stratum Poll Reach LastRx Last sample
^* time.cloudflare.com           3   6   377    32   +123us[ +456us] +/-   20ms
^+ ntp.ubuntu.com                2   6   377    33   -234us[ -101us] +/-   15ms
Alternative: systemd-timesyncd (Simpler)
Ubuntu/Debian:
# Install (usually pre-installed) sudo apt install -y systemd-timesyncdEdit /etc/systemd/timesyncd.conf
sudo vim /etc/systemd/timesyncd.conf
Configuration:
[Time]
NTP=ntp.ubuntu.com 0.ubuntu.pool.ntp.org 1.ubuntu.pool.ntp.org
FallbackNTP=time.cloudflare.com
Enable and verify:
# Enable sudo systemctl enable --now systemd-timesyncdCheck status
timedatectl status systemctl status systemd-timesyncd
Should show "System clock synchronized: yes"
Verify time synchronization across cluster
Create verification script:
#!/bin/bashcheck_time_sync.sh
echo "Checking time synchronization across cluster..." echo "================================================"
for node in pg-node1 pg-node2 pg-node3; do echo -n "$node: " ssh $node "date '+%Y-%m-%d %H:%M:%S.%N %Z'" done
echo "" echo "Time difference check:" time1=$(ssh pg-node1 "date +%s%N") time2=$(ssh pg-node2 "date +%s%N") time3=$(ssh pg-node3 "date +%s%N")
diff12=$(( (time1 - time2) / 1000000 )) # Convert to milliseconds diff13=$(( (time1 - time3) / 1000000 )) diff23=$(( (time2 - time3) / 1000000 ))
echo "node1 vs node2: ${diff12}ms" echo "node1 vs node3: ${diff13}ms" echo "node2 vs node3: ${diff23}ms"
if [ ${diff12#-} -lt 100 ] && [ ${diff13#-} -lt 100 ] && [ ${diff23#-} -lt 100 ]; then echo "✓ Time synchronization is good (< 100ms)" else echo "✗ WARNING: Time drift detected! Please fix NTP configuration" fi
chmod +x check_time_sync.sh
./check_time_sync.sh
6. Lab: Complete Infrastructure Setup
Lab Objectives
- Setup 3 VMs với network đúng
- Configure firewall cho tất cả required ports
- Thiết lập SSH passwordless authentication
- Đồng bộ thời gian với NTP
- Verify connectivity giữa các nodes
Lab Steps
Step 1: Verify VM specifications
# On each node ssh pg-node1 "cat /etc/os-release | grep PRETTY_NAME" ssh pg-node1 "nproc" ssh pg-node1 "free -h" ssh pg-node1 "df -h"Repeat for node2, node3
Step 2: Network connectivity test
# Create test script cat > test_connectivity.sh << 'EOF' #!/bin/bashNODES=("pg-node1" "pg-node2" "pg-node3") PORTS=(22 5432 8008 2379 2380)
for node in "${NODES[@]}"; do echo "Testing connectivity to $node..." for port in "${PORTS[@]}"; do if nc -zv -w 2 $node $port 2>&1 | grep -q succeeded; then echo " ✓ Port $port: OK" else echo " ✗ Port $port: FAILED" fi done echo "" done EOF
chmod +x test_connectivity.sh ./test_connectivity.sh
Step 3: Verify SSH authentication
# Test SSH without password
for node in pg-node1 pg-node2 pg-node3; do
echo "Testing SSH to $node..."
ssh -o BatchMode=yes $node "echo 'SSH OK'" || echo "SSH FAILED"
done
Step 4: Check time synchronization
./check_time_sync.sh
Step 5: Run comprehensive validation
cat > validate_infrastructure.sh << 'EOF' #!/bin/bashRED='\033[0;31m' GREEN='\033[0;32m' NC='\033[0m' # No Color
NODES=("pg-node1" "pg-node2" "pg-node3")
echo "=========================================" echo "Infrastructure Validation Report" echo "=========================================" echo ""
for node in "${NODES[@]}"; do echo "Checking $node..."
Hostname
hostname=$(ssh $node "hostname") echo " Hostname: $hostname"
IP Address
ip=$(ssh $node "hostname -I | awk '{print $1}'") echo " IP: $ip"
CPU/RAM
cpu=$(ssh $node "nproc") ram=$(ssh $node "free -h | grep Mem | awk '{print $2}'") echo " CPU: ${cpu} cores, RAM: ${ram}"
Disk
disk=$(ssh $node "df -h / | tail -1 | awk '{print $4}'") echo " Disk free: $disk"
Firewall
firewall=$(ssh $node "sudo ufw status | grep Status | awk '{print $2}'") echo " Firewall: $firewall"
Time sync
timesync=$(ssh $node "timedatectl | grep 'System clock synchronized' | awk '{print $4}'") if [ "$timesync" == "yes" ]; then echo -e " Time sync: ${GREEN}✓${NC}" else echo -e " Time sync: ${RED}✗${NC}" fi
echo "" done
echo "=========================================" echo "Connectivity Matrix" echo "========================================="
for src in "${NODES[@]}"; do for dst in "${NODES[@]}"; do if [ "$src" != "$dst" ]; then if ssh $src "ping -c 1 -W 1 $dst" > /dev/null 2>&1; then echo -e "$src → $dst: ${GREEN}✓${NC}" else echo -e "$src → $dst: ${RED}✗${NC}" fi fi done done
echo "" echo "=========================================" echo "Validation Complete" echo "=========================================" EOF
chmod +x validate_infrastructure.sh ./validate_infrastructure.sh
Expected output (all green checkmarks):
========================================= Infrastructure Validation ReportChecking pg-node1... Hostname: pg-node1 IP: 10.0.1.11 CPU: 2 cores, RAM: 4.0Gi Disk free: 25G Firewall: active Time sync: ✓
[... similar for node2, node3 ...]
========================================= Connectivity Matrix
pg-node1 → pg-node2: ✓ pg-node1 → pg-node3: ✓ pg-node2 → pg-node1: ✓ pg-node2 → pg-node3: ✓ pg-node3 → pg-node1: ✓ pg-node3 → pg-node2: ✓
7. Tổng kết
Checklist Infrastructure
Trước khi tiếp tục bài 5, đảm bảo:
✅ 3 VMs/Servers ready với đủ CPU, RAM, disk
✅ Networking configured: static IPs, /etc/hosts
✅ Firewall rules: ports 22, 5432, 8008, 2379, 2380
✅ SSH keys deployed, passwordless authentication works
✅ Time sync configured với chrony/timesyncd
✅ System optimized: swap disabled, kernel parameters tuned
✅ Connectivity verified: all nodes can reach each other
Troubleshooting
Problem: SSH connection refused
# Check SSH service sudo systemctl status sshdCheck firewall
sudo ufw status | grep 22
Problem: Time drift detected
# Force time sync sudo chronyc makestepOr restart chrony
sudo systemctl restart chrony
Problem: Network unreachable
# Check network interface ip addr showCheck routing
ip route show
Restart networking
sudo systemctl restart systemd-networkd
Câu hỏi ôn tập
- Tại sao cần ít nhất 3 nodes cho Patroni cluster?
- Firewall cần mở những ports nào? Tại sao?
- Tại sao time synchronization quan trọng cho distributed system?
- Swap có nên enable cho PostgreSQL server không? Tại sao?
- Latency giữa các etcd nodes nên là bao nhiêu?
Chuẩn bị cho bài tiếp theo
Bài 5 sẽ hướng dẫn cài đặt PostgreSQL:
- Cài PostgreSQL từ package repository
- Cấu hình postgresql.conf
- Thiết lập pg_hba.conf
- Lab: Cài đặt PostgreSQL trên 3 nodes