1. Giới thiệu: Từ Class Labels đến Text Prompts
Bài trước bạn đã implement Classifier-Free Guidance (CFG) với class labels (số 0–9). Nhưng Stable Diffusion không dùng class labels — nó dùng text prompts tự do. Vậy làm cách nào để chuyển từ "a photo of a cat" thành tensor mà U-Net hiểu được?
Câu trả lời nằm ở CLIP (Contrastive Language-Image Pretraining) — model cầu nối giữa ngôn ngữ và hình ảnh, được OpenAI giới thiệu năm 2021. Đây là bài cuối cùng trong phần Diffusion Models, kết hợp tất cả kiến thức bạn đã học để xây dựng full text-to-image pipeline.
Exam tip: DLI assessment S-FX-14 yêu cầu bạn kết hợp U-Net, DDPM, CFG, và text conditioning thành một pipeline hoàn chỉnh. Bài này là "tổng lực" — nếu bạn hiểu rõ từng thành phần ở Bài 3–4 và kết nối chúng ở Bài 5, bạn sẽ hoàn thành assessment nhanh hơn.
Roadmap: Class Label → Text Prompt Conditioning
════════════════════════════════════════════════

  Bài 3: U-Net backbone          → Kiến trúc denoiser
  Bài 4: DDPM + CFG              → Training & sampling với class labels
  Bài 5: CLIP + Cross-Attention  → Text-to-image pipeline ← BẠN ĐANG Ở ĐÂY
        │
        ▼
  ┌──────────────────────────────────────────────────────────┐
  │  "a sunset over mountains"                               │
  │         │                                                │
  │         ▼                                                │
  │   ┌──────────┐   ┌──────────────────┐   ┌──────────┐   │
  │   │   CLIP   │──►│  Cross-Attention  │──►│  U-Net   │   │
  │   │ Encoder  │   │  (K, V from text) │   │ Denoise  │   │
  │   └──────────┘   └──────────────────┘   └──────────┘   │
  │                                              │          │
  │                                              ▼          │
  │                                        [ 🖼️ Image ]     │
  └──────────────────────────────────────────────────────────┘
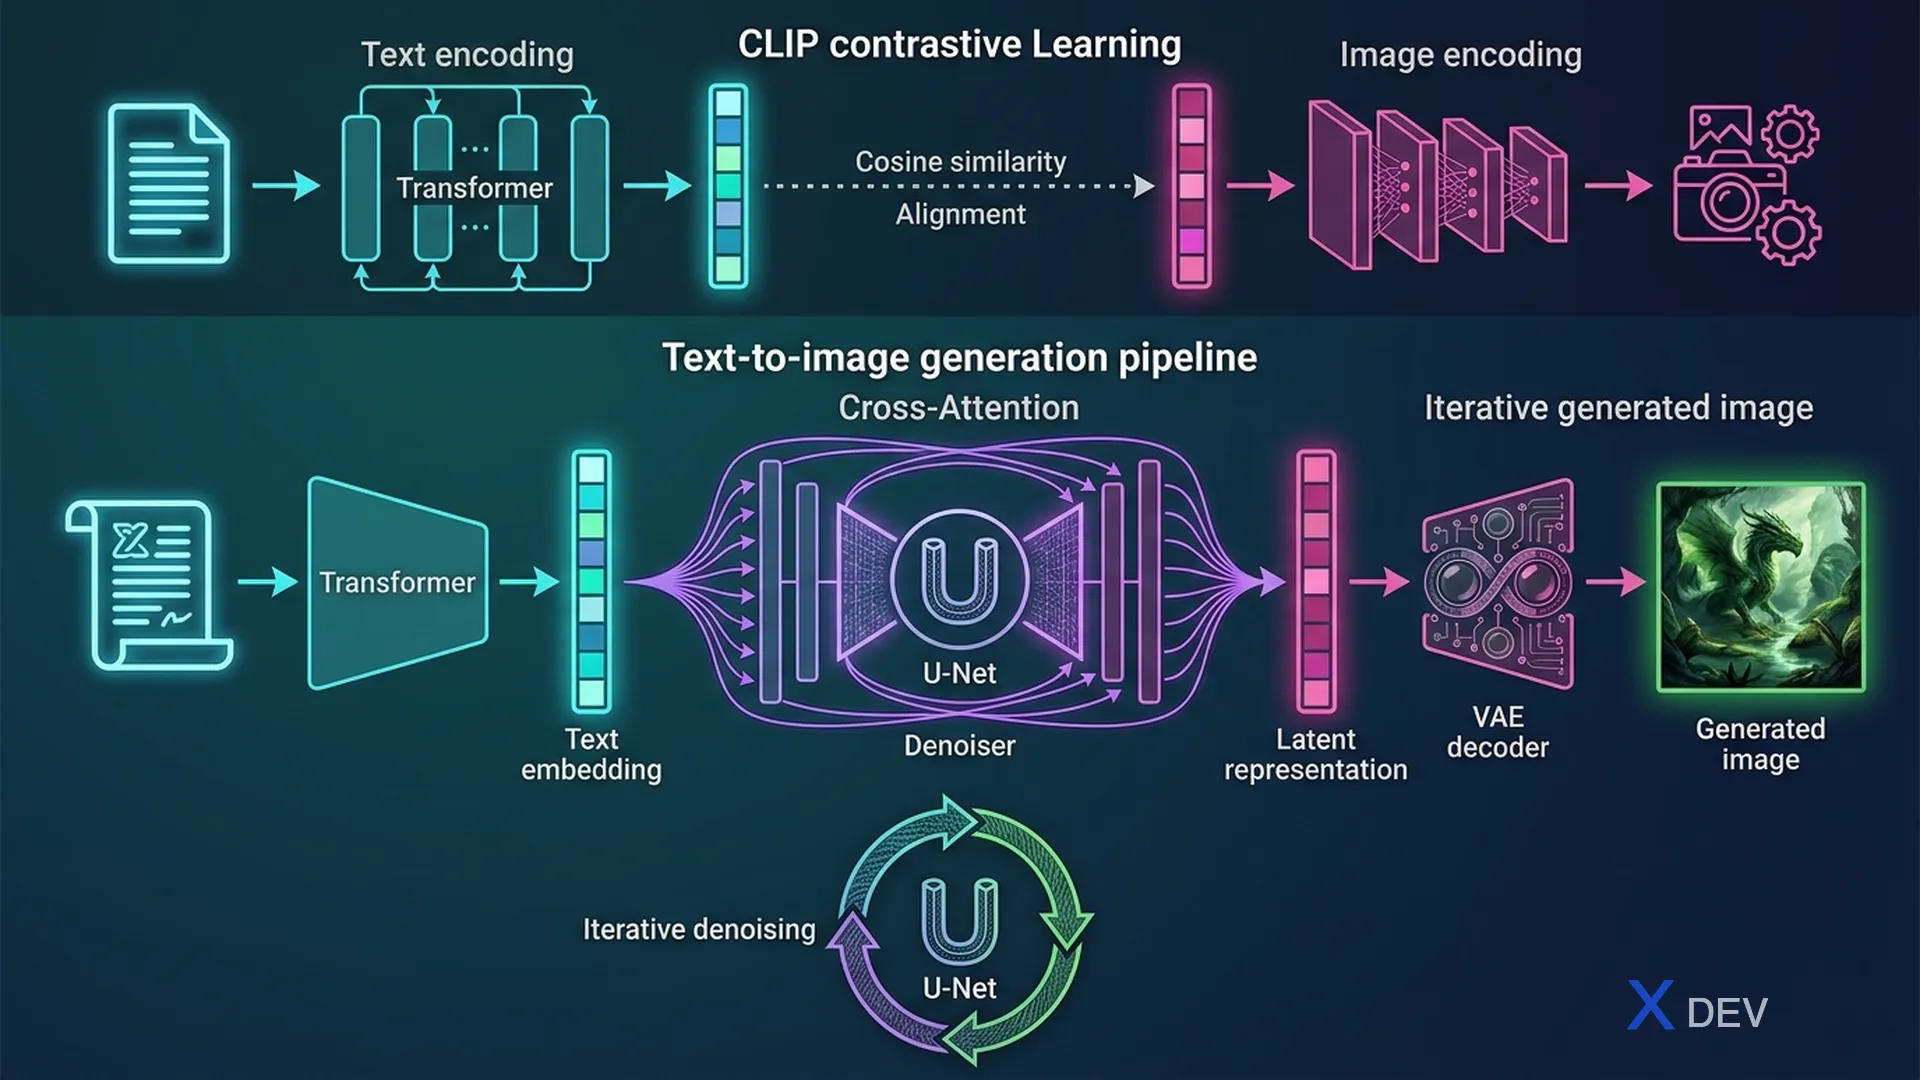
2. CLIP — Contrastive Language-Image Pretraining
2.1 Dual-Encoder Architecture
CLIP gồm hai encoder được train cùng lúc trên 400 triệu cặp (text, image) từ internet:
- Text Encoder: Transformer (giống GPT) — nhận text → output embedding vector (512-d hoặc 768-d)
- Image Encoder: ViT (Vision Transformer) hoặc ResNet — nhận image → output embedding cùng dimension
Điểm mấu chốt: cả hai encoder đều output embedding cùng không gian vector. Điều này cho phép so sánh trực tiếp text và image bằng cosine similarity.
CLIP Architecture — Dual Encoder
═════════════════════════════════

  TEXT BRANCH                          IMAGE BRANCH
  ───────────                          ────────────

  "a photo of    ┌───────────────┐     ┌─────┐   ┌───────────────┐
   a cat"    ──► │ Text Encoder  │     │ 🖼️  │──►│ Image Encoder │
                 │ (Transformer) │     │     │   │ (ViT / ResNet)│
                 └───────┬───────┘     └─────┘   └───────┬───────┘
                         │                                │
                         ▼                                ▼
                  ┌──────────────┐                 ┌──────────────┐
                  │ Text Embed.  │                 │ Image Embed. │
                  │ (768-dim)    │                 │ (768-dim)    │
                  └──────┬───────┘                 └──────┬───────┘
                         │                                │
                         └────────────┬───────────────────┘
                                      │
                                      ▼
                              ┌───────────────┐
                              │    Cosine      │
                              │  Similarity    │
                              │  sim(t, i)     │
                              └───────────────┘

  Training (400M image-text pairs):
  ┌──────────────────────────────────────────────────────┐
  │  Maximize sim(text_i, image_i)    ← matched pairs    │
  │  Minimize sim(text_i, image_j)    ← non-matched      │
  └──────────────────────────────────────────────────────┘
2.2 Contrastive Loss
CLIP sử dụng symmetric cross-entropy loss trên ma trận similarity NxN. Với batch N cặp (text, image):
Contrastive Loss — Similarity Matrix
═════════════════════════════════════

  Batch N = 4 cặp (text, image):

              image_0   image_1   image_2   image_3
            ┌─────────┬─────────┬─────────┬─────────┐
  text_0    │  0.95 ✓ │  0.12   │  0.08   │  0.03   │
            ├─────────┼─────────┼─────────┼─────────┤
  text_1    │  0.10   │  0.91 ✓ │  0.15   │  0.07   │
            ├─────────┼─────────┼─────────┼─────────┤
  text_2    │  0.05   │  0.11   │  0.93 ✓ │  0.09   │
            ├─────────┼─────────┼─────────┼─────────┤
  text_3    │  0.08   │  0.06   │  0.12   │  0.89 ✓ │
            └─────────┴─────────┴─────────┴─────────┘

  Goal: đường chéo (✓) → cao, phần còn lại → thấp

  Loss = (CE_rows + CE_cols) / 2
       = cross_entropy(logits, labels) cho cả 2 chiều

  logits = temperature * text_embeds @ image_embeds.T
  labels = [0, 1, 2, ..., N-1]   ← identity matching
Temperature parameter (learnable, khởi tạo ~0.07) kiểm soát sharpness của distribution. Temperature thấp → phân biệt rõ hơn giữa positive và negative pairs.
| Component | Chi tiết | Trong CLIP |
|---|---|---|
| Text Encoder | 12-layer Transformer, BPE tokenizer | Max 77 tokens, output CLS embedding |
| Image Encoder | ViT-B/32 hoặc ViT-L/14 | Chia image thành patches, output CLS |
| Embedding dim | 512 (ViT-B/32) hoặc 768 (ViT-L/14) | Shared space giữa text & image |
| Training data | 400M image-text pairs (WIT dataset) | Crawled từ internet |
| Loss function | Symmetric cross-entropy | InfoNCE / NT-Xent variant |
| Temperature | Learnable scalar τ | Init ≈ 0.07, learned during training |
Exam tip: CLIP không generate images — nó chỉ encode text và image vào shared space. Trong text-to-image pipeline, ta chỉ dùng Text Encoder của CLIP để tạo conditioning signal cho U-Net. Image Encoder không được sử dụng trong quá trình generation.
3. Sử dụng CLIP Encodings trong Code
3.1 Load CLIP và Encode Text
import torch
import clip
from PIL import Image

# Load pretrained CLIP model
device = "cuda" if torch.cuda.is_available() else "cpu"
model, preprocess = clip.load("ViT-B/32", device=device)

# ── Encode text ──
text_prompts = ["a photo of a cat", "a sunset over mountains", "a red car"]
text_tokens = clip.tokenize(text_prompts).to(device)  # (3, 77) — padded to 77 tokens

with torch.no_grad():
    text_embeddings = model.encode_text(text_tokens)  # (3, 512)
    text_embeddings = text_embeddings / text_embeddings.norm(dim=-1, keepdim=True)  # L2 normalize

print(f"Text embeddings shape: {text_embeddings.shape}")  # (3, 512)
3.2 Encode Image và Compute Similarity
# ── Encode images ──
images = [preprocess(Image.open(f"img_{i}.jpg")).unsqueeze(0) for i in range(3)]
image_batch = torch.cat(images).to(device)  # (3, 3, 224, 224)

with torch.no_grad():
    image_embeddings = model.encode_image(image_batch)   # (3, 512)
    image_embeddings = image_embeddings / image_embeddings.norm(dim=-1, keepdim=True)

# ── Cosine similarity ──
similarity = text_embeddings @ image_embeddings.T  # (3, 3)
print(similarity)
# tensor([[ 0.31,  0.05,  0.02],    ← "cat" matches image_0
#         [ 0.04,  0.28,  0.06],    ← "sunset" matches image_1
#         [ 0.03,  0.07,  0.26]])   ← "red car" matches image_2
Kết quả: text và image cùng nội dung có similarity cao nhất. Đây chính là sức mạnh của shared embedding space — bạn có thể search image bằng text hoặc ngược lại.
3.3 CLIP cho Diffusion Models: Sequence Embeddings
Quan trọng: Stable Diffusion không dùng CLS embedding (1 vector duy nhất). Thay vào đó nó dùng sequence of token embeddings từ CLIP Text Encoder — output trước projection layer:
CLS Embedding vs Sequence Embeddings
═════════════════════════════════════

  Text: "a photo of a cat"
  Tokenized: [SOS, "a", "photo", "of", "a", "cat", EOS, PAD, PAD, ...]

  CLIP Text Encoder output:
  ┌──────────────────────────────────────────────┐
  │  token_0 (SOS)  → [0.12, -0.34, 0.56, ...]  │
  │  token_1 ("a")  → [0.08, -0.21, 0.43, ...]  │
  │  token_2 ("photo") → [...]                   │
  │  token_3 ("of") → [...]                      │
  │  token_4 ("a")  → [...]                      │
  │  token_5 ("cat")→ [0.91, 0.15, -0.33, ...]  │  ← semantic info
  │  token_6 (EOS)  → [0.67, 0.42, -0.18, ...]  │  ← CLS (used by CLIP)
  │  ...                                         │
  │  token_76 (PAD) → [0.00, 0.00, 0.00, ...]   │
  └──────────────────────────────────────────────┘

  Stable Diffusion dùng: ALL 77 token embeddings → (1, 77, 768)
  CLIP zero-shot dùng:   CHỈ EOS token embedding → (1, 768)
| Use case | Output | Shape | Lý do |
|---|---|---|---|
| CLIP classification | CLS / EOS token | (B, 768) | So sánh similarity toàn cục |
| Stable Diffusion | Full token sequence | (B, 77, 768) | Cross-attention cần per-token info |
Exam tip: Nếu đề hỏi "What is the shape of the text conditioning input to the U-Net?", đáp án là (batch, 77, 768) — KHÔNG phải (batch, 768). Cross-attention cần sequence, không phải single vector.
4. Cross-Attention: Inject Text Embeddings vào U-Net
4.1 Cơ chế Cross-Attention
Ở Bài 3, U-Net đã dùng self-attention — Q, K, V đều từ image features. Cross-attention thay đổi nguồn K và V:
Self-Attention vs Cross-Attention
═════════════════════════════════

  SELF-ATTENTION (trong U-Net):
  ───────────────────────────────
  Q = W_q · image_features    ← từ image
  K = W_k · image_features    ← từ image
  V = W_v · image_features    ← từ image

  Attention = softmax(Q · K^T / √d) · V

  CROSS-ATTENTION (text → image):
  ────────────────────────────────
  Q = W_q · image_features    ← từ image (queries)
  K = W_k · text_embeddings   ← từ CLIP text (keys)
  V = W_v · text_embeddings   ← từ CLIP text (values)

  Attention = softmax(Q_image · K_text^T / √d) · V_text

  ┌──────────────────────────────────────────────────┐
  │  Q shape: (B, H*W, d_model)    ← spatial pixels  │
  │  K shape: (B, 77, d_model)     ← text tokens      │
  │  V shape: (B, 77, d_model)     ← text tokens      │
  │  Score:   (B, H*W, 77)        ← pixel-to-token    │
  │  Output:  (B, H*W, d_model)    ← text-aware image │
  └──────────────────────────────────────────────────┘
Mỗi pixel "nhìn vào" tất cả 77 text tokens và quyết định nên attend token nào. Pixel ở vùng mèo sẽ attend mạnh vào token "cat", pixel ở vùng bầu trời attend vào "sky".
4.2 Cross-Attention trong U-Net Block
U-Net Block với Cross-Attention
════════════════════════════════

  Input: x (image features, shape: B×C×H×W)
  Condition: text_emb (CLIP output, shape: B×77×768)
  Timestep: t_emb (timestep embedding, shape: B×d)

  ┌─────────────────────────────────────────────┐
  │                U-Net Block                   │
  │                                             │
  │  x ──► [ResBlock + t_emb] ──► x'           │
  │              │                               │
  │              ▼                               │
  │     [Self-Attention]                         │
  │       Q,K,V ← x'                            │
  │              │                               │
  │              ▼                               │
  │     [Cross-Attention]   ◄── text_emb        │
  │       Q ← x'                                │
  │       K,V ← text_emb                        │
  │              │                               │
  │              ▼                               │
  │     [FFN / MLP]                              │
  │              │                               │
  │              ▼                               │
  │           output                             │
  └─────────────────────────────────────────────┘

  Thứ tự trong mỗi block: ResBlock → Self-Attn → Cross-Attn → FFN
4.3 Implementation: CrossAttention Module
import torch
import torch.nn as nn
import torch.nn.functional as F

class CrossAttention(nn.Module):
    """
    Cross-attention: Q from image features, K/V from text embeddings.
    Used in U-Net blocks to inject text conditioning.
    """
    def __init__(self, d_model, context_dim, n_heads=8):
        super().__init__()
        self.n_heads = n_heads
        self.d_head = d_model // n_heads

        # Q from image, K/V from text
        self.to_q = nn.Linear(d_model, d_model, bias=False)
        self.to_k = nn.Linear(context_dim, d_model, bias=False)
        self.to_v = nn.Linear(context_dim, d_model, bias=False)
        self.out_proj = nn.Linear(d_model, d_model)
        self.norm = nn.LayerNorm(d_model)

    def forward(self, x, context):
        """
        Args:
            x: image features (B, H*W, d_model)
            context: text embeddings from CLIP (B, seq_len, context_dim)
        Returns:
            text-conditioned image features (B, H*W, d_model)
        """
        residual = x
        x = self.norm(x)

        B, N, _ = x.shape
        H = self.n_heads
        d = self.d_head

        # Project to Q, K, V
        Q = self.to_q(x).view(B, N, H, d).transpose(1, 2)       # (B, H, N, d)
        K = self.to_k(context).view(B, -1, H, d).transpose(1, 2) # (B, H, S, d)
        V = self.to_v(context).view(B, -1, H, d).transpose(1, 2) # (B, H, S, d)

        # Scaled dot-product attention
        scale = d ** -0.5
        attn = torch.matmul(Q, K.transpose(-2, -1)) * scale  # (B, H, N, S)
        attn = F.softmax(attn, dim=-1)

        # Weighted sum of values
        out = torch.matmul(attn, V)                     # (B, H, N, d)
        out = out.transpose(1, 2).contiguous().view(B, N, H * d)  # (B, N, d_model)
        out = self.out_proj(out)

        return out + residual  # residual connection
4.4 U-Net Block kết hợp Self-Attention + Cross-Attention
class TransformerBlock(nn.Module):
    """Single transformer block: Self-Attn → Cross-Attn → FFN"""
    def __init__(self, d_model, context_dim, n_heads=8):
        super().__init__()
        self.self_attn = nn.MultiheadAttention(d_model, n_heads, batch_first=True)
        self.self_attn_norm = nn.LayerNorm(d_model)

        self.cross_attn = CrossAttention(d_model, context_dim, n_heads)

        self.ffn = nn.Sequential(
            nn.LayerNorm(d_model),
            nn.Linear(d_model, d_model * 4),
            nn.GELU(),
            nn.Linear(d_model * 4, d_model),
        )

    def forward(self, x, context):
        # Self-attention
        norm_x = self.self_attn_norm(x)
        attn_out, _ = self.self_attn(norm_x, norm_x, norm_x)
        x = x + attn_out

        # Cross-attention (inject text)
        x = self.cross_attn(x, context)

        # Feed-forward
        x = x + self.ffn(x)
        return x
Exam tip: Sai lầm phổ biến trong assessment: đặt K, V từ image thay vì từ text. Nếu cross-attention lấy K, V từ image features → text prompt sẽ không có tác dụng → output giống unconditional. Debug tip: kiểm tra
self.to_kvàself.to_vcó nhận context (text) hay x (image).
5. Full Text-to-Image Pipeline
5.1 Overview: Kết hợp tất cả Components
Full Text-to-Image Pipeline
════════════════════════════

  Input: "a golden retriever playing in snow"

  ┌──────────────────────────────────────────────────────────────┐
  │                                                              │
  │  Step 1: TEXT ENCODING                                       │
  │  ─────────────────────                                       │
  │  prompt ──► CLIP Tokenizer ──► CLIP Text Encoder             │
  │                                      │                       │
  │                               text_emb (1, 77, 768)         │
  │                                      │                       │
  │  Step 2: NOISE INITIALIZATION        │                       │
  │  ────────────────────────────        │                       │
  │  x_T ~ N(0, I)  (pure noise)        │                       │
  │       shape: (1, C, H, W)           │                       │
  │              │                        │                       │
  │  Step 3: REVERSE DIFFUSION LOOP     │                       │
  │  ───────────────────────────────     │                       │
  │  for t = T, T-1, ..., 1:            │                       │
  │    │                                  │                       │
  │    ├─► ε̂_uncond = UNet(x_t, t, ∅)   │  ← unconditional     │
  │    ├─► ε̂_cond = UNet(x_t, t, text_emb) ← conditional       │
  │    │                                                         │
  │    ├─► ε̂ = ε̂_uncond + w·(ε̂_cond − ε̂_uncond)   ← CFG      │
  │    │                                                         │
  │    └─► x_{t-1} = denoise_step(x_t, ε̂, t)                   │
  │              │                                               │
  │  Step 4: OUTPUT                                              │
  │  ──────────────                                              │
  │  x_0 = final denoised image                                 │
  │                                                              │
  └──────────────────────────────────────────────────────────────┘
5.2 Implementation: Text-to-Image Sampling
@torch.no_grad()
def text_to_image_sample(
    unet, clip_model, prompt, schedule,
    guidance_scale=7.5, image_size=64, channels=3,
    device='cuda'
):
    """
    Complete text-to-image sampling pipeline.
    Combines CLIP encoding + CFG + DDPM reverse diffusion.
    """
    T = len(schedule['betas'])
    betas = schedule['betas'].to(device)
    alphas = schedule['alphas'].to(device)
    alpha_bar = schedule['alpha_bar'].to(device)

    # ── Step 1: Encode text prompt ──
    text_tokens = clip.tokenize([prompt]).to(device)           # (1, 77)
    text_emb = clip_model.encode_text_sequence(text_tokens)    # (1, 77, 768)

    # Null embedding for unconditional path (CFG)
    null_tokens = clip.tokenize([""]).to(device)
    null_emb = clip_model.encode_text_sequence(null_tokens)    # (1, 77, 768)

    # ── Step 2: Start from pure noise ──
    x_t = torch.randn(1, channels, image_size, image_size, device=device)

    # ── Step 3: Reverse diffusion with CFG ──
    for t in reversed(range(T)):
        t_batch = torch.tensor([t], device=device)

        # Conditional & unconditional predictions
        noise_cond = unet(x_t, t_batch, context=text_emb)     # ε̂_cond
        noise_uncond = unet(x_t, t_batch, context=null_emb)   # ε̂_uncond

        # Classifier-Free Guidance
        noise_pred = noise_uncond + guidance_scale * (noise_cond - noise_uncond)

        # DDPM denoise step
        alpha_t = alphas[t]
        alpha_bar_t = alpha_bar[t]
        beta_t = betas[t]

        # Predicted x_0
        x_0_pred = (x_t - (1 - alpha_bar_t).sqrt() * noise_pred) / alpha_bar_t.sqrt()
        x_0_pred = x_0_pred.clamp(-1, 1)

        if t > 0:
            alpha_bar_prev = alpha_bar[t - 1]
            # Posterior mean
            coeff1 = beta_t * alpha_bar_prev.sqrt() / (1 - alpha_bar_t)
            coeff2 = (1 - alpha_bar_prev) * alpha_t.sqrt() / (1 - alpha_bar_t)
            mean = coeff1 * x_0_pred + coeff2 * x_t

            # Posterior variance
            sigma = (beta_t * (1 - alpha_bar_prev) / (1 - alpha_bar_t)).sqrt()
            z = torch.randn_like(x_t)
            x_t = mean + sigma * z
        else:
            x_t = x_0_pred  # Final step: no noise

    return x_t  # Generated image (1, C, H, W)
5.3 Pipeline Components Summary
| Component | Vai trò | Input → Output | Trainable? |
|---|---|---|---|
| CLIP Text Encoder | Encode text → embeddings | str → (B, 77, 768) | Frozen (pretrained) |
| U-Net (with Cross-Attn) | Predict noise ε̂ | (x_t, t, text_emb) → ε̂ | Yes — main training target |
| Noise Schedule | Define β_t, α_t, ᾱ_t | t → schedule values | No (fixed) |
| CFG | Combine cond/uncond | (ε̂_cond, ε̂_uncond, w) → ε̂ | No (inference only) |
| DDPM Sampler | Denoise step-by-step | (x_t, ε̂, t) → x_{t-1} | No (fixed formula) |
Exam tip: Trong assessment, bạn sẽ nhận code skeleton có sẵn CLIP encoder và schedule. Nhiệm vụ của bạn là implement phần U-Net forward pass (có cross-attention) và sampling loop (có CFG). Đừng cố viết lại CLIP — nó đã được cung cấp.
6. Latent Diffusion — Stable Diffusion Overview
6.1 Vấn đề của Pixel-Space Diffusion
DDPM gốc thực hiện diffusion trực tiếp trên pixel space. Với ảnh 256×256 RGB, mỗi diffusion step xử lý 196,608 dimensions. Điều này rất chậm và tốn bộ nhớ.
Latent Diffusion Model (LDM) — nền tảng của Stable Diffusion — giải quyết vấn đề này bằng cách thực hiện diffusion trong latent space nhỏ hơn nhiều.
Pixel Space vs Latent Space Diffusion
══════════════════════════════════════

  PIXEL SPACE (DDPM gốc):
  ────────────────────────
  Image: 256 × 256 × 3 = 196,608 dims
  U-Net phải xử lý tensor RẤT lớn
  ✗ Chậm  ✗ Tốn VRAM  ✗ 1000 steps

  LATENT SPACE (Stable Diffusion):
  ─────────────────────────────────
  Image ──► VAE Encoder ──► Latent: 32 × 32 × 4 = 4,096 dims
                                          │
                              48× NHỎ HƠN │
                                          ▼
                              Diffusion trong latent space
                                          │
                                          ▼
                            Latent ──► VAE Decoder ──► Image

  ┌───────────────────────────────────────────────────────┐
  │  Stable Diffusion Architecture:                       │
  │                                                       │
  │  "a golden retriever"                                 │
  │         │                                             │
  │         ▼                                             │
  │  ┌──────────┐                                         │
  │  │   CLIP   │──── text_emb (1, 77, 768)              │
  │  │ Encoder  │         │                               │
  │  └──────────┘         │                               │
  │                       ▼                               │
  │  z_T (noise) ──► U-Net (latent) ──► z_0 (latent)    │
  │  (1,4,32,32)    + cross-attn      (1,4,32,32)       │
  │                                        │              │
  │                                        ▼              │
  │                                 ┌──────────┐          │
  │                                 │   VAE    │          │
  │                                 │ Decoder  │          │
  │                                 └────┬─────┘          │
  │                                      │                │
  │                                      ▼                │
  │                               Image (1,3,256,256)     │
  └───────────────────────────────────────────────────────┘
6.2 VAE: Encoder & Decoder
| Component | Pixel Space | Latent Space | Compression |
|---|---|---|---|
| Image size | 256 × 256 × 3 | 32 × 32 × 4 | 48× fewer dims |
| 512 × 512 × 3 | 786,432 dims | 64 × 64 × 4 = 16,384 | 48× fewer dims |
| U-Net input | Full resolution pixels | Compressed latents | Much faster |
| Training cost | Rất cao (nhiều GPU-days) | Thấp hơn nhiều | Feasible on 1 GPU |
# Latent Diffusion — sử dụng VAE + U-Net trong latent space
from diffusers import AutoencoderKL

# Load pretrained VAE
vae = AutoencoderKL.from_pretrained("stabilityai/sd-vae-ft-mse")
vae = vae.to(device).eval()

# ── Encode image → latent ──
with torch.no_grad():
    # image: (B, 3, 256, 256), normalized to [-1, 1]
    latent = vae.encode(image).latent_dist.sample()  # (B, 4, 32, 32)
    latent = latent * 0.18215  # scaling factor (Stable Diffusion convention)

# ── Diffusion happens in latent space ──
# x_T = torch.randn(1, 4, 32, 32)  ← noise in latent space
# ... reverse diffusion loop on latents ...

# ── Decode latent → image ──
with torch.no_grad():
    latent_decoded = latent / 0.18215
    image_out = vae.decode(latent_decoded).sample  # (B, 3, 256, 256)
    image_out = (image_out + 1) / 2  # [-1,1] → [0,1]
6.3 DDIM Scheduler: Fewer Steps
DDPM cần 1000 steps cho mỗi image. DDIM (Denoising Diffusion Implicit Models) cho phép deterministic sampling chỉ với 20–50 steps bằng cách skip timesteps:
| Scheduler | Steps | Stochastic? | Quality | Tốc độ |
|---|---|---|---|---|
| DDPM | 1000 | Yes (random z mỗi step) | Tốt | Rất chậm |
| DDIM | 20–50 | No (deterministic) | Tương đương | 20–50× nhanh hơn |
| Euler | 20–30 | Optional | Tốt | Nhanh |
| DPM-Solver | 10–25 | Optional | Rất tốt | Nhanh nhất |
DDPM (1000 steps) vs DDIM (50 steps)
═════════════════════════════════════

  DDPM:   x_1000 → x_999 → x_998 → ... → x_1 → x_0
          └──────────── 1000 U-Net calls ────────────┘

  DDIM:   x_1000 → x_980 → x_960 → ... → x_20 → x_0
          └──────────── 50 U-Net calls ──────────────┘
          (skip 20 steps mỗi lần)

  DDIM key insight: non-Markovian — x_{t-k} phụ thuộc x_t & x_0 (predicted)
  → Không cần đi qua từng step trung gian
  → Same quality, 20× faster
Exam tip: Nếu đề hỏi "Why does Stable Diffusion use 50 steps while DDPM uses 1000?", đáp án liên quan đến DDIM scheduler và latent space. Hai yếu tố cùng đóng góp: DDIM giảm số steps, latent space giảm kích thước mỗi step.
7. Cheat Sheet — Part 2 Tổng hợp
| Concept | Key Formula / Detail | Exam Focus |
|---|---|---|
| CLIP Text Encoder | text → (B, 77, 768) embeddings | Shape, frozen vs trainable |
| Contrastive Loss | CE trên similarity matrix NxN | Matched pairs ↑, non-matched ↓ |
| Cross-Attention Q | Q = W_q · image_features | Q từ image, NOT text |
| Cross-Attention K, V | K = W_k · text_emb, V = W_v · text_emb | K, V từ text, NOT image |
| Block order trong U-Net | ResBlock → Self-Attn → Cross-Attn → FFN | Coding order matters |
| CFG formula | ε̂ = ε̂_uncond + w·(ε̂_cond − ε̂_uncond) | w = 7.5 default, 2 forward passes |
| Latent space (SD) | 256×256×3 → 32×32×4 via VAE | 48× compression, 4-channel latent |
| DDIM vs DDPM | 50 vs 1000 steps | Non-Markovian, deterministic |
| VAE scaling factor | 0.18215 | Multiply after encode, divide before decode |
| Pipeline order | Text → CLIP → U-Net(+CFG) → VAE Decode → Image | End-to-end flow |
8. Assessment Prep — DLI S-FX-14 Final Assessment
8.1 Assessment Overview
DLI assessment S-FX-14 yêu cầu bạn hoàn thành coding tasks trong JupyterLab environment. Bạn sẽ nhận code skeleton với # TODO markers và phải implement các phần còn thiếu.
| Section | Nội dung | Tỷ trọng (ước tính) | Thời gian gợi ý |
|---|---|---|---|
| U-Net architecture | Implement ResBlock, Attention, CrossAttention | ~30% | 25 phút |
| DDPM Training | Forward diffusion, training loop, loss | ~25% | 20 phút |
| Text conditioning | CLIP integration, cross-attention wiring | ~25% | 20 phút |
| Sampling pipeline | Reverse diffusion + CFG sampling | ~20% | 15 phút |
8.2 Common Pitfalls & Fixes
| Pitfall | Triệu chứng | Fix |
|---|---|---|
| Cross-attn K/V from image | Text prompt không ảnh hưởng output | Đảm bảo K, V nhận context (text), Q nhận x (image) |
| Quên L2 normalize CLIP | Similarity values lệch range | Thêm / embed.norm(dim=-1, keepdim=True) |
| CFG guidance_scale = 1.0 | Ảnh chất lượng kém, không theo prompt | Dùng w = 7.5 hoặc theo đề yêu cầu |
| Sai shape khi reshape attention | RuntimeError: shape mismatch | Check (B, H, N, d) → (B, N, H*d) ordering |
Quên .no_grad() khi sampling | Out of memory | Wrap sampling loop trong torch.no_grad() |
| VAE scaling factor sai | Image output bị washed out hoặc saturated | Encode: × 0.18215, Decode: ÷ 0.18215 |
| Timestep embedding sai dim | Size mismatch trong ResBlock | Verify t_emb dim matches channel dim |
8.3 Assessment Strategy
- Đọc toàn bộ notebook trước (5 phút) — hiểu flow, xác định TODO blocks
- Implement theo thứ tự: U-Net blocks → forward diffusion → training loop → sampling
- Test từng phần: chạy cell sau mỗi TODO để confirm shape/output đúng
- Debug shape errors: thêm
print(tensor.shape)tạm thời - Không viết lại code đã cho — chỉ fill TODO, giữ nguyên phần khác
Exam tip: Assessment cho phép bạn chạy code nhiều lần. Hãy test incrementally: implement 1 TODO → chạy cell → verify → tiếp TODO tiếp theo. Đừng cố implement hết rồi mới chạy — sẽ rất khó debug nếu có nhiều lỗi cùng lúc.
9. Practice Questions — Coding Exercises
Các câu hỏi dưới đây mô phỏng dạng bài trong DLI assessment. Hãy cố gắng tự giải trước khi xem đáp án.
Q1: Implement CrossAttention module
Complete the CrossAttention module. Q comes from image features, K and V come from text embeddings. Use multi-head attention with residual connection.
class CrossAttention(nn.Module):
    def __init__(self, d_model=256, context_dim=768, n_heads=8):
        super().__init__()
        self.n_heads = n_heads
        self.d_head = d_model // n_heads
        # TODO: Define to_q, to_k, to_v, out_proj, and norm
        pass

    def forward(self, x, context):
        """
        x: (B, N, d_model) - image features
        context: (B, S, context_dim) - text embeddings
        Returns: (B, N, d_model)
        """
        # TODO: Implement cross-attention
        pass
Xem đáp án Q1
class CrossAttention(nn.Module):
    def __init__(self, d_model=256, context_dim=768, n_heads=8):
        super().__init__()
        self.n_heads = n_heads
        self.d_head = d_model // n_heads
        self.to_q = nn.Linear(d_model, d_model, bias=False)
        self.to_k = nn.Linear(context_dim, d_model, bias=False)
        self.to_v = nn.Linear(context_dim, d_model, bias=False)
        self.out_proj = nn.Linear(d_model, d_model)
        self.norm = nn.LayerNorm(d_model)

    def forward(self, x, context):
        residual = x
        x = self.norm(x)
        B, N, _ = x.shape
        H, d = self.n_heads, self.d_head

        Q = self.to_q(x).view(B, N, H, d).transpose(1, 2)         # (B, H, N, d)
        K = self.to_k(context).view(B, -1, H, d).transpose(1, 2)   # (B, H, S, d)
        V = self.to_v(context).view(B, -1, H, d).transpose(1, 2)   # (B, H, S, d)

        scale = d ** -0.5
        attn = torch.matmul(Q, K.transpose(-2, -1)) * scale
        attn = F.softmax(attn, dim=-1)

        out = torch.matmul(attn, V)
        out = out.transpose(1, 2).contiguous().view(B, N, H * d)
        out = self.out_proj(out)
        return out + residual
Key point: to_q nhận x (image), to_k và to_v nhận context (text). Đây là điểm khác biệt duy nhất so với self-attention.
Q2: Build full text-to-image sampling pipeline
Given a trained U-Net with cross-attention, CLIP text encoder, and DDPM schedule, implement the complete sampling function with Classifier-Free Guidance.
@torch.no_grad()
def sample_text_to_image(unet, clip_encoder, prompt, schedule,
                          guidance_scale=7.5, H=64, W=64, C=3,
                          device='cuda'):
    """
    Generate image from text prompt.
    Args:
        unet: U-Net with cross-attention (takes x_t, t, context)
        clip_encoder: encodes text → (1, 77, 768)
        prompt: string, e.g. "a cat sitting on a chair"
        schedule: dict with 'betas', 'alphas', 'alpha_bar'
        guidance_scale: CFG weight (w)
    Returns: generated image tensor (1, C, H, W)
    """
    # TODO: Implement full pipeline
    # 1. Encode prompt and null prompt with CLIP
    # 2. Initialize x_T as random noise
    # 3. Reverse diffusion loop with CFG
    # 4. Return x_0
    pass
Xem đáp án Q2
@torch.no_grad()
def sample_text_to_image(unet, clip_encoder, prompt, schedule,
                          guidance_scale=7.5, H=64, W=64, C=3,
                          device='cuda'):
    T = len(schedule['betas'])
    betas = schedule['betas'].to(device)
    alphas = schedule['alphas'].to(device)
    alpha_bar = schedule['alpha_bar'].to(device)

    # 1. Encode text
    text_emb = clip_encoder.encode(prompt)       # (1, 77, 768)
    null_emb = clip_encoder.encode("")            # (1, 77, 768)

    # 2. Initialize noise
    x_t = torch.randn(1, C, H, W, device=device)

    # 3. Reverse diffusion
    for t in reversed(range(T)):
        t_tensor = torch.tensor([t], device=device)

        # CFG: two forward passes
        eps_cond = unet(x_t, t_tensor, context=text_emb)
        eps_uncond = unet(x_t, t_tensor, context=null_emb)
        eps = eps_uncond + guidance_scale * (eps_cond - eps_uncond)

        # DDPM reverse step
        ab_t = alpha_bar[t]
        a_t = alphas[t]
        b_t = betas[t]

        x0_pred = (x_t - (1 - ab_t).sqrt() * eps) / ab_t.sqrt()
        x0_pred = x0_pred.clamp(-1, 1)

        if t > 0:
            ab_prev = alpha_bar[t - 1]
            c1 = b_t * ab_prev.sqrt() / (1 - ab_t)
            c2 = (1 - ab_prev) * a_t.sqrt() / (1 - ab_t)
            mean = c1 * x0_pred + c2 * x_t
            sigma = (b_t * (1 - ab_prev) / (1 - ab_t)).sqrt()
            x_t = mean + sigma * torch.randn_like(x_t)
        else:
            x_t = x0_pred

    return x_t
Key points: (1) Null embedding cho CFG unconditional path, (2) hai lần forward qua U-Net mỗi step, (3) clamp x0_pred để tránh numerical instability, (4) t=0 không thêm noise.
Q3: Explain why Latent Diffusion uses ~50 steps while DDPM needs 1000
Write a short function that demonstrates the difference between DDPM and DDIM step selection, and explain in comments why DDIM can skip steps.
def compare_schedulers(T=1000, ddim_steps=50):
    """
    Show the difference between DDPM and DDIM timestep selection.
    TODO: Return both timestep sequences and add comments explaining
    why DDIM can skip steps without quality loss.
    """
    # TODO: implement
    pass
Xem đáp án Q3
import numpy as np

def compare_schedulers(T=1000, ddim_steps=50):
    """
    DDPM: must visit every timestep t = T-1, T-2, ..., 1, 0
      → each step is Markovian: x_{t-1} depends ONLY on x_t
      → cannot skip steps without breaking the Markov chain

    DDIM: can skip timesteps using a non-Markovian formulation
      → x_{t-k} = f(x_t, predicted_x_0) — depends on x_t AND predicted x_0
      → the "shortcut" through predicted x_0 allows jumping multiple steps
      → deterministic (no random noise z added at each step)
    """
    # DDPM: all 1000 steps
    ddpm_steps = list(range(T - 1, -1, -1))  # [999, 998, ..., 1, 0]

    # DDIM: evenly spaced subset
    step_size = T // ddim_steps  # 1000 // 50 = 20
    ddim_timesteps = list(range(T - 1, -1, -step_size))  # [999, 979, 959, ..., 19]

    print(f"DDPM: {len(ddpm_steps)} steps")
    print(f"  First 5: {ddpm_steps[:5]}")
    print(f"  Last  5: {ddpm_steps[-5:]}")

    print(f"\nDDIM: {len(ddim_timesteps)} steps")
    print(f"  First 5: {ddim_timesteps[:5]}")
    print(f"  Last  5: {ddim_timesteps[-5:]}")

    # Key reason: DDIM uses non-Markovian update rule:
    # x_{t-k} = sqrt(ᾱ_{t-k}) * predicted_x0 + sqrt(1 - ᾱ_{t-k}) * direction
    # This formula works for ANY t-k, not just t-1
    # → can skip from t=999 to t=979 directly

    return ddpm_steps, ddim_timesteps
Core insight: DDPM là Markovian (mỗi step chỉ phụ thuộc step trước), DDIM là non-Markovian (phụ thuộc cả predicted x_0). Non-Markovian formulation cho phép "nhảy" qua nhiều steps cùng lúc mà không mất quality đáng kể.
Q4: Debug — Text prompt has no effect on generated image
The following code generates images, but changing the text prompt does NOT change the output. Find and fix the bug.
class BuggyUNetBlock(nn.Module):
    def __init__(self, d_model=256, context_dim=768, n_heads=8):
        super().__init__()
        self.self_attn = nn.MultiheadAttention(d_model, n_heads, batch_first=True)
        self.cross_attn_q = nn.Linear(d_model, d_model)
        self.cross_attn_k = nn.Linear(d_model, d_model)      # BUG HERE?
        self.cross_attn_v = nn.Linear(d_model, d_model)      # BUG HERE?
        self.cross_attn_out = nn.Linear(d_model, d_model)
        self.norm1 = nn.LayerNorm(d_model)
        self.norm2 = nn.LayerNorm(d_model)

    def forward(self, x, context):
        # Self-attention
        norm_x = self.norm1(x)
        sa_out, _ = self.self_attn(norm_x, norm_x, norm_x)
        x = x + sa_out

        # Cross-attention
        norm_x = self.norm2(x)
        Q = self.cross_attn_q(norm_x)
        K = self.cross_attn_k(norm_x)    # ← THIS LINE
        V = self.cross_attn_v(norm_x)    # ← AND THIS LINE
        # ... attention computation ...
        return x
Xem đáp án Q4
# BUG: cross_attn_k and cross_attn_v take norm_x (image features)
# instead of context (text embeddings).
# This makes "cross-attention" effectively another self-attention,
# so text prompt has ZERO effect on the output.

# FIX 1: Change Linear input dimensions
self.cross_attn_k = nn.Linear(context_dim, d_model)  # context_dim, not d_model
self.cross_attn_v = nn.Linear(context_dim, d_model)   # context_dim, not d_model

# FIX 2: Pass context instead of norm_x
K = self.cross_attn_k(context)    # ← FIX: use context, not norm_x
V = self.cross_attn_v(context)    # ← FIX: use context, not norm_x
Two bugs: (1) cross_attn_k và cross_attn_v có input dim = d_model thay vì context_dim, (2) K và V được compute từ norm_x (image) thay vì context (text). Kết quả: U-Net hoàn toàn bỏ qua text conditioning → output giống unconditional generation bất kể prompt.
Q5: Integration test — Assemble working text-to-image system
Given the following pre-built components, write the integration code that connects them into a working text-to-image system and generates one image.
# Pre-built components (already defined):
# - clip_model: has .encode_text(tokens) → (B, 77, 768)
# - unet: has .forward(x_t, t_emb, context) → noise prediction
# - schedule: dict with 'betas', 'alphas', 'alpha_bar' (T=1000)
# - ddpm_reverse_step(x_t, noise_pred, t, schedule) → x_{t-1}

def generate_image(prompt: str, negative_prompt: str = "",
                   guidance_scale: float = 7.5, steps: int = 1000,
                   image_size: int = 64, channels: int = 3):
    """
    TODO: Wire all components together.
    Handle: CLIP encoding, null prompt for CFG, reverse loop, CFG combination.
    Return final image tensor.
    """
    pass
Xem đáp án Q5
@torch.no_grad()
def generate_image(prompt: str, negative_prompt: str = "",
                   guidance_scale: float = 7.5, steps: int = 1000,
                   image_size: int = 64, channels: int = 3):
    device = next(unet.parameters()).device

    # ── 1. CLIP encode: positive and negative/null prompts ──
    pos_tokens = clip.tokenize([prompt]).to(device)
    neg_tokens = clip.tokenize([negative_prompt]).to(device)

    pos_emb = clip_model.encode_text(pos_tokens)     # (1, 77, 768)
    neg_emb = clip_model.encode_text(neg_tokens)     # (1, 77, 768)

    # ── 2. Initialize random noise ──
    x_t = torch.randn(1, channels, image_size, image_size, device=device)

    # ── 3. Reverse diffusion with CFG ──
    for t in reversed(range(steps)):
        t_tensor = torch.tensor([t], device=device)

        # Two forward passes for CFG
        noise_pos = unet(x_t, t_tensor, context=pos_emb)
        noise_neg = unet(x_t, t_tensor, context=neg_emb)

        # CFG combination
        noise_guided = noise_neg + guidance_scale * (noise_pos - noise_neg)

        # Denoise step
        x_t = ddpm_reverse_step(x_t, noise_guided, t, schedule)

    # ── 4. Post-process ──
    image = (x_t.clamp(-1, 1) + 1) / 2   # [-1,1] → [0,1]
    return image

# Generate!
img = generate_image("a golden retriever playing in snow", guidance_scale=7.5)
print(f"Output shape: {img.shape}")  # (1, 3, 64, 64)
Integration checklist: (1) Encode cả positive và negative prompt, (2) khởi tạo noise đúng shape, (3) loop ngược từ T-1 đến 0, (4) 2 forward passes mỗi step cho CFG, (5) combine với guidance_scale, (6) gọi denoise step, (7) post-process output. Negative prompt rỗng "" hoạt động như unconditional — đây là cách Stable Diffusion xử lý CFG.